Loading...
Loading...
Loading...
Loading...
Loading...
Loading...
Loading...
Loading...
Loading...
Loading...
Loading...
Loading...
Loading...
Loading...
Loading...
Loading...
Loading...
Loading...
Loading...
Loading...
Loading...
Loading...
Loading...
Loading...
Loading...
Loading...
Loading...
Loading...
Loading...
Loading...
Loading...
Loading...
Loading...
Loading...
Loading...
Loading...
Loading...
Loading...
Loading...
Loading...
Loading...
Loading...
Loading...
Loading...
Loading...
Loading...
Loading...
Loading...
Loading...
Loading...
Loading...
Loading...
Loading...
Loading...
Loading...
Loading...
Loading...
Loading...
Loading...
Loading...
Loading...
Loading...
Loading...
Loading...
Loading...
Loading...
Loading...
Loading...
Loading...
Loading...
Loading...
Loading...
Loading...
Loading...
Loading...
Loading...
Loading...
Loading...
Loading...
Loading...
Loading...
Loading...
Loading...
First time planning in Aphex? Start here
Switch between Views to see the Plan the way you need - this could be anything from your own Tasks, to upcoming Milestones, or Tasks with delays from a specific subcontractor over the last 7 days. Each View lets you filter, group, and set a date range that fits.
The main navigation controls live at the top of the page:
Add and remove Filters to reveal relevant Tasks
Change the Date Range to view Tasks occurring within a particular timeframe
Update the Grouping to change how Tasks are organised in your Plan
Swap between the Gantt, Map, List & Board View tabs that are open at the top of your page
Create your own Views for personal use, or to share with your Team
Next up: start adding new Tasks or editing existing ones.
Add Tasks inside your project's existing structure by clicking Add Task
Open the Column Picker to view and edit Task information
Select tasks and use the multi-select to apply edits in bulk
Once your Tasks are up to date, mark your plan as ‘Ready’ to show your team it’s good to go for the Weekly Published Version.
Check the upcoming deadline in the top-right for when you have to be Ready by. Typically this will line up with your existing short-term planning cycle.
Resolve any Missing Data, Clashes or Overdue Blockers
Once you're happy to be accountable for your plan, you can mark your Tasks as
Once your Admin publishes the official Weekly Version, you can share the plan with anyone, even if they’re not using Aphex.
Copy the public URL to your Weekly Version and share with non-Aphex users
Open and select Print View to generate a PDF
Under View Options you'll also find Export Tasks to CSV
As work proceeds and the plan changes, keep your tasks up to date by recording delays and improvements.
Extend your Promised Tasks or use the Thumbs Down to log a delay
Use the Thumbs Up to log an Improvement or On Schedule
Mark Tasks as completed by changing the Status to
To generate a session token, you must provide a valid Client ID and Client Secret.
While in closed beta, you can obtain your API keys by contacting our Customer Success team.
Use this endpoint to generate a temporary Access Token
Use this endpoint to revoke a previously generated Access token
Project assets are the defined lists of objects that can be attached to tasks within a project. You can query these assets to assist in constructing more precise Task queries.
Use this endpoint to query the list of Users on a project.
Use this endpoint to query the list of Subcontractors on a project.
Use this endpoint to query the tree of Folders on a project.
Use this endpoint to query the list of Packages on a project.
Use this endpoint to query the list of Calendars on a project.
Use this endpoint to query the list of Locations on a project.
By connecting Aphex to Power BI, you can use your weekly Published Plans to create consistent, reliable dashboards without adding extra steps. The data’s already there, this is just a way to make use of it.
This page pulls together everything you need to get set up, along with links to downloadable reporting templates and supporting docs.
Each project can generate its own secure connection to Power BI, giving teams full control over whether and when to enable reporting.
You can enable the Power BI data source from the project’s Integrations menu, then generate a token and URL to connect to Power BI.
The Power BI API is based entirely on Published Versions, meaning your reports are built from official, reviewed snapshots of the plan. Because these versions are already created as part of your planning cycle, there’s no extra work required.
If you've downloaded one of our , you may have questions about how the PPC (Percent Plan Complete) is being calculated.
PPC shows you what percentage of your planned work actually got done between two dates (usually last week and this week). There are two ways to measure it:
This method looks at how many work days you completed as planned.
Example:
Let's say you have three tasks:
Task A: 3-day task, all days planned for the reference week
Can't remember your password? We've gotcha! Follow the simple steps below to reset your Aphex account password.
First head to the Aphex login page and enter your email and hit continue
Next, click Forgot Password then Reset your Password
Enter your email and select Send reset instructions
Our list of subprocessors is now hosted on our Trust Centre.
This Acceptable Use Policy applies to the Services as defined in the Aphex Platform Terms and Conditions. In the event of any inconsistency between this Acceptable Use Policy and the terms of the Aphex Platform Terms and Conditions, the terms of the Aphex Platform Terms and Conditions take priority.
Unless the context requires otherwise, defined terms in the Aphex Platform Terms and Conditions have the same meaning in this Acceptable Use Policy.
To keep the Services running safely and smoothly, we need our users to agree not to misuse them. Specifically, you agree not to:
(a) probe, scan, or test the vulnerability of any system or network used with the Services;
(b) tamper with, reverse engineer or hack the Services, circumvent any security or authentication measures of the Services or attempt to gain unauthorized access to the Services (or any portion thereof) or related systems, networks or data;
(c) modify or disable the Services or use the Services in any manner that interferes with or disrupts the integrity or performance of the Services or related systems, network or data;
(d) access or search the Services by any means other than our publicly supported interfaces, or copy, distribute, or disclose any part of the Service in any medium, including without limitation by any automated or non-automated "scraping";
(e) overwhelm or attempt to overwhelm our infrastructure by imposing an unreasonably large load on the Services that consume extraordinary resources, such as by: (i) using "robots," "spiders," "offline readers" or other automated systems to send more request messages to our servers than a human could reasonably send in the same period of time using a normal browser; or (ii) going far beyond the use parameters for any given Service as described in its corresponding documentation;
(f) solicit any users of our Services for commercial purposes;
(g) misrepresent yourself (or any other user) or disguise the origin of any data, content or other information you submit (including by "spoofing", "phishing", manipulating headers or other identifiers, impersonating anyone else, or falsely implying any sponsorship or association with us or any third party) or access the Services via another user's account without their permission;
(h) use the Services for any illegal purpose or in violation of any laws (including without limitation data, privacy and export control laws);
(i) use the Services to violate the privacy of others, or to collect or gather other users' personal information (including account information) from our Services;
(j) submit (or post, upload, share or otherwise provide) data, content or other information that (i) infringes our or a third party's intellectual property, privacy or other rights or that you don't have the right to submit (including confidential or personal information you are not authorized to disclose); (ii) that is deceptive, fraudulent, illegal, obscene, defamatory, libelous, threatening, harmful to minors, pornographic, indecent, harassing, hateful, religiously, racially or ethnically offensive, that encourages illegal or tortious conduct or that is otherwise inappropriate in our reasonable opinion; (iii) contains viruses, bots, worms, scripting exploits or other similar materials; or (iv) that could otherwise cause damage to us or any third party;
(k) promote or advertise products or services other than your own without appropriate authorisation;
(l) use meta tags or any other "hidden text" including our or our suppliers' product names or trademarks;
(m) permit or encourage anyone else to commit any of the actions above; and
(n) otherwise perform or assist any unauthorised act or action that may cause any harm or disrepute to our brand or reputation.
Without affecting any other remedies available to us, we may, without recourse, permanently or temporarily terminate or suspend your account or access to the Services without notice or liability if we (in our sole discretion) determine that you have violated this Acceptable Use Policy.
Because it’s versioned data, it’s easy to track changes over time.
To help you get started quickly, we’ve created a set of plug-and-play Power BI templates. These dashboards work with your weekly Published Pan data and cover common use cases like PPC tracking, delay trends, and subcontractor performance.
Once you’ve connected your project, you can also schedule a refresh so the dashboards pull in each week’s data automatically after a new version is published. Most teams choose to align this with their weekly planning cycle.
Templates are free to download and easy to customise.
Task B: 2-day task, all days planned for the reference week
Task C: 4-day task, with 2 days planned for the reference week and 2 days the following week
What actually happened:
Task A: ✓ All 3 days completed during the reference week
Task B: ✗ Slipped—only 1 of the 2 planned days completed during the reference week
Task C: ✗ Slipped—only 1 of the 2 planned days completed during the reference week
How we calculate it:
Task A: 3 / 3 days = 100% PPC
Task B: 1 / 2 days = 50% PPC
Task C: 1 / 2 days = 50% PPC
Total PPC = Average(100%, 50%, 50%) = 66%
This method only counts tasks that were completely finished on schedule.
Example:
Let's say you have three tasks:
Task A: Final day planned to occur in the reference week
Task B: Final day planned to occur in the reference week
Task C: Final day planned to occur in the reference week
What actually happened:
Task A: ✓ Final day of task occurred in the reference week
Task B: ✗ Slipped—final day pushed to the following week
Task C: ✓ Final day of task occurred in the reference week
How we calculate it:
Task A: Completed = 100% PPC
Task B: Not Completed = 0% PPC
Task C: Completed = 100% PPC
Total PPC = Average(100%, 0%, 100%) = 66%
Draw links between your Tasks to create relationships
Drag Task Bars to adjust dates & sequences
Learn to navigate the four different View types;
See how to Create your Own View or Open a Shared View to see Views your Team have already built
See how to Create Tasks or how to Edit Tasks
Experiment with adding your Tasks to the Map or Allocating Materials
Learn to Create Relationship Links
Understand how Task Permissions impact what you can edit
What is a Weekly Published Version
Learn how to complete Missing Data and Resolve Clashes
See how to Ready your Plan
Learn how to Share an Interactive Copy of the plan with anyone
See how to Print your Plan
Check out how to export your Tasks to CSV and Resource Demand to CSV
Start to Record Delays and Improvements
See how to Mark Tasks as Done
Learn to compare the plan by Turning on a Baseline


Enter your new password, confirm it and hit Continue
Your Aphex password will now be updated accordingly!


Primavera P6
Microsoft Project
Asta Powerproject
PPC Dashboard
Delay Breakdown
Milestone Analysis
Resources
Sensat
Nearmap
MetroMap
The Resource reports show planned Labour, Plant, and Material demand across your project, helping you anticipate peaks and plan ahead.
Each resource report has two widgets: a stacked bar chart of total planned quantity by date, and a summary table with the minimum, maximum, and total planned quantity per resource.
The bar chart shows demand across time, with each resource type represented by its own colour.
The summary pivot table shows Minimum, Maximum, and Total planned quantity per resource - expandable to see each individual task-day.
The date range defaults to today + 6 weeks.
Use the date range picker to focus on a specific window of time.
To change the date range:
Use the Date Range picker in the filter bar
Select a start and end date for the period you want to analyse
The chart and table will update to reflect your selection
Below the chart, the Summary table breaks down planned quantities per resource, with the option to expand each row to see the day-by-day detail.
Each resource appears as a collapsed row showing three values across your selected date range:
Minimum Planned Quantity - the lowest planned quantity on any single day
Maximum Planned Quantity - the highest planned quantity on any single day
Planned Quantity - the total planned quantity across the full date range
To see the day-by-day breakdown for a resource:
Click the > arrow next to any resource name to expand it
Each date row shows the planned quantity for that specific day
Narrow the report to show resource demand for a specific part of the project.
To filter resource reports:
Click in the top right corner
Select one or more values. You can filter by: Task Owner, Subcontractor, Shift, Package, Assignee, Folder, Labour, Plant, and Material
Applied filters appear as removable tags; select to reset
To change which publication the report is anchored to:
Use the Publication selector in the filter bar
Defaults to the latest published version
See also
Every chart and table can be exported as a CSV, with your active filters applied. Read our doc for a step by step guide.
Things to know before you get started:
This feature is available on Pro+ or Enterprise plans
You need to be a Project Admin to set up the integration
If your team uses Propeller to capture drone surveys and aerial imagery, you can bring that same data into Aphex. The Propeller integration uses WMTS (Web Map Tile Service) to stream live site imagery directly onto your Map, so your team plans against the most current picture of the site, without anyone downloading or re-uploading a thing.
This guide walks you through how to generate a WMTS link in Propeller, add it to your project in Aphex, and set a Layer Policy to control what shows up.
Propeller generates a unique WMTS link per site. You'll need this link to connect your survey imagery to Aphex.
In Propeller, click your User Icon → WMTS and API
Click , give the link a clear name, and select the Site you want to connect
Click
Copy the generated link - this is the link you’ll use in Aphex
Once you’ve got your WMTS link handy, you can plug it into any real-world Location in your Project.
Visit our doc for step by step instructions on how to add layers to the Map.
When Aphex connects to your Propeller WMTS link, it detects all available survey sublayers for that site. A Layer Policy controls which of those sublayers are brought into your project, keeping things clean and relevant for your team.
Because Propeller WMTS links auto-update with each new survey upload, your Layer Policy also determines how Aphex handles those incoming datasets over time.
Visit our doc for step by step instructions on how to define a layer policy.
Propeller WMTS links update automatically each time a new survey is processed and published for your site. You don't need to regenerate the link or reconnect the layer in Aphex, new datasets will appear in line with your Layer Policy, with no action needed on your end.
Milestone Analysis shows the current status of every milestone in your project and how each date has shifted across publications.
Every milestone in the project appears as a row, showing its current date, target date, and whether it's ahead, on target, or behind.
To sort the table:
Click any column header to sort by that column
The Date Variance Over Time sparkline column isn't sortable
Use the status filter to focus on upcoming milestones, or get a full view of past and future ones.
To filter milestones by time period:
Use the status filter in the top-right of the widget
Switch between Current (next 6 weeks), Future, Past, and All
Current is the default
To change which publication the report is anchored to:
Use the Publication selector in the filter bar
Defaults to the latest published version
See also
Every chart and table can be exported as a CSV, with your active filters applied. Read our doc for a step by step guide.
Things to know before you get started:
This feature is available on Pro+ or Enterprise plans
You need to be a Project Admin to set up the integration
If your team uses DroneDeploy to capture drone imagery, you can stream those surveys directly into Aphex as a WMTS layer. This means your team plans against the most current aerial view of the site, without downloading or re-uploading a thing.
Each map layer in DroneDeploy has a unique WMTS URL. This is the URL you'll paste into Aphex.
You will need to have the ESRI integration included in your DroneDeploy subscription to access the WMTS URL. If you are unsure whether you have access, contact your DroneDeploy Customer Success Manager.
To retrieve the URL:
Log in to DroneDeploy and open your project
In the top navigation bar, select the Explore tab
Scroll to Apps + Integrations on the left side-panel
Expand the WMTS Integration section
Click Copy Link next to Map-Level WMTS - this is the URL you will paste into Aphex.
The DroneDeploy URL will follow a format similar to this:
Once you’ve got your Layer URL handy, you can plug it into any real-world Location in your Project.
Visit our doc for step by step instructions on how to add layers to the Map.
Once your DroneDeploy layer is connected, a Layer Policy controls which sublayers appear in Aphex and how new ones are handled as fresh surveys are uploaded to DroneDeploy.
Visit our doc for step by step instructions on how to define a layer policy.
A guide for users in accessing their accounts when Enterprise SSO is enabled
Who can use this feature? SSO is available on Enterprise plans Your system Administrator will have to enable SAML SSO for your primary email domain.
Single Sign On (SSO) allows users to log into many applications or websites using an identity provider. Security Assertion Markup Language (SAML) is a security standard for managing authentication and access.
In a SAML SSO set-up, the identity provider manages the organisation's user accounts and credentials. The service provider (Aphex) is the app or website that provides services to the user or organisation.
When using SAML SSO, members are forced to log in to their Aphex account using the organisation's identity provider.
When SSO is enabled for your domain, you will be unable to log in with any other method.
E.g. if your email is [email protected] and SSO is enabled for wayneindustries.com domain, you must use SSO and cannot sign in with a password or social providers.
Head to the Aphex log-in page (app.aphex.co)
Enter your email address in the login form and submit
You will be redirected to your Identity Provider (Microsoft, Okta, etc) to confirm your identity
Once completed, you will be redirected back to Aphex in a logged-in state
If you have issues with logging into Aphex via SSO, please check the following possible issues;
Unable to proceed past the login page with no visible errors:
This usually means you have attempted an invalid login method (such as email/password) while SSO is enabled.
The most common cause is your browser attempting to autofill and auto-submit your email and password.
The Delay Breakdown shows where delay days are coming from, sorted by impact, so you can see your biggest problem areas before drilling into who's responsible.
Bars are sorted largest impact first, giving you an immediate picture of which delay reasons are having the most effect on the project.
Improvements aren't included in this report - only delays.
Use the filter bar to narrow the report to a specific part of the project or a specific date range.
To set a date range:
Use the Date Range picker in the filter bar to choose the window you want to analyse
To filter by subcontractor, owner, or other dimensions:
Click in the top right corner
Select one or more values - you can filter by: Task Owner, Subcontractor, Shift, Package, Assignee, Folder, and Location
Applied filters appear as removable tags; select to reset
To change which publication the report is anchored to:
Use the Publication selector in the filter bar
Defaults to the latest published version
See also
Below the chart, two pivot tables let you see exactly which subcontractors or task owners are behind each delay reason.
Click any reason row in the Delays by Reason & Subcontractor or Delays by Reason & Task Owner table
The row expands to show a breakdown by Subcontractor or Task Owner
Each row shows the Tasks Delayed count and total Impact Days
Every chart and table can be exported as a CSV, with your active filters applied. Read our doc for a step by step guide.
Project Insight and the Power BI integration work alongside each other. Project Insight brings the most common performance reports directly inside Aphex, computed server-side, updated every publication. Power BI remains the best option for deeper, plan-level analysis.
These reporting needs are now available directly in Aphex. Where the same metric also appears in Power BI, the table notes it.
For the following, continue to use the Power BI integration:
Plan Comparison - compare the full plan between any two Published Versions at the task level. Useful for schedule audits and board reporting.
Publication Summary - readying completion, clashes, and blocker counts per user per publication. Useful for publication quality monitoring.
Resource actuals - Project Insight currently shows planned Labour, Plant, and Material only. Actuals (fed from the Site Diary) are coming next.
If you already have Power BI connected, these templates continue to work as before.
See also
1.1 This Service Level Agreement applies to the Platform as defined in the Aphex Platform Terms and Conditions (the Target Services). In the event of any inconsistency between this Service Level Agreement (SLA) and the terms of the Aphex Platform Terms and Conditions, the terms of the Aphex Platform Terms and Conditions will take priority.
2.1 Unless the context requires otherwise, defined terms in the Aphex Platform Terms & Conditions have the same meaning in this Service Level Agreement and the following definitions also apply:
Availability means:
(Total Minutes - Downtime) / Total Minutes × 100Availability Target means 99.5% per month.
Downtime means the number of whole minutes within the relevant calendar month that you are unable to access the Target Services. Downtime does not include the time that the Target Services are unavailable due to Scheduled Downtime, Emergency Maintenance or an Excluded Event.
Emergency Maintenance means any maintenance deemed necessary to protect and maintain the security or integrity of the Target Services.
Excluded Event means each of the following:
(a) failure caused by any software, hardware or other components outside our network or not provided by us;
(b) any trial or beta software, including any Experimental Services (being any software released to the market for testing and feedback);
(c) any event or circumstance which is beyond our reasonable control including but not limited to, acts of God including fire, hurricane, typhoon, earthquake, landslide, tsunami, mudslide or other catastrophic natural disaster, civil riot, civil rebellion, revolution, terrorism, insurrection, militarily usurped power, act of sabotage, act of a public enemy, war (whether declared or not) or other like hostilities, ionising radiation, contamination by radioactivity, nuclear, chemical or biological contamination, any widespread illness, quarantine or government sanctioned ordinance or shutdown, pandemic (including COVID-19 and any variations or mutations to this disease or illness) or epidemic.
(d) any resource reduction directed and approved in writing by you despite our written notice that such reduction may result in that failure or less than optimum performance;
(e) any modification, revision, variation, translation or alteration of the Target Services that is not authorised by us;
(f) failure of access circuits to our network or upstream providers, unless such failure is caused solely by us;
(g) your acts or omissions (or the acts or omissions of others engaged or authorised by you), including, without limitation, any negligence, wilful misconduct, or use of the Target Services in breach of the Aphex Platform Terms & Conditions;
(h) outages elsewhere on the internet that hinder or prevent access to the Target Services or your Account;
(i) failure caused by Your Data;
(j) failure caused by third party products or services; and
(k) IP address blacklisting by third parties.
Failure means that we have failed to achieve the Availability Target for the Target Services in the relevant calendar month.
Scheduled Downtime means planned maintenance or upgrades to the Target Services in accordance with advance notice provided to you by us.
Service Credit means any fee rebate or refund, as determined in accordance with clause 3.3.
Service Credit Request has the meaning given to it in clause 3.2.
Total Minutes means the total number of minutes in the relevant calendar month.
3.1 During the term of the Aphex Platform Terms & Conditions, we will use commercially reasonable efforts to provide you with the Target Services in accordance with the Availability Target.
3.2 Where we fail to meet the Availability Target in 2 consecutive calendar months, you may terminate the Aphex Platform Terms & Conditions and cancel your Account with us by giving us 30 days’ written notice. In such event, we agree to provide you with a prorata refund of any Fees paid in advance by you to us.
3.3 You acknowledge and agree that the remedy set out at clause 3.2 will be your sole and exclusive remedy against us arising from or in connection with our failure to meet the Availability Target.
At Aphex, we take the security of our customer's data very seriously. That's why we hold industry standard certifications: ISO27001 and Cyber Essentials Plus.
ISO27001 is an international standard for information security management systems. It ensures that our company has implemented appropriate measures to protect the confidentiality, integrity, and availability of our customer's data.
Cyber Essentials Plus is a UK government-backed certification that demonstrates our commitment to protecting against common cyber attacks. It involves a rigorous independent assessment of our security controls, including firewalls, access controls, and malware protection.
We are committed to maintaining these certifications and continuing to prioritize the security of our customer's data.
This feature is in a closed beta phase and is available upon request only for Enterprise partners. Talk to us to learn more.
The foundation of the Aphex Planner data model are projects and tasks. Tasks reflect planned work and crucial properties such as subcontractors or shifts.
For customers and partners wanting to build external or internal applications and workflows on top of planned tasks, we provide a broad set of endpoints that give access to real-time data from a Plan workspace.
Typically use cases for these endpoints include;
Third-party platforms and products building integrations to Aphex
Internal customer teams using planned tasks as the trigger for internal apps or workflows
Our APIs follow the essence of REST and all queries must be made via HTTPS to pass the endpoint security rules.
Endpoints query rules and response structure can be accessed from the following page;
To add an extra layer of protection to your account, you can enable Multi-Factor Authentication.
Click your User Avatar in the top right corner
Hit Account & Preferences
Scroll down to the bottom of Account Settings & Click Add MFA
On your chosen authenticator app, scan the QR code
Enter the verification code shown on your authenticator app to complete MFA setup
Project Insight is a built-in reporting dashboard inside each project. It gives your team instant visibility into PPC, delays, milestones, and resource demand, without leaving Aphex.
Project Insight gives you an up-to-date view of how your project is performing, with no setup required. The reports update automatically each time a new Published Version is created.
To view your Project Insight:
Open your project and select from the top navigation
The PPC Dashboard shows how well your team is delivering against the plan, tracking Task PPC and Task Day PPC across your publication history.
The PPC dashboard shows two KPIs side by side, Task PPC and Task Day PPC.
The trend chart tracks both Task PPC and Task Day PPC across your full publication history, so you can spot patterns and see whether performance is improving.
Use the toggle above the chart to switch between
Tags give you a way to label Tasks with anything that matters to your team, from safety and risk, to key priorities, review flags, or anything else. They’re multi-select, fully custom, and can be used to filter views to suit different meetings, roles, or priorities.
Creating tags lets you build a reusable library of Tags to assign to Tasks.
To create a new Tag:
Click your Project Title in the top left, then select Project Assets
From time to time, some customers find that we're unable to create group chats due to external access restrictions in their Teams configuration.
Your Aphex Customer Success Manager might contact you saying they're experiencing an error when trying to add team members to a Teams group chat. The error typically appears as:
"We can't set up the conversation because your organisations are not set up to talk to each other"
To solve this, please delete the saved password in your password manager
User does not exist error:
This usually means that the email address returned by the Identity Provider does not exist in Aphex.
This could indicate that you are a new user and can head to the Sign Up page, or
Your Primary Email address returned by your Identity Provider is different than you expect. For example, if your Aphex account is usually accessed from [email protected] but your company identifies you as [email protected] you will appear as a new and separate user.
Successful login but cannot find your usual projects
This usually means that the email address returned by the Identity Provider does not match your usual one in Aphex.
PPC & Task Progress over time
PPC Dashboard
Yes (calendar-day basis)
PPC / Task Progress by Subcontractor & Owner
PPC Dashboard
Yes
Delay breakdown by reason, subcontractor & owner
Delay Breakdown
Partial
Milestone status & movement over time
Milestone Analysis
Yes (Variance template)
Planned Labour / Plant / Material demand
Resources
Yes
Where PPC and Task Progress appear in both tools, the Project Insight figures are more accurate, and will usually read higher than the Power BI template. The difference comes down to working days vs calendar days.
Project Insight is computed server-side off the full published plan, so it knows each task's working calendar and counts working days only. The result reflects what the team actually committed to.
Power BI runs on the Published Plan API, which (to stay under the data limit on large projects) sends only each task's start and end date. With no working-calendar detail, it spreads progress across calendar days, including weekends and non-working days. This stretches the denominator, so PPC and Task Progress read lower than the plan actually asked for.
Because the calculation runs server-side, Project Insight also scales to large projects that can strain or break the Power BI feed.


WMTS is a paid-premium feature in Propeller. Check with your Propeller Customer Success Engineer if you're unsure whether your account has access
Propeller WMTS links don't require a username or password, anyone with the link can access your survey imagery. Only share them with trusted teammates, and avoid sending them over email or messaging apps where possible.
Each link is unique. If a link is shared accidentally, you can delete it from WMTS and API settings in Propeller to instantly revoke access.
Most Recent is usually the best starting point for Propeller surveys. It keeps your map current without pulling in every historical dataset.


The milestone's Task Owner
External ID
The milestone's External ID
Date
The milestone's current end date
Target
The milestone's Target Date
Variance to Target
Number of days between the current date and Target Date
Status
Ahead, On Target, or Behind, based on variance to target
Date Variance Over Time
A sparkline showing how the milestone date has shifted each publication - improvements above the anchor line, delays below
Milestone
The milestone's name and Task ID


Owner
You will need to have the ESRI integration included in your DroneDeploy subscription to use this feature. If you are unsure whether you have access, contact your DroneDeploy Customer Success Manager.
Most Recent is usually the best starting point for drone survey layers, it keeps your map showing the latest capture without loading every historical flight.

https://www.dronedeploy.com/api/v1/wmts/plan/{plan-id}?jwttoken={token}On the left hand panel, you will see a list of available reports
Project Insight includes six reports, each powered by your Weekly Published Versions.
PPC Dashboard
PPC and Task PPC scores, trend over time, and performance by Subcontractor or Task Owner
Delay Breakdown
Total delay days by reason (sorted by impact), with breakdowns by Subcontractor and Task Owner
Milestone Analysis
Milestone status (ahead, on target, or behind) with a variance-over-time sparkline across publications
All reports are anchored to a Published Version. By default this is the latest, but you can switch to any previous version to see how performance looked at that point in time.
To change the published version:
Click the Published Version dropdown at the top left of the report
Select the version you want to view
Reports load at a fixed width of 940px, use the toggle in the top-right corner of the report to stretch it horizontally and fill the available space.
Every chart and table can be exported as a CSV, with your active filters applied.
To export report data:
Click the button in the top-right corner of any chart or table
Click Download as CSV - a CSV will be saved to your downloads
Who can use Insight?
All Project Users have access to Project Insight.


Hover over any date on the chart
A tooltip will appear showing:
The publication date
Task PPC - e.g. "0 / 9 completed"
Task Day PPC - e.g. "Avg. of 37 tasks"
See also Changing the Published Version
Two tables show performance for the latest publication side by side, one grouped by Subcontractor, one by Task Owner.
Use the filter bar to focus on a specific part of the project. By package, folder, subcontractor, or more.
To filter the PPC Dashboard:
Click at the top of the report
Select one or more values from the panel. You can filter by: Task Owner, Subcontractor, Shift, Package, Assignee, Folder, and Location
Applied filters appear as removable tags; select to reset
To change which publication the report is anchored to:
Use the Publication selector in the filter bar
Defaults to the latest published version
Every chart and table can be exported as a CSV, with your active filters applied. Read our Exporting as a CSV doc for a step by step guide.
Task PPC counts tasks as pass or fail between two publication dates. A task scores 1 if all its planned working days in the window were completed, and 0 if not. The final PPC is the sum of those scores divided by the number of tasks planned in the window.
Task Day PPC takes the average percentage of planned working days completed per task. This means a task that was 80% done gets partial credit, rather than being counted as a failure.


Select Tags from the menu
Click
Create your custom Tag by entering the name and assign a colour
The Tag is added to the library of Tag the team can assign to their Tasks
Tags can be added to Tasks to help group and organise work across your plan, they’re a flexible way to highlight key information without changing the structure.
To assign Tags to Tasks:
On the Gantt, open the column picker and toggle Tags
Click a cell in the column to add a Tag to the Task from the dropdown
See also: Bulk Edits
Filtering by Tags lets you focus on specific Tasks based on what’s been added to them. It’s a quick way to review and manage work related to a particular Tag across your plan.
Click then
Select Tag in the first dropdown
Select from Is, Is Not, Is Empty or Is Not Empty in the second dropdown
Select your desired Tag in the third dropdown
See also: create & share Views
Who can use this feature?
Task Owners, Assignees and Admin users can add Tags to Tasks.
All Project Users can create and edit Tags by default. This can be changed to Admins only in the Project Settings.

External access is not enabled for this organisation"If your Customer Success Manager reports seeing these errors, it's usually caused by your organisation's Teams external access settings blocking communication with external domains.
To resolve this issue, you'll need:
Teams Administrator Access: The person making these changes must have Microsoft Teams administrator privileges in your Microsoft 365 environment
Permission to Modify Security Settings: This change affects organisation-wide communication policies, so appropriate approval may be required depending on your company's change management process
Sign in with Teams administrator credentials
You have two recommended options:
Option A: Allow All External Domains (Simplest)
In the "Teams and Skype for Business users in external organisations" section
Select "Allow all external domains" from the dropdown
Click Save
Option B: Allow Specific Domains (More Restrictive)
In the "Teams and Skype for Business users in external organisations" section
Select "Allow only specific external domains"
Add aphex.co to the allowed domains list
Click Save
Wait 2-4 hours for the changes to propagate across Microsoft's systems
Contact your Aphex Customer Success Manager to test group chat creation
Verify functionality by sending a test message in the group chat
If issues persist after 4 hours, contact your Teams administrator to verify the configuration was saved correctly.
Aphex uses Microsoft Teams to communicate with customers and their users where they typically communicate internally. We do this for training, support, coordination, and analytics work. This allows us to provide real-time support with fast response times.
Gantt
Board
List
Map
Tasks
Blockers
Calendars
Clashes & Work Area
Exports
Folders
Labour & Plant
Locations
Master Schedule Import
Materials
Owner, Assignee & Teams
Packages
Printing
Publishing
Readying & Reviewing
Relationship Links
Shift
Spreadsheet Import
Status
Subcontractor
Tags
Views


Running Aphex on your browser requires your browser to be in good health. If not, it's possible that you may experience any of the following:
Stuck on 'Fetching Data' loading screen
Notification of Errors like 'Disconnected from Server' or 'Internal Server Error'
Unresponsive pages
Unresponsive actions
Chat / Aphex Messenger not loading
Good news! We've found most of these issues are resolved after taking some minor steps below to check the health of your browser.
Turn off any browser extensions when you're accessing Aphex
Ensure your browser is updated to the latest version
Clear your browser's cookies/history/cache
Test accessing Aphex from another browser or from an Incognito window
Aphex in your browser
If you've given all the troubleshooting steps above a shot and you're still stuck, then it's likely some of the services or technology we require to run Aphex are being blocked by your device or company IT security.
We'd recommended unblocking and (or) whitelisting the following domains from HTTPS/SSL inspection:
aphex.co
Inc. subdomains: app.aphex.co, help.aphex.co
.cloudfunctions.net
Also, if it's specifically the Aphex Chat Messenger that's not loading, unblocking and(or) whitelisting these domains from HTTPS/SSL inspection should do the trick:
api-iam.intercom.io
widget.intercom.io
If you'd like a hand liaising with your company's IT tech to get things diagnosed and sorted, we're more than happy to help! Feel free to copy us in, or drop us a line directly on
At Aphex, we see AI as a tool that can be embedded within core workflows to help construction teams plan, communicate, coordinate, and track their work more effectively. Rather than building standalone AI chatbots, we focus on solving specific user problems where AI provides the best path to a solution.
We always start with identifying genuine user problems. When we find that AI offers the most effective way to solve these problems, we explore that path thoughtfully and transparently.
Today, our AI features are implemented within our Diary product. Teams using only our core Planner product will not encounter any AI functionality.
We currently use AI in three main ways within the Diary product:
Making it frictionless for site teams to create diary entries through multiple input methods.
Current examples include:
Voice to Text: Real-time transcription of spoken notes using mobile devices
Image to Text: Converting handwritten notes from photos into digital text
Helping teams compile and structure their daily records efficiently.
Current examples include:
Diary Summary Generation: Automatically compiling notes, progress updates, and photos into coherent daily summaries
Enabling teams to extract insights and locate specific information from their project records.
Examples in development:
Search functionality: Query across multiple diary records to find specific information
Automated recaps: Scheduled summaries of diary records (e.g., night shift updates)
Our AI features currently use these external service providers which Aphex interacts with via API:
Note: SAML SSO is available on Enterprise plans only.
SAML Single Sign-On (SSO) integration with Aphex streamlines access management by allowing your team to use existing identity provider credentials. If you're experiencing issues with your SSO configuration or want to prevent common problems, this guide covers the most frequent issues and their resolutions.
For step-by-step setup instructions, see our Setting up SAML SSO guide.
Scenario: SSO has been enabled, but some team members continue to log in using email and password instead of being redirected to SSO.
Most likely cause: These colleagues have email addresses from domains that weren't included in your SSO configuration.
Why this happens: Only domains that have been verified as part of the SSO setup process will trigger enforced SSO workflows. Construction teams often use email aliases for joint venture projects or project-specific emails (e.g., [email protected] vs [email protected]). If the joint venture domain wasn't included when SSO was set up, those users won't be subject to SSO enforcement.
Resolution:
For administrators: Review which domains were registered during SSO setup. You can view and modify these settings in the Aphex admin console, or contact to add any missing domains that should be subject to SSO.
Scenario: User attempts to log in, gets redirected to identity provider (e.g., Microsoft), but receives an "unauthorised" error screen.
Most likely cause: The user hasn't been assigned to the Aphex application in your identity provider.
Why this happens: For authentication to succeed, your identity provider needs to confirm both who the user is and that they have permission to access Aphex. This permission is controlled by application assignments within your IdP.
Resolution:
For end users: Contact your internal IT team to request access to the Aphex application
For administrators:
Log into your identity provider (e.g. Microsoft Entra, Okta)
Scenario: User logs in with [email protected] but gets logged into an account for [email protected], or receives an error about the @company1.com account being unauthorised.
Most likely cause: The primary identifier returned by your identity provider differs from the email address the user is attempting to use for login.
Why this happens: When a user enters any email address from a domain configured for SSO, Aphex routes them to your identity provider. However, the identity provider returns its own primary identifier for that user (which might be their main corporate email), regardless of which alias they used to initiate login.
Resolution:
For End Users:
Check which email address your Aphex invitation was sent to - this indicates the account you should be accessing
Ask your administrator which email address was used when your account was set up
If your plan already lives in Excel, you don’t need to start from scratch. Quickly import Task names, dates and more - turn your spreadsheet into a live plan in Aphex.
Start by selecting your CSV file or copying data directly from your spreadsheet.
Click your Project Title in the top left
Select Import Tasks
List View turns your Gantt into a daily to-do list. See what’s on for today, or the next day - filter by properties like Supervisor (Assignee) or Location, and report progress with a Thumbs-Up or Thumbs-Down.
Use grouping to organise your Task List around what matters most. Sort Tasks by the team doing the work, where they're happening or how they're tracking.
Click in the top left
Select from
Calendars define your project’s working and non-working days. Task durations are based only on the working days set in the assigned Calendar, so Tasks won’t be scheduled on non-working days.
Create a custom Calendar to set specific working and non-working days that match your project’s schedule.
Click your Project Title in the top left, then select Project Assets
If your team uses Civillo to manage geospatial data (utilities, design models, boundaries, work zones, and permits) you can bring those same layers directly into Aphex. The Civillo integration lets your site teams access up-to-date spatial context right alongside their short-range plan, without switching between systems.
This guide walks you through how to retrieve your Layer URL from Civillo, add it to your project in Aphex, and set a Layer Policy where applicable.
Navigate to your project space in Civillo and select the desired layer you wish to publish.
From the selected layer's view, click the three-bar menu to access the admin view.
Shifts help you show when work is planned to happen whether it’s during the day, in the afternoon, overnight, or across multiple shifts.
Assigning a Shift to a task helps clearly communicate when the work is planned to happen.
On the Gantt, navigate to the column picker and toggle Shift
Integrating ArcGIS layers into Aphex allows construction teams to visualise their schedules on top of the actual project design, imagery or services. If you have any issues during setup, this is a really useful starting point that collects the most common problems and resolutions.
To set up an ArcGIS integration, make sure your Aphex project has the following;
Subscription: There is an active subscription to Pro+ or Enterprise plans (unless your project is on the Limited Beta program)
https://firestore.googleapis.com
https://storage.googleapis.com/aphex-prod.appspot.com
https://storage.googleapis.com/aphex-prod-aus.appspot.com
api.workos.com


Labour Resources
Planned labour demand over your selected date range
Plant Resources
Planned plant demand over your selected date range
Material Resources
Planned material quantities over your selected date range


Task Day PPC (%)
Active Task - Count of active tasks assigned to that subcontractor / owner in the selected publication (including tasks that weren't due to finish in this period).


Tag
Is Is Not Is Empty Is Not Empty


Multi-Select
Aphex supports layers being connected from any ArcGIS service (Online or Enterprise); however, there are some common things to validate if you experience issues;
Connecting an ArcGIS layer to Aphex requires valid credentials to be provided during setup. Please make sure that the credentials provided have permission to view the layers being connected.
Aphex currently supports the following source resources from ArcGIS;
Feature Layers
Map Image Layers
Tile Layers (Raster and Vector)
Web Map Tile Service (WMTS)
By default, ArcGIS allows CORS - meaning external services like Aphex can, with the appropriate credentials, view resources such as layers. However, some GIS administrators may disallow this feature as an added security feature.
If you find that a layer connects successfully, but no data is visible on the map, it may be a result of the ArcGIS CORS policy at your company.
ArcGIS supports CORS access enabled, disabled, or disabled with exceptions. Therefore you can either ask your GIS administrator to return the CORS policy to default enabled or to add the following domains as CORS exceptions;
https://app.aphex.co
https://dev.aphex.co
For guides on adjusting the ArcGIS CORS policy, please refer to the ArcGIS Help Guide here.
Aphex is designed to be as fast and lightweight as possible for users who could be accessing their project on poor connections or underpowered devices.
ArcGIS, however, is a powerful GIS service that allows its customers to create immense geographical datasets.
Connecting an ArcGIS layer to Aphex will allow that layer to be loaded to an almost identical way to the way that layer is loaded from ESRI services.
To keep load times as short as possible, each sublayer within a layer can be set to Hide or Show, depending on the context needed at the time.
There is currently a limit of 42 sublayers per layer - any sublayers that attempt to load past this amount will not render.
Therefore, teams creating layers for use in Aphex should seek to balance information and end-user performance. The more data that is included in a layer, the longer it will take to load for everyone.
Some common tactics can be used to maximise layer loading performance in both ArcGIS and Aphex;
Layer Type: Tiled or raster image layer types generally load faster than feature layers. This is especially true for layers with many strings (lines), such as design alignments. Where possible, seek to publish layers with these types;
Map Image Layers: Designs, utilities, alignments. Anything that is suited to a feature layer will perform well in Aphex as a Map Image.
Tile Layers: Drone or other aerial imagery are often already stored as tile layers and perform well. If your company's ESRI account doesn't support this, Map Image will work, too.
Server Selection: If your company can publish layers to an Enterprise or ArcGIS online server, there is usually a performance difference across those. Whichever is faster for loading layers in the ESRI service will be faster in Aphex.
If you are using a Registered User account for access, you can test the access level of that account by simply logging into your ESRI/ArcGIS account and attempting to open the layer you want to integrate. If you can open a layer in ArcGIS, your account has permission to view it.
Please ensure you add the CORS exception domains exactly as they appear above.
In general, Aphex should take as long to load a layer as it takes ArcGIS to load the same layer. You can test the expected load time for your users by opening a layer natively in ArcGIS first.
Anthropic
Does not train models on business data by default
Has no right of ownership to inputs and outputs (where allowed by law).
Deletes all API context after 30 days
AssemblyAI
Voice transcription
OpenAI
Text and image processing, diary summarisation.
Anthropic
AI response generation for diary capture
AssemblyAI
Supports customer "opt out" requests which Aphex has done.
Deletes most API content within 3 days
OpenAI
Does not train models on business data by default
Has no right of ownership to inputs and outputs (where allowed by law).
Deletes all API context after 30 days
Assign the user or their group to the application
Refer to step 4 in our Setting up SAML SSO guide for detailed instructions
For administrators:
Review what identifier field is being mapped from your IdP to Aphex (user principal name, primary email, etc.) in the Aphex admin console
Ensure users understand which email address corresponds to their Aphex account
Consider whether the current mapping strategy aligns with how your users expect to access the system
If needed, you can adjust identifier mapping settings in the admin console or contact for assistance
Important: Unless directly sync is being used, user management typically happens within Aphex. To avoid duplicated effort and the need to add or remove users from both within Aphex and your IdP, we recommend assigning a broad group or making the application available to everyone.
If Directory Sync is enabled then the IdP becomes the primary manager of users.
Choose between Upload a CSV or Copy and Paste
Upload your CSV file, or paste your data into the importer
Select
Aphex will scan your spreadsheet and show the columns it found. Just match each one to the right Aphex property - like Task Name, Start Date, or Shift. You only need to map what you’re using.
Choose which columns in your spreadsheet match Aphex properties like Task Name, Start Date, End Date, Subcontractor, Shift, or Package.
If needed, toggle Exclude up to row to skip up to the first 10 rows - handy if your file includes notes or headers before the actual data starts
Select
Get a quick sense check of what you’re about to create. We’ll show you a preview of the task names, dates, and any mapped fields so you can confirm it’s all as expected.
Review the Tasks you're about to import
If you're happy, select to add your Tasks to the Plan
Who can use this feature?
All Project Users can import Tasks via CSV.

The migration tool is built to support CSV formatted data.
If your plans are in any system with rows and columns, you can most likely either export the data directly to CSV or copy the data from the interface and paste it into a CSV or other spreadsheet.
Should your existing data be inconsistently structured due to headings or another formatting technique, you can download an example CSV template below and paste your relevant data before importing.
SubcontractorOwnerScheduleLocationPackageFolderShiftTasks and Groups will reorganise automatically
Choose what Task details appear on each Task Card in List View. Show only the properties that matter for the day and hide all the rest.
Click at the top left of the List
Toggle any property you'd like to display on the Task Cards
Use the ⋮⋮ drag handles to reorder the properties on the Task Cards
Optionally, click the > beside the property to open more options
Use the to hide specific values within that property from view
Track daily progress in List View with a simple thumbs up or down. Every update adjusts the task, schedule, and reporting, automatically.
Locate the Task you want to update
Choose to mark it on track or improved, or to record a delay
If delayed, select a reason, add the number of impacted days, and optionally include a comment or photo
See also: Progress Updates
Task Update Compliance shows how many Tasks have been updated for the selected day. It appears at the top of List View and summarises what’s on track, delayed, or missing updates.
Click
Toggle on Show Task Update Compliance
Click to dismiss
Filters in Aphex let you show only what matters, whether that’s Tasks with certain properties, or ones that are missing something. Keep it simple or build something more detailed, it's up to you.
Click at the top of the List
In the dropdown that appears select and choose the property you'd like to filter by
Change the logic from options like or to or to hide or reveal the relevant Tasks
Click to swap between and
See also: creating & sharing Views
Who can use this feature?
All Project Users have access to List Views on both Web and the Mobile App

Calendars from the menuClick
Add a name and choose a colour to represent the Calendar
Pick your base Working Days
Click specific days on the Calendar to mark them as Working or Non-Working exceptions
Optionally,
Click Done once you're finished editing
The Calendar is added to the library of Calendars the team can assign to their Tasks
See also: Group Calendars
You can edit an existing Calendar to update working days, non-working days, change its name or colour.
Click your Project Title in the top left, then select Project Assets
Select Calendars from the menu
Hover over the existing Calendar
Click then select Edit
If the Calendar is already in use, select whether to apply changes to existing Tasks or keep their current dates unchanged
Assigning a Calendar to a Task sets its working days and controls when it can start or finish.
On the Gantt, navigate to the column picker and toggle on Calendar
Click a cell in the column to add a Calendar to the Task from the dropdown
See the non-working days appear with reduced opacity on the Task Bar
See also: Bulk Edits
Filter by Calendar to focus on Tasks working to a certain schedule.
Click and
Select Calendar in the first dropdown
Select from Is or Is Not in the second dropdown
Select your desired Calendar in the third dropdown
See also: create & share Views
Who can use this feature?
Admin users can create, edit and archive the library of available Calendars.
Task Owners, Assignees and Admins can change the Calendar allocated to their Tasks.

Go to Administration > Layers > Edit.
Scroll to the bottom of the page to find the Published Layer box.
Click the box to initiate the publishing process.
After you trigger the publishing process, you'll receive an email notification that is essential for accessing your published layers:
Locate the email from Civillo that confirms the layer publishing has started.
This email contains a direct link to the project's publishing page. This link is important because the publishing area can be difficult to access through standard navigation.
Save or bookmark this URL for future use. The page provides a summary of all published layers within your project.
Once you have published the layer, you will be able to copy the layer URL to paste into Aphex. All Civillo layer URLs are accessed through your Civillo Publish portal.
Navigate to your project, then choose the service type you need. Civillo exposes its geospatial data through two service types that Aphex supports:
ESRI Vector Tile Service
Vector data including design models, utilities, boundaries, and work zones. These layers do not require credentials in Aphex and connect directly without a login. Layer Policy and Quantity options are not available for this layer type.
Web Map Tile Service
Pre-rendered raster imagery such as aerial photography. These layers follow the same rules as other WMTS connections in Aphex, including Layer Policy support.
Log in to your Civillo Publish portal and open your project
Click ESRI Tile Service. This opens the ArcGIS REST Services Directory, listing all available layers with their service name and code
Locate your layer by name, then click into it to open the layer detail page
Click in the top-right corner to view the layer in JSON format
Copy the url value. This is the Layer URL you'll use in Aphex
A Civillo Vector Tile URL will appear in a format similar to the below;
Log in to your Civillo Publish portal and open your project
Click Web Map Tile Service. This opens a list of available imagery datasets for the project
Click in the top-right corner
Copy the URL from your browser's address bar. This is your WMTS Capabilities URL
A Civillo WMTS URL will appear in a format similar to the below;
Once you’ve got your Layer URL handy, you can plug it into any real-world Location in your Project.
Visit our Add Map Layers doc for step by step instructions on how to add layers to the Map.
Layer Policies apply to Civillo WMTS layers and control which sublayers are brought into your project. They do not apply to ESRI Vector Tile Service layers.
Visit our Layer Policies doc for step by step instructions on how to define a layer policy.
Things to know before you get started:
This feature is available on Pro+ or Enterprise plans
You need to be a Project Admin to set up the integration
Aphex supports two Civillo layer types: ESRI Vector Tile Service and WMTS
WMTS is a paid-premium feature in Civillo. Check with your Civillo Customer Success Manager if you're unsure whether your account has access.
WMTS is a paid-premium feature in Civillo. Check with your Civillo Customer Success Manager if you're unsure whether your account has access.
https://pub.civillo.com/<id>/<id>/arcgis/rest/services/<layer-code>/VectorTileServerhttps://pub.civillo.com/<project-id>/wmts/WMTSCapabilities.xmlVector Tile layers connect without credentials - you won't be prompted to log in and no Layer Policy options will appear. WMTS layers may prompt you to select credentials if the layer requires authentication, and support Layer Policy configuration.
Day, Night, Afternoon or AllSee also: Bulk Edits
Group by Shift gives you a simple way to lay out your plan by all the different Shifts the team is working. This is possible across all View types, but let's start by looking at Group By Shift on Board.
Click
Select Shift
Increase visibility of Shifts by updating the task bar, card colour, or work area based on shifts assigned to Tasks.
Open a Gantt View
Click
Click Bar Colour and select Shift
Open a Board View
Click
Click Task Card Colour and select Shift
Open a Map View
Click
Click Work Area Colour and select Shift
Filter by Shift to see Tasks planned for a specific time of day, perfect for coordinating teams across different shifts.
Click and
Select Shift in the first dropdown
Select from Is or Is Not in the second dropdown
Select from Day, Night, Afternoon or All in the third dropdown
See also: create & share Views
Who can use this feature?
Admins, Owners and Assignees can update the Shift on a Task.

Who can use this feature? All Project users can export Project data.
Exporting lets you download key project data from live plans and published versions to Resources, Folders, Blockers, and Milestones.
You can export your live plan from the Gantt, Map, Board, or List views. The export will reflect whatever filters and dates you’ve set at the time.
To export a Live plan:
Open your preferred view and click
Select
Exporting a published version lets you download plan data exactly as it was at the moment it was published. The export will reflect whatever filters and dates you’ve set at the time.
To export a Published version of a plan:
Open any Published version and Click
Select Export Tasks to CSV
See also:
Export the Resource Overlay to get a daily breakdown of Labour, Plant, Materials, or Subcontractors based on your current view and filters.
To export Resources:
Navigate to the Gantt view and select
Click and select the desired resource
Select and click
See also:
Exporting a project’s folder structure creates a CSV file with each Folder’s name and code, making it easy to review or reuse your Folder setup.
To export Folders:
Click your project title in the top left
Select Project Assets
Open the Folders page from the menu
See also:
You can export Blockers from the live Gantt, and the file will match whatever filters and dates you’ve set at the time.
To export Blockers:
Navigate to the right-side of the Gantt and click
Click the configuration icon and select
See also:
You can export Milestones from the live Gantt, and the export will reflect the filters and date range you’ve set at the time.
To export Milestones:
Navigate to the right-side of the Gantt and click
Click the configuration icon and click
See also:
You can export Clashes from the live Gantt and Map, and the export will reflect the filters and date range you’ve set at the time.
To export:
Navigate to the right-side and click
Click in the top-right of the Clashing Tasks panel
Click
See also:
Who can use this feature?
Task Owners can make their part of the plan Ready
Reviewers and Admins can approve plans on behalf of other Task Owners.
Before a plan is published, you can mark your part as Ready to signal it’s up to date and good to go. Even if you don’t mark it as ready, your tasks will still be included in the published version.
If you own Tasks in the lookahead period, it's your responsibility to make sure they're accurate, up to date and don't have any outstanding Unresolved Issue. This means Task Owners need to be mitigating any Clashes, adding Missing Data and resolving any Overdue Blockers.
Click your Publishing Deadline in the top right of the page
This will open the Make Ready Window
You'll see a count of all your Clashes, Missing Data and Overdue Blockers
Click any of the counts to open the relevant panel and start resolving issues
The Missing Data Panel highlights tasks you own that are missing required info, based on the lookahead set in the publishing schedule.
Open the Missing Data panel:
Open the Gantt
Towards the right-hand side, select
This will open the Missing Data Panel
The Blockers Panel highlights Open and Overdue Blockers, with Overdue ones always visible even if they fall outside the lookahead window so nothing critical gets missed.
Open the Blockers Panel:
Open the Gantt
Towards the right-hand side, select
This will open the Blockers Panel
See also:
The Clashes Panel shows Tasks in your lookahead that share the same work area, helping you spot and resolve scheduling conflicts.
Open the Clashes panel:
Open the Gantt
Towards the right-hand side, select
This will open the Clashes Panel
See also:
Filtering by Issue lets you focus on specific Tasks based on what issues they have. It’s a quick way to review and manage work related to a particular issue across your plan.
Click and
Select Issue in the first dropdown
Select from Is, Is Not, Is Empty
Your Project comes with a pre-made Unresolved Issues View.
Click + Views within the open View Tabs
Select Unresolved Issues View
See also: create & share
Marking your part of the plan as Ready lets your team know your Tasks are up to date and good to go for publishing.
How to Make Ready:
Click your Publishing Deadline in the top right of the page
This will open the Make Ready Window
Select
See also:
You can assign a Reviewer to any User, ideal for reviewing Subcontractor's plans, or if someone on the Project is away. Reviewers are notified when plans are Ready and can either approve them or mark them Ready on the User’s behalf.
Click your Project Title in the top left then select Users
Find the user you want to assign a Reviewer to
Click the + in the Reviewer column
Click the 0/X Reviewed button in the top right of the page
Find the Work for Review section in the menu that opens
Use the to view each User's plan
See also:
Who can use this feature?
Admins & Owners can update Task Status. This can be changed to Admin only and Admins, Owners & Assignees in the Project Permissions
Admins can regress Task Status, this can be changed to All Members in the Project Permissions
Task Status helps track the lifecycle of work, from planning, to commitment, to completion. It’s a simple way to bring structure and accountability to the plan.
Promised Tasks are commitments. If the committed dates are changed, a delay reason must be recorded in order for the update to save.
On the Gantt, use the Column Picker to toggle Status
Click the Status cell for your task & select Promised from the dropdown menu
See also:
Done Tasks are those determined to have actualised start and end dates. Done Tasks are locked in place so no date changes or Progress Updates can be made.
On the Gantt, use the Column Picker to toggle Status
Click the Status cell for your task & select Done from the dropdown menu
See also:
Planned Tasks are those not yet promised to be delivered, and can be moved freely. This is the default state of all tasks.
On the Gantt, use the Column Picker to toggle Status
Click the Status cell for your task & select Planned from the dropdown menu
The promised Period can be set when Publishing. The Promised Period is shown as a hatched section on the Gantt, ending with a solid purple Promised Line.
On the Gantt, Hover over and Click
A menu will appear, on the menu click
See also:
Filtering by Status lets you show or hide Tasks based on whether they're Planned, Promised or Done.
Filter by Status:
Click and
Select Status in the first dropdown
Select from Is or Is Not in the second dropdown
See also: create & share
Projects contain all the work, routines, assets, and users needed to deliver a specific project. Projects live inside an Organisation.
Project Name
Custom Project Name
Project Logo
Project Admins can control who can edit Task Status (Planned → Promised → Done).
Additionally, if Admin & Owners, or Admins, Owners & Assignees is selected, Projects can control the direction of Status changes to make sure their commitments can't be undone.
Project Admins can control who can edit Create and Manage Folders.
Additionally, if All Project Members have permission to Create & Manage Folders, Projects can disable the option for Members to create Root Folders .
Projects can control who can edit Create and Manage Blockers.
Projects can control who can edit Create and Manage Tags.
Projects can be transferred from one Organisation into a different Organisation (within the same data region).
All data inside a transferred Project is preserved. Transferring a Project impacts the Project URL, leaving any prior URLs to Published Versions and Shared Plans invalid.
If the users on the Project do not already exist as a User inside the Destination Org, they will be automatically invited as Standard Organisation Users.
In order to start a Project transfer, the user initiating must be an Organisation Admin in both Organisations.
If a project is Archived, it is no longer accessible to any users and will not appear in the Project list. Archived Projects can be restored at any time.
Archived Projects can be permanently deleted. All project data will be deleted without any possibility of being restored.
A guide for system administrators to configure an enable SAML based SSO for their teams.
Who can use this feature? SSO is available on Enterprise plans You will need to have Administrator access to your company's IdP platform (Active Directory, Okta or similar)
Single Sign On (SSO) allows users to log into many applications or websites using an identity provider. Security Assertion Markup Language (SAML) is a security standard for managing authentication and access.
In a SAML SSO set-up, the identity provider manages the organisation's user accounts and credentials. The service provider (Aphex) is the app or website that provides services to the user or organisation.
When using SAML SSO, members are forced log in to their Aphex account using the organisation's identity provider.
How SAML SSO works:
Member attempts to log in to Aphex with an email at a registered SAML SSO domain
Aphex enforces login via SAML SSO
Aphex sends a SAML request to the identity provider
The identity provider checks this member's credentials
The identity provider sends a response to Aphex to verify the member's identity
Aphex accepts the response and logs the member into their Aphex account
If the user is new, they will be provisioned in
Note: Aphex uses SAML 2.0 for all SAML SSO configurations. This includes configurations with supported identity providers and any custom configurations.
The process for configuring SAML will depend on your specific identity provider. We've outlined the general process for implementing SAML SSO below.
SAML SSO only applies to users from the organisation's registered domains. Other users (from other domains) accessing the organisation's data in Aphex can continue to log in via other methods such as email + password or Sign in with Microsoft.
Domains are the way we identify entities on the internet. They let Aphex know which authentication methods to allow or enforce for users.
Organisations can typically have a single domain however, we do support more than one domain, including subdomains.
For example: ACME Corp has three domains registered to their organisation: acme.org, acme-abc-jv.com, and acjv.com.
Anyone with an acme.org, acme-abc-jv.com, or acjv.com email address will be subject to the enforced SSO rules applied.
Contact your Account Manager or Customer Success Manager to request the SAML SSO setup for your domains.
Once approved, you will be provided with access to an SSO which will guide you through the set up.
Within your company's identity provider, create or register a new enterprise application for Aphex. As you setup the SAML SSO for the application you will need to enter the information provided in the prior step.
When you add Aphex to your identity provider, they will provide you with;
Identifier (for example: Microsoft Entra ID Identifier)
Login URL
Logout URL (optional)
You will need to save these and return them securely to your Aphex Account Manager or Customer Success Manager.
Certain services allow you to customise the logo of your Enterprise application. If so, you can use this logo here.
Now that you have created the enterprise application, you need to assign your users/user groups to it.
Under the Getting started section, select Assign users and groups.
Select the Add user/group button.
Under Users, select the None Selected link.
Aphex will expect three specific properties as part of the SAML SSO configuration. You can add these as custom claims in your IdP;
firstName: The user's fist name (For example this will be mapped to user.givenname in Microsoft Entra)
lastName: The user's last name (For example this will be mapped to user.surname in Microsoft Entra)
mail: The user's unique, primary email address (For example this will be mapped to
Once configured, the connection can be tested in a development environment with your Aphex Account Manager or Customer Success Manager.
Once tested, your Aphex Account Manager or Customer Success Manager can deploy your SAML SSO configuration.
The next time users from your domains attempt to access Aphex they will be required to login again and the use of SAML SSO will be enforced (meaning they will no longer be able to use their prior authentication methods).
This Support Policy applies to the Support Services as defined in the Aphex Platform Terms and Conditions. In the event of any inconsistency between this Support Policy and the terms of the Aphex Platform Terms and Conditions, the terms of the Aphex Platform Terms and Conditions will take priority.
Unless the context requires otherwise, defined terms in the Aphex Platform Terms and Conditions have the same meaning in this Support Policy, and the following definitions also apply:
Business Day means a day on which banks are open for general banking business in the relevant support region, excluding Saturdays, Sundays and public or bank holidays.
We provide the Support Services across the various channels set out below. In order for you to receive the Support Services, you must place a request with us using either the Live Chat Support or Email Support channels set out below.
Help Center: Comprehensive product documentation, guides, and resources available 24/7.
Live Chat Support: Available between 9am and 5pm, Business Days in active support regions. Active support regions are:
United Kingdom (GMT); and
Australia (GMT+10).
Email Support: Available via .
If your use of the Support Services significantly exceeds typical usage patterns, we may initiate a discussion to review and address this with you. Any changes to the Services or Fees resulting from such review will be mutually agreed upon between the Parties in writing. If the Parties are unable to mutually agree changes to the Services or Fees, we may, in our sole discretion, adjust our response times accordingly, and/or terminate the Aphex Platform Terms and Conditions with 14 days' written notice to you.
We provide the following onboarding and activation services to support your implementation and adoption of the Services:
Implementation Support, which includes reasonable assistance with:
initial system configuration and setup;
user account provisioning and permissions;
together, the 'Onboarding Services'.
The Onboarding Services are provided remotely, unless otherwise agreed between the Parties in writing.
Where required by you, we may agree to provide multiple sessions in relation to Training and Enablement. All Training and Enablement sessions will be provided at a time and date mutually agreement between the Parties, and will be aimed at your core team only.
The Parties agree to work together to decide on a plan for the Onboarding Services. We reserve the right to limit the Onboarding Services where we consider your requests to exceed the reasonable scope of the Onboarding Services. Where we consider your use of the Onboarding Services to be excessive, we may agree to provide additional onboarding services at agreed commercial rates.
You may report errors or abnormal behaviour of the Service ("Incidents") by contacting us via the Aphex Messenger or via email at . You agree to provide us with all information and cooperation reasonably requested by us in order for us to provide the Support Services to you. This includes, without limitation, providing the following information to Aphex regarding the Incident:
aspects of the Service that are unavailable or not functioning correctly;
an assessment of the impact of the Incident on your users;
start time of Incident;
list of steps to reproduce Incident;
Our personnel will assign a priority level ("Priority Level") to each Incident and seek to provide responses in accordance with the table below.
Subject to clause 5, if an Incident is passed to us outside the applicable service availability window (as set out in the Support Channels and Hours section of this Support Policy), time measurement for the Target Response Time will begin from the commencement of the next service availability window.
We will have no obligation to provide Support Services to the extent an Incident arises from:
(a) use of the Services by you in a manner not authorised in the Aphex Platform Terms and Conditions or any applicable documentation;
(b) general Internet problems, force majeure events or other factors outside of our reasonable control;
(c) your equipment, software, network connections or other infrastructure;
(d) any Third Party Products or Services; and
(e) any trial or beta software, including any Experimental Services (being any software released to the market for testing and feedback).
To the extent that you are provided access to additional resources, including but not limited to Power BI templates (Additional Resources):
basic implementation guidance may be provided for standard features, at our sole discretion;
support does not include custom modifications or bespoke development;
you maintain full ownership and responsibility for any customisation; and
At Aphex, we believe software should demonstrate value before customers commit significant resources. Unlike the industry standard of locking customers into large upfront costs, our Fair Billing Policy allows organisations to scale their investment based on the actual value they receive. As your use of Aphex grows and delivers measurable benefits to your projects, your costs can adapt accordingly—putting control firmly in your hands.
To help understand our billing approach, here are the fundamental elements of the Aphex platform:
Product
At Aphex, plans are selected at the organisation level, determining the feature set and functionality available to all users within that organisation. The plan also establishes the pricing for seats throughout the organisation.
Each organisation selects:
Which Aphex products they require (e.g., Planner, Diary)
The appropriate plan for each product (e.g., Pro, Pro+, Enterprise)
The number of seats to allocate to users within their organisation
We understand that project teams evolve throughout delivery. Our billing approach puts customers in control of their costs by allowing them to directly manage seat allocations within their organisation.
Customers control which users are assigned seats through the Admin Console, with billing based on occupied seats during each billing period.
Our Flexible Plans are designed for organisations that want maximum adaptability with simple monthly billing.
Customers are billed monthly in advance based on the number of seats allocated at the start of each billing period
Seat allocation can be adjusted at any time through the Admin Console
Changes to seat allocations are reflected in the next billing cycle
Customers may upgrade, downgrade, or cancel their subscription with notice as specified in the Terms of Service
Changes take effect at the next billing cycle
Enterprise Plans offer predictable costs through pre-committed seat volumes or contract durations.
Enterprise customers agree to a fixed monthly fee that includes a specified maximum number of seats
A billable seat is occupied by any organisation member who has been allocated a seat in the Admin Console
Seat usage is monitored automatically with customers having full visibility of allocation through the Admin Console
If the number of allocated seats exceeds the pre-committed amount, additional seats will be billed at the agreed overage rate
Overage charges are billed monthly in advance based on seats allocated at the start of each billing period
Customers who include multiple Aphex Organisations within their Enterprise plan will have their total seat usage calculated as the sum of all allocated seats across each included organisation
Each user occupies one seat per organisation, so if a user works across multiple organisations, they will require a seat in each
As Aphex introduces new products, customers may subscribe to multiple offerings simultaneously. Each product subscription follows its own plan terms, with seats allocated independently for each product. Clear visibility of seat usage across all subscriptions is provided through the Admin Console.
For invoice billing, invoices will be issued on Net 30 day terms and contain a reference to the Purchase Order number provided by the Customer
For card billing, invoices will be generated immediately upon charge
Payment methods and terms are established at the time of subscription and can be reviewed in the Admin Console
Aphex is headquartered in the United Kingdom, with our base pricing established in British Pounds (GBP). For the convenience of our global customers, we offer billing in select additional currencies including EUR and AUD, with plans to expand to USD in the future.
While we aim to maintain stable pricing in all currencies, please note:
Pricing in non-GBP currencies is based on foreign exchange rates
We may periodically review and update these rates to maintain alignment with market conditions
We'll provide advance notice of any significant adjustments to currency-based pricing
For any questions regarding our Fair Billing Policy, please contact your Customer Success Manager or email [email protected].
The Location library is where you create and manage all Locations for your Project. Locations can be geolocated maps that connect to external layers like ArcGIS or drone flyovers, or static images to represent a zone, floor, or layout. Each Task can be assigned to a Location - which can then be used in filters, to group the plan, or to open Map Views.
Pick a Location type, set a name and save it to your Project's library.
Click your Project Title in the top left
Every Task in Aphex has an Owner: the person ultimately accountable for that scope of work. Owners can add Assignees to help update and progress the Task.
Teams are collections of Tasks Owners you can use as quick filters, making it easy to see work owned by a specific group of Users.
Every Task will always have an Owner, but Ownership can be changed at any time. You can reassign Tasks individually or in bulk to reflect who’s now responsible.
Open the column picker and toggle Owner
Milestones mark critical points in your project, from contract deliverables to site handovers. In Aphex, they work just like Tasks, so you can assign all the same details: like Owners, Resources, Subcontractors, Blockers, Work Areas, and Delays.
Milestones can include a fixed Target Date, giving you a reference point to track progress against. The Gantt will summarise & highlight whether you're on track or slipping, across all your Milestones.
To create a Milestone, convert any existing Task or Subtask, or import Milestones directly from your Master Schedule.
Create a Milestone from the Gantt:
Packages give you a flexible way to organise your Tasks without changing the project’s core structure. While the Folder tree typically remains the shared backbone of the plan, Packages let anyone group Tasks by whatever makes the most sense for delivery: zones, trades, phases, disciplines - you decide.
They’re easy for anyone to create, drag into a custom order, and use to shape views that are more practical for how you plan and build.
Packages can be created at any time while planning. Just give it a name and you're ready to start grouping Tasks in a way that works for you.
Make sure that your is set to Package
Production Measures let you define the measurable outputs work is planned against, each created with a name, unit (e.g. ‘Panels, each’), and an optional target rate per day. When a target rate is set, Aphex calculates the implied daily rate and compares it against that target, surfacing the variance as a red, amber, or green indicator in a dedicated Production Measure column on the Gantt.
Creating Production resource lets you build a reusable library of Production to assign to Tasks.
Click your Project Title in the top left, then select Project Assets


initial template and workspace configuration; and
Training and Enablement, which includes the provision of reasonable training sessions covering:
core platform functionality;
administrative features and controls;
best practices for your intended use cases; and
additional sessions as reasonably required for successful adoption,
relevant log files or data; and
wording of any error message.
Priority 3
Affects specific features or a limited set of users. Functionality is partially impacted, but a workaround may exist. Examples include single feature downtime, degraded performance for some users, or non-critical integration/data issues.
High Priority = 2 Weeks Medium Priority = 4 Weeks
Priority 4
Non-critical issue; no significant impact on performance of the Service but user experience may be affected.
Priority 1
Operation of the Service is critically affected (not responding to requests or serving content) for a large number of users; no workaround available.
2 hours
Priority 2
Service is responding and functional but performance is degraded, and/or Incident has potentially severe impact on operation of the Service for multiple users.
2 days
Any String
"New Task"
Start
dd/MM/yyyy',
'dd/MM/yy',
'yyyy/MM/dd',
'dd-MM-yyyy',
'dd-MM-yy',
'yyyy-MM-dd',
'ddMMyy',
'yyyyMMdd',
Prefix of the day are also supported i.e. "Tue ddMMyyyy"
Today
End
Same as Start
Same as Start
Shift
'Day',
'Afternoon',
'Night',
'All',
Day
Package
Any String
N/A
Subcontractor
Any String
N/A
Imported tasks will be assigned to the project's default calendar and the owner undertaking the migration.
Tasks will be created in the plan immediately


Task Name
Monday, Tuesday, Wednesday, Thursday, Friday, Saturday
Seven Day
Monday, Tuesday, Wednesday, Thursday, Friday, Saturday, Sunday
The edited calendar will not be applied to any existing Tasks
Making any changes to the start date, end date or duration of a Task will apply the updated calendar to the Task
Save and force reschedule existing Tasks
The edited calendar will be applied to all future planned tasks and Tasks with days in progress
The edited calendar will not automatically be applied to any Tasks that have finished (no working days in progress or in the future)
Five Day
Monday, Tuesday, Wednesday, Thursday, Friday


Six Day
Save and hold dates on existing Tasks
Night
Covers tasks planned to take place overnight. Common for work that needs to happen outside normal site hours.
All
Used when a task spans multiple shifts or doesn’t fit neatly into a single timeframe.
Day
Used for tasks planned during the daytime. Typically, for tasks within standard site hours.
Afternoon
Shift
Is Is Not


Applies to work scheduled later in the day. Ideal for teams running extended hours beyond the usual daytime window.
Day, Night, Afternoon, All
Progress updates
Status categories:
On Schedule includes On Schedule, Move, and Shorten updates
Delayed is triggered by any negative update and takes priority if multiple updates exist
Missing Update applies when no update has been recorded for that day


Select
A ZIP file downloads containing three CSVs, one for each tab
All active filter values are applied consistently across all three files
If a Task clashes with multiple other Tasks, it appears on a separate row for each clash partner
For Non-Conflicting rows, Overlap Start, Overlap End and Overlap Duration are left blank
Group By and Overlay Property are UI-only and do not affect the CSV structure
Each CSV includes: Task Name, Activity ID, External ID, Owner, Owner Email, Start Date, End Date, Duration, Location, Folder, Subcontractor, and the matching fields for the clashing Task, plus Clash Status, Overlap Start, Overlap End and Overlap Duration.


Is Not EmptySelect your from Clashes, Overdue Blockers or Missing Data in the third dropdown
Make Ready even if some issues haven’t been resolved.Select Make Ready with Issues
Select the User you'd like to set as the Reviewer
Tick off their plan once you're ready to mark it as Reviewed


Select from Planned, Promised or Done in the third dropdown


Select the check box next to the user or group that you want to assign.
Select the Select button at the bottom of the page.
Select the Assign button at the bottom of the page.
user.userprincipalnameLike most software services, Aphex utilises "Email" as the unique identifier of a user.
If you plan on using SAML SSO, you may want to consider sub-brands and joint ventures that your company controls. Be aware that email aliases will not work with SAML SSO.
Azure AD (Entra) customers can choose to simply provide their App Federation Metadata Url in lieu of the above.
Important: Unless directly sync is being used, user management typically happens within Aphex. To avoid duplicated effort and the need to add or remove users from both within Aphex and your IdP, we recommend assigning a broad group or making the application available to everyone.
If Directory Sync is enabled then the IdP becomes the primary manager of users.
A specific Aphex offering such as Planner or Diary that delivers distinct functionality
Plan
The tier of service for a product (e.g., Planner Pro, Planner Pro+, Planner Enterprise) which determines available features and pricing
Subscription
A customer's purchase of a specific plan for their organisation
Seat
An allocation that grants a specific user access to product functionality within an organisation
Entitlement
The specific functionality and features a customer is entitled to use based on their subscription plan
We've evolved how seats are assigned within our billing model to give customers greater visibility and control over their costs. While Aphex has always used seat-based billing, we've made an important change to how these seats are managed:
Previous approach: Seats were automatically calculated as assigned or not behind the scenes based on project roles, with limited customer visibility or control over the assignment process.
New approach: Customers explicitly assign seats to their users to unlock associated functionality.
This change delivers several benefits:
Direct control: Organisations can now directly control which users are allocated paid seats through the Admin Console
Cost management: Customers can more easily manage costs by allocating seats only to users who require specific functionality
Multi-product clarity: As we introduce additional products, the seat allocation model provides a consistent approach across all Aphex offerings
Clearer scaling: For larger organisations, the explicit seat management approach makes it easier to plan and budget as teams grow
Flexibility: Seat allocation is now disconnected from project roles, giving greater flexibility in how teams are structured
ACME Contracting is managing 10 active construction projects with approximately 400 total users across these projects. They have selected:
Planner Enterprise: A subscription with a commitment to 400 seats (currently using 300)
Diary Alpha Preview: Currently in pilot phase with 50 users testing the functionality (from the available 2,500 free seats)
In this scenario:
ACME pays a fixed monthly fee for their 400 committed Planner Enterprise seats regardless of current usage
ACME doesn't pay for their Diary usage as they're part of the Alpha Preview
If ACME increased their Planner seat allocation to 450, they would pay the agreed overage rate for the additional 50 seats
Project AssetsSelect Location from the menu
Click
Pick a Location Type; Model Space, Real World or Off Site
Give your Location a name and select
See also: open a Map View
These are real-world Locations with coordinates - similar to Google Earth. You can switch between base maps (satellite or street), and connect external layers to give the team extra context while they’re planning.
You can connect up to 10 external map layers to a Map Space Location. These layers come from tools like ArcGIS or drone services like Propeller, and let your team overlay context - like utilities, survey data, or design drawings - directly in the Map. Layers can be shown or hidden as needed to help mark up work areas or communicate plans more clearly.
Click your Project Title in the top left
Select Project Assets
Select Location from the menu
Click into your Map Space Location
Select
Paste in your Layer URL and click Continue
If required, select the correct Credential to access the layer
Review the Layer Summary and click to add the layer to the Location
See also: Connect to ArcGIS
When you connect a layer, Aphex will detect all available sublayers. Layer Policies help you control which ones are brought into your project - and whether they stay synced automatically or not.
Open the Configure Location Layer menu
Click into the Layer Policy dropdown
Make a selection from: Most Recent, Change Over Time, All Layers or Custom Selection
If you select Custom, use the checkboxes to manually pick sublayers
If you select Most Recent, define the Layer Quantity
Click to add the layer to your Location
The selected policy will apply to both existing and future sublayers
These policies & selected Sublayers can be changed at any time.
Model Space Locations use a single uploaded image, like a site GA, floor plan, or layout export as the base for marking up Work Areas.
Click your Project Title in the top left
Select Project Assets
Select Location from the menu
Click into your Map Space Location
Select
Select the file you want to upload
Select to add the image to the Location
Locate the Location you'd like to replace
Hover the Image layer and click ...
Select Replace File
Upload your replacement image and confirm
Off Site Locations are simple placeholders for areas that aren't part of the site map. They're helpful for tagging work that happens elsewhere (like a precast yard) without need for a visual representation.
Off Site Locations cannot be opened in a Map View, and no Work Areas can be marked up on them.
Archiving a Location removes it from active use - it can't be opened in Map View or assigned to Tasks. The data is still part of the project's history and you can restore it at any time if you need to bring it back.
Locate the Location you'd like to replace
Hover the Image layer and click ...
Select Archive
Each Task can be assigned to a Location from your Project's library - the first step in showing that Task on the Map.
To assign a Location:
On the Gantt, use the Column Picker to enable the Location column
Click the Location cell for your Task and choose a Location from the dropdown
See also: mark up a Work Area
Group Tasks by Location to organise your plan by where work is happening. It's possible in all View Types, but let's first take a look at grouping by Location on the Gantt:
Open a Gantt View
Click the menu in the top left
Select Location as the primary grouping
Tasks will be arranged into groups based on their assigned Location
Use the ⋮⋮ to drag and reorder groups as needed
Filter by Location to focus on Tasks happening in a specific area or zone.
Click and
Select Location in the first dropdown
Select from Is, Is Not, Is Empty in the second dropdown
Select your desired Location in the third dropdown
See also: create & share Views
Who can use this feature?
All Project Users can allocate a Location to their Tasks.
Project Admins can create and manage the Library of available Locations and External Map Layers.

Be careful when replacing the Location Image
Image replacements must match the original dimensions exactly. Work Areas are fixed to points on the image, if the scale or aspect ratio changes, Tasks risk being misaligned and may need to be redrawn.
Click into the Owner cell
Select a different user from the dropdown
Need to give another user the same permission as the Owner so that User A can always edit User B's tasks? Set up Owner Delegates.
See also: Bulk Edits and Task Delegates and Task Permissions
Assignees are collaborators on a Task. You can Assign one or more people to help update the Task - they’ll then see it in their daily Task List, can report progress, and make edits if needed.
Open the column picker and toggle Assignee
Click into the + Assignee cell
Select all the users you want to set as Assignees
See also: Bulk Edits and Task Delegates and Task Permissions
Create a Team to group Task Owners for quick filtering. A team can be used in filters like “Owner = Civils Team” to show related work.
Click your Project Title in the top left and select Users
Select Teams from the menu
Click
Pick the Team Members and name your Team
Click Create Team
You can filter any View by who Owns the Task, who's been Assigned to it, or which Team they're part of. It's a simple way to focus on just your scope, or keep track of work across different roles.
Click and
Select Owner in the first dropdown
Select from Is or Is Not in the second dropdown
Select from Me, any combination of specific Users, or any Team on the project
Click and
Select Assignee in the first dropdown
Select from Is , Is Not, Is Empty or Is Not Empty in the second dropdown
Select from Me, any combination of specific Users, or any Team on the project
See also: create & share Views
Grouping by Owner arranges the Plan by the person responsible for each Task. This is possible across all View types, but let's start by looking at Group By Owner on the Gantt:
Open a Gantt View
Click
Select Owner
Optionally, select a different Primary Group, and select Owner as the Sub-Group
Grouping by Assignee organises your Board by the person(s) each task is assigned to, so you can quickly see who’s working on what (and what’s still unassigned):
Open a Board View
Click
Select Assignee
Optionally, select a different Primary Group, and select Assignee as the Sub-Group
Make it easier to see which Owner is responsible for an activity by changing your Task or Work Area colour according to which Owner is completing the Task
Open a Board View
Click
Click Task Card Colour and select Owner
Open a Gantt View
Click
Click Bar Colour and select Owner
Open a Map View
Click
Click Work Area Colour and select Owner
Because every Task has a clear Owner, it's easy to track how each person is performing across the Project - not just in terms of delays, but also how consistently they're keeping their part of the plan up to date.
Aphex Insight gives you a live snapshot of Owner performance - no set up required. Automatically see which Owners are responsible for the highest shares of delay and why.
User Power BI to build custom reporting on Owner delays and performance, based on data in your weekly Published Versions. Aphex provides free templates as a starting point but everything can be customised to suit your project reporting requirements.
See also: Connect to Power BI
Who can use this feature?
Task Owners, Assignees and Admins can edit Task Assignees.
Task Owners and Admins can update Task Ownership.
All project users can create Teams.
Click and select Convert to Milestone
Each Milestone can be assigned a Target Date: the original or ideal date you’re aiming for, often pulled from a Master or Contract Schedule. The Target Date marker changes colour based on performance, helping you see at a glance how things are progressing against the plan.
Right click a Milestone and select View Details
In the Task Panel that opens, locate the Target Date section
Toggle Set Target Date
Pick the date
If your Milestone has slipped the Target Date marker will appear as
If your Milestone is on track, Target Date marker will appear as
Use the +/- indicators to see how many days a Milestone is ahead or behind
Use the Milestone Panel to compare current Milestone Dates to Target Dates, or pervious Weekly Versions to see how things have shifted over time - and spot the impact of today's changes on future Milestones, even if they're outside of your View.
On the Gantt, select the Milestone Icon in the right-hand panel
This opens the Milestone Panel, showing Milestones across the Project
Click the ⌄ next to any Milestone to expand its history and see how it’s changed over time
Open the config menu to toggle filters for delayed or improved Milestones
In the Milestones Panel, click into the Compare To dropdown
Select Target Date
Instantly see how many days ahead/behind for each Milestone, compared to their Target Dates
In the Milestones Panel, click into the Compare To dropdown
Select Previously Published Version
Instantly view the variance between current and baseline dates
See also: Export Milestone Data
Turn on the Critical Path Overlay to highlight the short term path to any Milestone. The critical path will light up in gold, and everything else fades to blue - so it's easy to see what's critical and what's not. You can view paths for all Milestones or focus on one at a time.
To turn on the Critical Path
Open the Gantt and click
Select Critical Path to highlight all Milestone paths in gold
Or click the > to choose specific Milestone pathways to highlight individually
Click and
Select Milestone in the first dropdown
Select from Is True or Is False in the second dropdown
Your Project comes with a pre-made Upcoming Milestones View.
Click + Views within the open View Tabs
Select Upcoming Milestones View
See also: creating & sharing Views
Who can use this feature
All Project users can convert a Task to a Milestone.
Task Owners, Assignees and Admins can edit the Milestone Target Date.

Date Range: Controls which Milestones appear in the list. You can show only those within your current Gantt view, all future Milestones, or every Milestone in the project. Group By: Organises your Milestones into sections. Choosing Performance vs Target splits them into four groups based on how the Milestone's end date compares to its Target Date:
Approaching Target: the end date is before the Target Date
An option to Create Package will appear on the Gantt
Click this and give your new Package a name
Once your Packages are set up, it's easy to start using them. Add new Tasks straight into a Package, or update existing Tasks to move them into the right Package.
On the Gantt, open the column picker and toggle Package
Click the Package cell for your task & select a Package from the dropdown menu
Alternatively, use drag and drop to move a Task into a Package
See also: Bulk Edits
Group by Package gives you a simple way to lay out your plan around the Packages you're using. This is possible across all View types, but let's start by looking at Group By Package on the Board.
Open a Board View
Click
Select Package
Optionally, select a different Primary Group, and select Package as the Sub-Group
Packages are flat and do not allow for sub-packages to be created. If you need more hierarchy, it's best to use Subfolders to build out your plan.
Change the order of Packages in your Plan by dragging and dropping them.
Hover over the Package you want to move
Use ⋮⋮ to drag your Packages in the order in which you want them to be displayed
Drop the Package to a new location
Apply a Package filter to see only the Tasks sitting in specific Packages in your Project .
Click and
Select Package in the first dropdown
Select from Is, Is Not, Is Empty or Is Not Empty in the second dropdown
Select your desired Package in the third dropdown
See also: create & share Views
Who can use this feature?
All project users can create & own Packages.
Project Admins can edit and archive Packages.

Select Production from the menu
Click
Create your custom Production resource by entering the Name, Unit and a Colour
Optionally assign a Unit Name and toggle Set Daily Target Rate
The Production resource is added to the library of Production the team can assign to their Tasks
Assign Production to tasks and track progress throughout the task duration
Assign from the Gantt column and the task side panel.
Pick a unit-based measure to open a planning view where you can set the total quantity, review the daily breakdown and alignment, then
Make changes to the production breakdown where needed and impact the cumulative total needed.
Right-click a Task and select View Details
Scroll to Planned Resources and click into
Update the value and see the cumulative total impact
A Task's Production breakdown is locked the moment the Task is Promised, or once it has any Progress recorded. Once Confirmed, the measure, quantity and breakdown becomes read-only. To change them, delete the task's progress first or change the status to Planned.
When a task's average production rate is below or in excess of its target, you can extend or shorten the task duration in one click so it lines up with the target rate no manual recalculating needed.
Hover the Target Rate Variance icon on the Production Gantt cell, in the Task side panel, or on a Board/List task card
Where the average is off target, an Align Task Duration button appears
Click it to extend or shorten the task duration until the daily average production matches the target rate
The quantity breakdown updates automatically to reflect the new duration
Once a Production Measure with a target rate is assigned to a task, Aphex continuously compares the task's planned daily rate against that target so misalignment is visible before it becomes a problem.
Resizing or dragging a task with a Production Measure assigned updates its plan in real time.
As you stretch or shrink the Task Bar, a Task Resize Indicator tooltip shows a live preview of the new average daily production rate
If the measure has a target rate set, the tooltip also shows whether that new average is aligned, above, or below target
Release the bar to confirm the new duration the daily breakdown recalculates automatically
On the Gantt, navigate to and toggle on Production
Check the visuals of , and to check the Target Rate Variance
Click and
Select Production in the first dropdown
Select from Is, Is Not, Is Empty or Is Not Empty in the second dropdown
Select your desired Production measure in the third dropdown
See also: create & share Views


Upload a PNG or JPEG as a Custom Project Logo to be used on PDF printouts (optional)
External Project ID
Custom ID used for business reference (optional)
Project Location
Entering a Location for a Project enables the Weather feature, and serves as the default position for any Real World Maps.
Project Timezone
Sets the default timezone for Planner and Diary features
Admins Only
Creating and Managing Folders is restricted to Admins Only
*Managing Folders includes editing all properties (name, code, colour, position) and the ability to delete folders. It does not include the permission to change Folder Protection State. This will always be reserved for Admins Only.
Who can use this feature?
Task Owners, Assignees and Admins can allocate a Subcontractor to their Tasks.
Project Admins can create and manage the library of available Subcontractors.
Subcontractors can be assigned to Tasks to show who’s delivering the work. They help teams organise, group, and colour Tasks by Subcontractor, making it easier to coordinate and track progress across your plan.
Creating Subcontractors lets you build a reusable library of Subcontractors to assign to Tasks.
Click your Project Title in the top left, then select Project Assets
Select Subcontractors from the menu
Click
Create your Subcontractor by entering a name and assign a colour
The Subcontractor is added to the library of Subcontractors the team can assign to their Tasks
Assigning a Subcontractor to a Task can show who’s responsible for the work and helps with organising and visualising your plan.
On the Gantt, use the column picker to toggle Subcontractor
Click a cell in the column and add a Subcontractor to the Task from the dropdown
See also:
Make it easier to see which Subcontractor is responsible for an activity by changing your Task or Work Area colour according to which Subcontractor is completing the Task.
Open a Gantt View
Click
Click Bar Colour and select Subcontractor
Open a Board View
Click
Click Task Card Colour and select Subcontractor
Open a Map View
Click
Click Work Area Colour and select Subcontractor
Grouping by Subcontractor arranges the Plan by who's delivering each Task. This is possible across all View types, but let's start by looking at Group By Subcontractor on Board.
Click
Select Subcontractor
Optionally, select a different Primary Group, and select Subcontractor as the Sub-Group
Turn on the Resources Overlay to see how many Tasks are planned each day per Subcontractor. You’ll get a clear view of daily workload, plus a breakdown of which Tasks are contributing to it.
Open a Gantt View
Click and select
Click the icon on the left to view your Subcontractors
Filter by Subcontractor to review and manage Tasks related to particular Subcontractors across your plan.
Click then
Select Subcontractor in the first dropdown
Select from Is, Is Not, Is Empty
See also: create & share
Once Subcontractors have been assigned to Tasks, all updates (including Delays, On Track & Improvement events) can be traced back to each Subcontractor. This makes it easy to understand how each Subcontractor is performing across the project.
Aphex Insight gives you a live snapshot of Subcontractor performance - no set up required. Automatically see which Subcontractors are responsible for the highest shares of delay and why.
User Power BI to build custom reporting on Subcontractor delays and performance, based on data in your weekly Published Versions. Aphex provides free templates as a starting point but everything can be customised to suit your project reporting requirements.
See also:
This feature is only available on Pro+ or Enterprise plans
This endpoint provides access to the Work Areas on Published Plans for a project.
Teams generating plans utilising Map Space Locations generate a unique related dataset of real-world work areas and schedule tasks. Teams can use this location data in any of their external GIS or analytics tools with the Work Area API.
The Work Area API has three components.
You can access the Work Area API by querying the endpoint URL for your desired project and providing a valid Token.
Finding your API URL
As a Project Administrator, head to your project in the Aphex Planner app. From the Integrations page, the API can be enabled.
This will uncover the API URL specific to that project. The URL structure will be;
From the same location you sourced the API URL, a new Token can be created.
To successfully authenticate your request to the API, set the Token in the Query String of the URL.
The example below can be used by replacing the API account ID and Token using those retrieved in the earlier step
Valid requests to the API will return a JSON response consistent with the API data model.
The Work Area API Data Model contains the following objects;
The Work Area API has a small number of restrictions and limits to ensure the availability of the system and the security of customer data.
Token Management Restrictions: As covered in the Authentication section, requests to the API will only succeed if they follow the correct request structure and include both a valid URL and Token. Tokens are generated individually for a Project, by a user with Project Admin rights.
Token Validity Limits: Generated tokens have a maximum lifespan of 3 months to ensure that over time, project data is secure by default. On expiry, or at any time, new tokens can be generated for the project.
Publication Limit: To maintain system availability, a Publication Limit exists for the Work Area API. Successful API requests will return up to a maximum of five (5) of the most recent Publications of data.
If your team uses ArcGIS to manage design context, utilities, exclusion zones, or aerial imagery, you can bring that same data into Aphex. The ArcGIS integration allows you to overlay live GIS layers directly onto your Map, so that short-term planning happens with real site context in view.
This guide walks you through how to connect your ArcGIS account, find the correct URL for your layer, add it to your project in Aphex, and manage the integration moving forward.
Aphex supports a range of commonly used ArcGIS layer types. Here’s what you can connect and display in your project. We’ll keep this list updated as more are added:
Feature Layers
Map Image Layers
A User's Profile stores information that makes your identity on Aphex unique, and keeps your Account secure:
If ACME had a separate organisation for their Special Projects division, users working in both the main organisation and Special Projects would require seats in each
Admins & Owners
Editing Task Status is restricted to Admins and Task Owners
Admins, Owners & Assignees
Editing Task Status is available to Admins, Task Owners & Task Assignees
False
Project Members cannot regress Task Status. Only Project Admins can. E.g Planned ← Promised or Done Promised ← Done
All Project Members
Creating and Managing Folders can be done by Admins and Members
False
Members cannot create Root Folders. (Subfolders can still be created)
All Project Members
Creating and Managing Blockers can be done by Admins and Members
All Project Members
Creating and Managing Tags can be done by Admins and Members
Total Project Utilisation
The daily allocation of the Resource
Blockers
Any overdue Blockers within the lookahead period
Missing Data
Any tasks missing Publication Requirements set on the publication routine that are within the lookahead period
Multi-Select


The Owner has full permissions on the Task. They can edit, delete update progress, resolve clashes and mark it as Ready.
As the Owner, you're accountable for making sure your Tasks meet the standards for being included in the next Published Version.
By default, Task Bar colour is tied to it's Owner's user colour, unless custom colouring has been applied to your View
Tasks can be grouped by Owner across all View types
Adding someone as an Assignee also adds that Task to their daily Task List.
You can assign someone to a Parent Task or Package. They're automatically assigned to all Tasks underneath.
Adding someone to a Team won't let them edit more Tasks
Assignee
Is Is Not Is Empty Is Not Empty
Multi-Select from the Project User list, Teams or Me (dynamic - will always show Tasks assigned to the logged in user)
Owner
Is Is Not

Single-Select from the Project User list, Teams or Me (dynamic - will always show Tasks owned by the logged in user)
Attempting to set the Duration to 0 will also trigger the Convert to Milestone flow
You can convert a Milestone back into a Task or Subtask at any time
Target Dates will show red if:
The Milestone End Date is after the Target Date
On the Gantt, a Variance Number will show how many days the Milestone has slipped or improved by
Target Date Icons & Variance update in real time as changes are made to the plan
Behind Target: the end date has passed the Target Date
No Target: no Target Date has been set
You can also group by Owner, Subcontractor, Folder, or Package. Sort By: Controls the order Milestones appear within each group. Sort by date or variance, in ascending or descending order. Spotlight Milestones with Variance: When toggled on, this highlights Milestones that have slipped or improved. You can choose to spotlight just slippage, just improvements, or both. Your configuration is saved automatically per user, so the panel will remember your preferences next time.
Milestones
Is True Is False

Multi-Select
Packages are seperate from the Folder structure - assigning a Package does not change where the Task sits in the WBS
Each Package has a Name and an automagically generated Code to help distinguish between similarly named Packages
Archived Packages will no longer be available to add to tasks but will still exist on tasks it was assigned to before the Package was archived
User-selected colour to represent the Package
Owner
User that is accountable for the Package
Start
Start date of the first Task within the Package
End
End date of the last Task within the Package
Assigned to
User(s) that have been assigned to all Tasks inside the Package
Notes
Additional text notes that can be attached the Package
Comments
Thread of communications on the Package
Documents
Documents that have been uploaded and attached to the Package
Name
Descriptive name given to the Package
Package
Is Is Not Is Empty Is Not Empty


Package Tag Colour
Multi-Select
Task ID
2IPGEecKYBdwrpxcwXCX
Task Name
Build Wall
Start
2022-06-13 00:00:00+00:00
End
2022-06-14 00:00:00+00:00
Duration
2
Shift
day
Owner Display Name
Bruce Wayne
Owner Email
Subcontractor
Batman Ltd
WBS Path
12.2.3
WBS Name
Factories
External ID
Aiw9123
Package Code
W-203
Package Name
Internals
Task ID
2IPGEecKYBdwrpxcwXCX
Key Task
False
Status
Planned
Notes
Crane access at 10AM
Fair Use Policy: The API endpoint is designed to support periodic (usually weekly) requests from projects. Use of the service outside that threatens the availability of the service for other projects could result in a suspension of the service for the offending project.
Work Area ID
HEntifOafSu297hg3oj8.2IPGEecKYBdwrpxcwXCX
Location Name
Main Site
Location Type
Map Space
https://app.aphex.co/work-areas/v1/<your_api_account_id>https://app.aphex.co/work-areas/v1/<your_api_account_id>/t/<your_token>Click the Resources Configuration icon to switch between Tasks in View and Project Utilisation
Hover over the daily quantity value to see the daily breakdown
Is Not EmptySelect your desired Subcontractor in the third dropdown
Subcontractors are a single-select property
Subcontractor acts as a tag to show which company is delivering the work - it’s not a permission-setting field. If you want someone from that company to be able to update progress or edit the Task, add them as an Assignee or an Owner.
Tasks can be coloured by or grouped by Subcontractor across all View types
Archived Subcontractors will no longer be available to add to tasks but will still exist on tasks it was assigned to before the resource was archived
On hover, the daily breakdown includes:
# of Tasks
Number of Tasks in your current View assigned to that Subcontractor on the selected day (respects filters)
# no of Project Tasks
Number of Project-wide Tasks using assigned to that Subcontractor on the selected day (ignores filters)
Task Owner Breakdown
Lists each Task Owner contributing to Project usage
Includes Task Count and percentage of total utilisation for that day
Cell shading
Darker = higher quantity
Lighter - lower quantity
Scale is relative to the values shown in the current overlay
Quantity values are only shown in Day View
In Week, Month or Year mode, cell shading remains but numeric values are hidden


All Layers
Includes all sublayers and automatically connects to new sublayers
Custom Selection
Choose which sublayers you want included - selected sublayers will update automatically, but new sublayers require manual selection
*Temporal order is inferred from the layer order (bottom = oldest, top = newest) as dates aren’t always available
Sublayers that were not successfully connected will display a icon next to the sublayer name - please check your source Layer service for more information.


On the current Target and is in accordance with the daily forecast rate
Under the current target and could mean the duration of the task can be shortened
Over the current target rate and could mean reforecasting is needed
Production
Is Is Not Is Empty Is Not Empty


Multi-Select
Tile Layers (Raster and Vector)To connect a layer to Aphex, you’ll need the page URL from the ArcGIS Item Details page. This makes sure the layer metadata and access permissions load correctly.
Login to your ArcGIS instance
Navigate to the layer you want to connect to your Aphex Project
Make sure the layer is one of the supported layer types
Click into the layer to open the Item Details Page
Copy the URL from your browser’s address bar - this is the URL you’ll use in Aphex
The ArcGIS Item Details URL will commonly appear in a format similar to the below;
You can connect your ArcGIS account to Aphex using either your ArcGIS login credentials or a registered app. Once linked, you’ll be able to access and validate layers tied to your connected ArcGIS account.
Open your Aphex Project
Click your Project Title in the top left then select Integrations
Scroll to the Mapping Connection section
Click and select from:
Registered User
Registered App (Client ID and Client Secret - OAuth2)
Select
Once you’ve got your Layer URL handy, you can plug it into any real-world Location in your Project. After connecting it, set a Layer Policy to control exactly which sublayers show up in Aphex, keeping things neat and relevant for your team.
Aphex will then automatically pull through any updates from ArcGIS, so your map stays fresh without you needing to re-upload or re-import a thing.
Both private and public layer sources from ESRI ArcGIS can be used as a canvas for mapping in Aphex. Each Aphex Location will accept up to 20 different layer connections.
Visit our Add Map Layers doc for step by step instructions on how to add layers to the Map and define a layer policy.
Aphex supports layers being connected from any ArcGIS service (Online or Enterprise); however, there are some common things to validate if you experience issues;
Check that the ArcGIS user or app you’re using has permission to view the layer. Try logging into ArcGIS directly and opening the layer using the same credentials - if it works there, it should work in Aphex.
By default, ArcGIS allows CORS - meaning external services like Aphex can, with the appropriate credentials, view resources such as layers. However, some GIS administrators may disallow this feature as an added security feature.
If you find that a layer connects successfully, but no data is visible on the map, it may be a result of the ArcGIS CORS policy at your company.
ArcGIS supports CORS access enabled, disabled, or disabled with exceptions. Therefore you can either ask your GIS administrator to return the CORS policy to default enabled or to add the following domains as CORS exceptions;
https://app.aphex.co
https://dev.aphex.co
For guides on adjusting the ArcGIS CORS policy, please refer to the ArcGIS Help Guide here.
Make sure you're using the Item Details page URL (not the direct tile or REST endpoint). Only supported layer types (listed above) will load.
Aphex is designed to be as fast and lightweight as possible for users who could be accessing their project on poor connections or underpowered devices.
ArcGIS, however, is a powerful GIS service that allows its customers to create immense geographical datasets.
Connecting an ArcGIS layer to Aphex will allow that layer to be loaded to an almost identical way to the way that layer is loaded from ESRI services.
To keep load times as short as possible, each sublayer within a layer can be set to Hide or Show, depending on the context needed at the time.
There is currently a limit of 42 sublayers per layer - any sublayers that attempt to load past this amount will not render.
Therefore, teams creating layers for use in Aphex should seek to balance information and end-user performance. The more data that is included in a layer, the longer it will take to load for everyone.
For ArcGIS Map Service Layers (Raster Tile Layers & Map Image Layers) you have the ability to change the request mode, once the Layer has been connected to your Aphex Location, to reduce server requests.
Open your Aphex Project
Click your Project Title in the top left then select Locations
Locate your Layer and click ...
Select View Summary and scroll to the Minimise Server Requests section. Make a choice between:
Optimised (default)
Reduce Server Requests
Click
This mode is set on a layer-by-layer basis.
Things to know before you get started:
This feature is available on Pro+ or Enterprise plans
You need to be a Project Admin to set up the integration
Aphex supports layers being connected from any ArcGIS service (Online or Enterprise)


https://<your-source>.maps.arcgis.com/home/item.html?id=<id>You can connect private ArcGIS layers to Aphex using either a registered user account or a registered app (OAuth2.0). Both options work, but the app connection is more flexible if you're managing access across multiple projects.
Using a registered app allows you to control exactly which layers projects can access, without relying on a single user having access to everything. This is especially useful if your Organisation needs to manage permissions per project or restrict access to sensitive layers.
With a registered user, that user account must have access to every layer being connected - which can get messy across teams or projects. Apps make it easier to scale securely.
If you are using a Registered User account for access, you can test the access level of that account by simply logging into your ESRI/ArcGIS account and attempting to open the layer you want to integrate. If you can open a layer in ArcGIS, your account has permission to view it.
Error inside the Add Layer window:
"Url Error - Please check the url is correct and that the server is configured to allow requests from app.aphex.co"
Error inside the Browser Developer Console:
Access to '<layer url>' from origin 'https://app.aphex.co' has been blocked by CORS policy: No 'Access-Control-Allow-Origin' header is present on the requested resource.
In general, Aphex should take as long to load a layer as it takes ArcGIS to load the same layer. You can test the expected load time for your users by opening a layer natively in ArcGIS first.
The default colour of the User's Task Bars and Work Areas.
First / Last Name
User's chosen First and Last Name
User's email address attached to their Aphex account. This cannot be modified.
You can change your date range within Aphex to these two types :
ISO 8601
DD/MM/YYYY
UK, Europe, Australia, New Zealand
Middle Endian
MM/DD/YYYY
America & Canada
You can change the scale and spacing of Tasks on the Gantt.
There are three options:
Comfy
Large row height and text - fewer tasks and more space
Default
The default row height
Compact
Smaller row height and text - fits more work on the page
Your selected Gantt scale will apply to all Projects that you view in planner, it does not change the Gantt scale for other users on the Project.
To add an extra layer of protection to an Aphex account, each User has the ability to enable on Multi Factor Authentication (also known as 2FA).
This feature is available for all Users on all Aphex Subscriptions and can easily be set in the Account & Preferences menu.
Accessible from the Security Menu, the following options are available to configure for MFA:
Authenticator App (like Google Authenticator)
Users can control exactly what notifications they will receive via email, and find a feed of all their notifications in-app.
Each notification will include a unique link taking users where they are needed.
Mentioned in a comment or note
You were mentioned in a comment or note by other user
Yes
Yes
* X represents the number of hours chosen for the reminder in Notification Preferences.
Version Published notifications will only be triggered if the Publishing User elects to send a notification to Project Users.
Users are able to unsubscribe from specific notifications and mute notifications from individual Projects in the Notifications Preferences section under User Settings.
Avatar
An uploaded image of the User's choice. Will appear next to their work in the Plan.
User Colour
Promised
Task Bar Visualisation
Done
Task Bar Visualisation
Planned
Task Bar Visualisation
Multi-Select
Who can use this feature?
Project Users with Full Planner Access can create and open Map Views.
Map View gives you a visual way to track work on site. Use it for daily coordination, spotting clashes, creating automatic staging diagrams, or to walk others through what’s happening; where, when & who. Maps can be simple floor plans or real-world maps with coordinates, and can connect to external layers like GIS data or drone imagery.
Every Task on the Map is tied to the schedule, so when the plan moves, the Map automatically updates too.
Each Project can have multiple Maps. From static Site GAs to geolocated Maps - pick the one you want to view and work with. You'll only see Tasks linked to that Map.
Click + Views at the top of the View Tabs
Scroll through Views you & your team have created, or Views Aphex has provided
Open any Map View
Open any Map View
In the top left, open the Map Selector
Click into the Map you want to open
See: and
Use the Date Picker to show what's happening on site for a certain day, week, month or custom range.
Click the Date Range at the top of the Map
Pick one of the shortcuts: Today, Next Week, This Month or use the calendar to select a specific date range
Use the <
The Task List on Map Views can be organised into different groups, depending on what type of set up you need.
Click at the top of the Map View
Select how you want to group tasks
Clicking a task on the Map will open its full details in a panel, right on top of the Map. You can view, update or progress the Task without moving away from your current view.
Click any Task Card from the section on the left hand-side
Or, click the Work Area on the Map and then the icon
The Task Panel will open
Click the Work Area on the Map to open the Task Preview
Click any of the Progress Bars, underneath any of the current or past Task Days
Select or
See also:
You can toggle external map layers on or off to bring in additional site context, like utilities, drone flyovers, or design information, without crowding the Map view when they’re not needed.
Open a Map View
Click into the tab in the left-hand panel
Use the to turn Layers on and off
Open a Map View
Click into the tab in the left-hand panel
Swap between Satellite, Street or None
See also:
You can change how Work Areas are colour-coded on the map to reflect what matters most during planning. Switch between colours for Task Owner, Subcontractor, or Shift, or choose to highlight Clashes and Overdue Blockers in red when you need to spot issues quickly.
Click and select Work Area Colour
Pick from Subcontractor, Owner or Shift
Click and select Highlight Issues
Pick from Clashes or Overdue Blockers
Filters in Aphex let you show only what matters, whether that’s Tasks with certain properties, or ones that are missing something. Keep it simple or build something more detailed, it's up to you.
Click at the top of the Map
In the dropdown that appears select and choose the property you'd like to filter by
Change the logic from options like or to or to hide or reveal the relevant Tasks
See also:
Markups turn the map into a richer planning surface where you can annotate visual context using polygons, arrows, text, and icons across named layers you can toggle on or off - ideal for traffic layouts, briefing notes, and risk callouts. Kept entirely separate from scheduled work, they never affect clashes, connected external layers, or work areas.
Open a Map View
Click into the tab in the left-hand panel
Click
Use the Editor menu to add polygons, arrows, text or icons to your layer
If you want to add more mark-ups later, just click the Layer title in the left-hand panel to bring up the Editor menu.
Who can use this feature?
Task Owners, Assignees and Admins can add Work Areas to tasks.
Clashes are visible to everyone on the Project. Admins and Task Owners can resolve Clashes.
Work Areas let you define the physical space each Task needs to take place. Once a Task is assigned to a Location, you can draw its Work Area on the map. That shape stays linked to the Task and automatically updates as dates change - helping you communicate exactly where work is planned to happen.
Clashes are triggered when two tasks are scheduled to use the same space at the same time. If their Work Areas overlap and their dates intersect, a Clash is flagged - giving teams a chance to coordinate early and avoid planning conflicts on site.
To create a Work Area, open a Task and draw the shape directly on the Map.
On the Map, click the work area cell
Select the , or tool to draw a Work Area
Adjust the work area shape by dragging and dropping if needed, click on the fab to exit
On the Gantt, open the column picker and toggle Location and Work Area
Make sure the Task you want to mark up has the correct Location assigned
Double-click the Work Area cell to open the drawing window
You can easily add the same Work Area to multiple Tasks by copying and pasting from the Work Area column:
In the Work Area column, select the cell with the Work Area to copy and press CTRL + C on your keyboard
Select the Work Area cell of the desired Task and press CTRL + V to paste the Work Area
See also: open a
If a Task clashes with another, you’ll see it right away on the Gantt. Clashing Task Bars turn red instantly, and selecting a Task highlights which days are safe to move to, and which would still result in a clash.
Clashing Task Bars always appear red regardless of your settings or overlays
Single click a clashing Task Bar to see available dates on the Gantt
Aphex scans the full project and highlights cells behind the Task:
Open a Map View
Click
Select Highlight Issues
Tasks with Clashes will display this icon
The Clashing Tasks panel shows every active clash across your project. Filter by owner, location or date range, and resolve Clash pairs directly from the panel in both Gantt and Map views.
Click the Clashes Iconin panel toward the right of the Gantt
The Clashes Panel will open
Choose between Clashes , Non-Conflicting & For Review
See also:
Once you’ve identified a clash, there are a few ways to resolve it. You can adjust the Dates, Shift, or Work Areas of the Tasks involved, helping create clear separation in time or space. If the clash isn’t actually a problem, and both Tasks can go ahead as planned, you can mark them as non-conflicting.
Click the Clashes Iconin panel toward the right of the Gantt
Click and bulk select the pairs you want to resolve
Click
You can filter any view to show just the clashing Tasks. It’s useful for Task Owners working through their own issues, or for Reviewers/Admins checking the plan’s readiness across the project.
Click and
Select Issue in the first dropdown
Select from Is or Is Not in the second dropdown
Your Project comes with a pre-made Clashing Tasks View.
Click + Views within the open View Tabs
Select Clashing Tasks View
See also: create and share
Who can use this feature
Admins can create and manage Materials
All project users can add Materials to their Tasks and log actuals
Materials can be added to Tasks to forecast your daily resource demand and track planned vs actual quantities.
Creating Materials lets you build a reusable library of Materials to assign to Tasks.
Creating New Materials:
Click your Project Title in the top left, then select Project Assets
Select Materials from the menu
click
Create your custom Material resource by entering the name, unit, Material type and colour
The Material is added to the library of Materials the team can assign to their Tasks
Assigning Materials to tasks helps plan how much is needed for each one, making it easier to manage demand across your project.
To add Planned Materials to a task:
On the Gantt, navigate to the column picker and toggle Materials
Click the Material cell for your task & select Materials from the dropdown menu
See also:
When you add a planned Material, Aphex spreads the total amount across the Task’s planned days. If you expect to use more or less of a material on a certain day, you can adjust the daily quantity to match.
Double-click your task bar on the Gantt to open the right-hand panel
Scroll down to Planned Resources and click to expand your chosen Material
Click into the Quantity box and change the value
Material tracking doesn't just stop at forecasting demand. Use Actuals to log what was used each day, directly on the Task - giving you a clear picture of performance over time, and use the inputs to automatically generate planned vs actual quantity reports.
Adding Actuals to Tasks:
Double-click your task bar on the Gantt to open the right-hand panel
Scroll down to Actual Materials and click to expand your chosen Material
Click and select a planned material
Use the Resource Overlay in the Gantt to forecast Material demand day by day. You'll see how much of each Material is needed across the project, with a clear breakdown of which Tasks are driving that usage and who's using it.
View the Resource Overlay by Material:
Click and select Resources and click Material
Hover over the numbers to view your Total and Project Utilisation
See also:
Filter by Material to quickly review and manage work related to a particular Material items across your plan.
Click and
Select Material in the first dropdown
Select from Is, Is Not, Is Empty
See also: create & share
Once Materials have been assigned to Tasks, all updates (including Delays, On Track & Improvement events) can be traced back to each Subcontractor. This makes it easy to understand how each Subcontractor is performing across the project.
Connect your Project as a datasource for Power BI to report on Material Demand, and track Planned vs Actuals.
Utilise Aphex Insight to track Material Demand. See trends and drill down into specific Tasks to identify where each Material Resource is allocated.
See also:
Who can use this feature?
Project Admins can configure the publishing routine, publish the plan for the project and enable Share to Web.
All Project users can open Published Versions, and copy the public URL.
Publishing takes a snapshot of your plan at a specific moment. It’s great for sharing, keeping the team aligned, or using as a baseline to compare progress.
Creating a publication routine lets you set recurring deadlines for task updates, helping keep the whole project team aligned and on track.
Setup a Publishing Routine:
Click your Project Title in the top left and select Publishing
Click the settings icon in the top right
Configure the Publishing Routine by setting a Lookahead Period, Publication Frequency, and Publication Requirements
Before publishing, check that your team has updated their part of the plan and that there are no outstanding issues. When you're ready, just hit ‘Publish’, you can do this anytime, even if some team members haven’t marked their work as ready.
Check the Plan:
Click your Project Title in the top left and select Publishing
Click into the Next Scheduled Publication
Check the user table to see if the team have readied/reviewed their plan, if they have any Clashes, Overdue Blockers or Missing Data
See also:
Once you're happy with the plan, Publishing takes a snapshot of it at that exact moment in time. Published Versions are shared with everyone on the project and stored as a historical record - capturing how the plan looked, week by week.
How to Publish the Plan:
Click your Project Title in the top left and select Publishing
Click into the next scheduled publication
Select Publish in the top right
During the Publishing process, Automations let you optionally set historic tasks to ‘Done’, locking them in place or mark Tasks within a set window as ‘Promised’. A Promised Line will appear on the Gantt to show where commitments end, helping track delays and their impacts.
To Mark Historic Tasks as Done:
Open your upcoming Published Version and click
Toggle Set Historic Tasks to Done
To set a Promised Period:
Open your upcoming Published Version and click
Toggle Promise Tasks
Pick a date for the Promised Period to end
To send a notification:
Open your upcoming Published Version and click
Toggle Send Notification
See also:
Compare the live plan with any Published Version to see how things have moved. Spot where Tasks have slipped or improved as the plan progresses.
Click at the top off the Gantt
To compare the Live Plan to a previous week, select Baseline
This will show a list of all Published Versions on the Project
Click at the top off the Gantt
Toggle Baseline
You can open any historical Published Version to view the full plan exactly as it was at the time of publish. It’s fully interactive so you can use filters, open Task Details, view the Map - just like the live plan. The only difference is that everything is read-only, like an interactive PDF.
Open a Published Version:
Click your Project Title in the top left and select Publishing
Locate the list of all Published Versions in your Project
Hover over an existing published version and click ...
See also:
Published Versions can be Shared to Web to allow anyone (including non-Aphex users) to view the plan.
Enable sharing:
Click your Project Title in the top left and select Publishing
Locate the list of all Published Versions in your Project
Hover over an existing published version and click ...
A Task in Aphex is more than just a name and a date - this doc breaks down the core elements that make each Task functional, and who has the permission to edit them.
Tasks properties are the details and metadata that can be assigned to Tasks.
Blockers help you surface, monitor & resolve anything that needs to happen before a Task can start (or finish). Use them to stay on top of permits and sign-offs to stop delays before they occur. Add due dates, get visibility on what’s overdue, and tick things off once they’re sorted.
Set up a library of Blockers that can be used across the Project. Give each Blocker a name, category, and an optional due date rule so deadlines stay in sync automatically as the plan evolves.
Click your Project Title in the top left, then select Project Assets
In addition to our built in reporting app, Aphex Insight we also provide an integration with Power BI so that teams can customise their reports and hunt for insight.
In this guide we will go through the key steps to start analysing your data in Power BI. Where necessary we will include links to more advanced features throughout.
The Power BI Integration is enabled at a project level so that every team has control over who can access their data. To start, head to your project in Aphex Planner and locate the Integrations page.
Open your project
Progress Updates can be recorded to represent any delays and improvements made to a Task over time. As the plan progresses the team can log updates to keep the plan accurate and allow for a deeper understanding of the leading causes of delay and who's responsible.
Delays can be added to any day of a Task to show it's no longer on track to finish as planned. Just hit the Thumbs Down, choose a Delay Reason, log the days of impact and add optional comments or photos. It'll update the schedule automatically ad start building your delay history. Delays can be added to a Task from anywhere in the project, but let's start by looking at recording a Delay from List View.
Open a List View
This Cookie Policy explains how Aphex (collectively "Aphex", "we", "us", and "ours"), use cookies and similar technologies to recognize you when you visit our websites, including without limitation , and help.aphex.co, and any related URLs, mobile or localized versions and related domains / sub-domains ("Websites"). It explains what these technologies are and why we use them, as well as the choices for how to control them.
We may process personal data about you when we use cookies or similar technologies, for example, your IP address, username, unique identifier, or an email address. Where we do so we will only process your personal data in compliance with our Privacy Policy.
Cookies are small data files that are placed on the browser on your computer or mobile device when you visit a website and use its functions, or use an app. Cookies are widely used by online service providers to facilitate and help to make the interaction with users faster and easier (by helping us to distinguish between you and other users and enabling us to retrieve things like your settings and preferences), as well as to provide reporting information and facilitate online advertising.
Comments on your Work
Another user commented on an owned or assigned Task
Yes
Yes
Delay or Improvement on your Work
Another user adds a Status on an owned or assigned Task
Yes
Yes
Ready Plan Reminder
You have work in the lookahead and Publication target is in X hours*
Yes
Yes
Review Plans Reminder
You are the Reviewer of a user that has work in the lookahead and Publication target is in X hours*
Yes
Yes
Upcoming Publishing Deadline
Publication target is in X hours*
Yes
Yes
Publish Plan Overdue Reminder
Publication target is exceeded by 24 hours
Yes
Yes
Version Published
A new version of the plan is published
Yes
Yes
Your Plan Unreadied
A change was made to your readied plan
Yes
Yes
Import Complete
A import is completed
No
Yes
New Work Assigned to You
New tasks enter your Backlog
Yes
Yes
Added to a Project or Organisation
You are added to a new Organisation or Project
Yes
No
Project Utilisation
The demand for your entire project
Hide Un-utilised resources
Removes resources that aren’t assigned to any Tasks from the resource list
Multi-Select

Add Subtasks
Update Task Links
Update Task Dates, Duration, Calendar and Shift
Update Task Blockers
Update Task Tags
Update Task Subcontractor, Labour, Plant and Materials
Update Task Location and Work Area
Update Task Parent
Update Package
Update Folder
Update External ID
Mark as Non-Conflicting
Convert to Milestone
Update Target Date
Update Task Owner
Update Task Assignees
Add Task Comment
Update Task Notes
Update Task Documents
Update Task Status
Update Material Actuals
Record Progress Update
Unique identifier automatically assigned to every Task in the plan. Non-editable.
Users who can help to edit and update a Task
Tick-off items that need to be completed before a task proceeds or finishes
Working and non-working days of a Task
Thread of communication on the Task, with @mentions of other users.
Documents that can be uploaded and attached to Tasks
Duration in working days. Minimum duration of 1 day.
End date
A custom unique identifier used to connect a task to an external plan, this commonly represents an Activity ID in a master schedule
Structure used to group and organise Tasks in the plan. Typically represents the Project WBS.
Human resources required to deliver the Task
Visual map of an on-site location of the Task, or description of the off-site location
Material resources required to deliver the Task
Name given to the Task
Additional notes that can be attached to Tasks
User responsible for the Task
Custom way of grouping related Tasks in the plan
Parent Task of a Subtask
Equipment and machinery required to deliver the Task
Predecessors and Successors. Relationships can exist between Tasks in the form of Logic Links
Used to label if work is scheduled during the Day, Afternoon, Night or All.
Start date
Subcontractor responsible for delivering the Task
The overall state of a Task
Custom labels used to group, filter, or track tasks across your Project
Milestone Target Date
Physical location of a Task on-site, marked-up on a Map
Delete Task
Duplicate Task
Designs, utilities, alignments. Anything that is suited to a feature layer will perform well in Aphex as a Map Image.
Tile Users
Drone or other aerial imagery are often already stored as tile layers and perform well. If your company's ESRI account doesn't support this, Map Image will work, too.
Server Selection: If your company can publish layers to an Enterprise or ArcGIS online server, there is usually a performance difference across those. Whichever is faster for loading layers in the ESRI service will be faster in Aphex.


Map Image Layers


>Hold SHIFT then Click to turn multiple on and off at once
Use theto turn Layers on and off
Markup layer order is user-specific and isn't saved as part of the view definition
There is no limit on how many can be created
Once created, markups are available to the whole project (they're not personal/private)
Markups are attached to the location, not the view
Markups are not linked to a task


Select the pen tool to draw a Work Area and click to mark each corner of the shape - no need to click and drag
Once the shape is complete, the cell will show that a Work Area has been added
The task can now be viewed on the Map
Red = moving here would still cause a clashBlue = safe to move, no clash detected
ClashesTasks with clashes will have their Work Areas shown in red
Select Clash in the third dropdown
Tip!
If you have multiple Tasks in a row that need the same Work Area:
Hold SHIFT between selecting the top and bottom cell to highlight everything in between, then CTRL + V will paste the Work Area into all of the Tasks at once
Each task can have only one Work Area
To represent multiple areas, break the task into subtasks and assign a different Work Area to each
Work Areas must be complete shapes
You’ll need to draw a closed polygon, open shapes aren’t supported
Snapping helps prevent accidental clashes
While drawing, your cursor will snap near the edges of existing shapes (but never directly on top) to help avoid overlap
You can use drawing tools like pen, rectangle, or circle to mark up the shape
Use the hand tool to pan around the map
Zoom controls help you focus on the right area before you start drawing
To edit a Work Area, just open it and drag the points to adjust the shape
To remove a Work Area, right-click the cell and select Clear
If no Work Area is needed, you can set the cell to No Work Area Required
This completes the field without drawing anything on the map
Use the config icon in the top-right of the panel to adjust what you see. Filters apply across all three tabs simultaneously and are saved per user
For review shows your personal inbox for incoming non-conflicting requests from other Task Owners. Only shows requests relevant to your Tasks. Admins have no visibility of all requests.
You are able to revert clashes that have been marked as non conflicting
Permissions:
Admins can mark any Clash as Non-Conflicting
Users who are Owners or of both clashing Tasks or or owns one task and the other is owned by an Admin or Task Delegate can mark their own Clashes as Non-Conflicting
Users who are Owners of one clashing task can request to mark a Clash as Non-Conflicting
Users who are Owners of one clashing task and are a Task Delegate of the other task can mark their own Clashes as Non-Conflicting
What happens when a clash is marked as Non-Conflicting:
The two Tasks are permanently linked as non-conflicting
Even if the Dates or Work Areas change in the future, they will not trigger a clash again


Click the Resources Configuration icon to switch between Tasks in View and Project Utilisation
Hover over to see the daily breakdown
Is Not EmptySelect your desired Material item in the third dropdown
Materials are a multi-select property
A Quantity of the Material can be inputted when adding Materials to tasks
Quantities are applied per day
The unit quantity is split across the task's duration
Archived Material resources will no longer be available to add to tasks but will still exist on tasks it was assigned to before the resource was archived
On hover, the daily breakdown includes:
Utilisation
Quantity of Material used by Tasks in your current View (respects filters)
# of Tasks
Number of Tasks in your current View using that Material on the selected day (respects filters)
Project Utilisation
Total quantity used across the entire project (ignores filters)
# no of Project Tasks
Number of Project-wide Tasks using that material on the selected day (ignores filters)
Task Owner Breakdown
Lists each Task Owner contributing to Project usage
Includes Task Count and percentage of total utilisation for that day and Material
Cell shading
Darker = higher quantity
Lighter - lower quantity
Scale is relative to the values shown in the current overlay
Quantity values are only shown in Day View
In Week, Month or Year mode, cell shading remains but numeric values are hidden


Decide if you're happy to Publish or if more updates are needed first
A menu will appear with a summary of the data you're about to Publish
Select when you're ready to create the weekly version
Select View Version
Toggle on Share to Web
Optionally toggle Include Baselines or Include Progress Updates
Copy the URL and share with anyone
Setting a Publication Frequency triggers notifications to all Task Owners that they need to Ready their plan before the deadline each week
Adds a Due Date above the Gantt, counting down till when you're expecting to create the next Published Version
Teams typically set the Publishing Frequency to align with their weekly planning meetings. E.G if your Lookahead meeting is on a Friday, set the Publishing Deadline for Thursday at 5pm so you can ensure all Task Owners have updated their plans ahead of the meeting, and so that you can create the offical weekly Publish in time for the session
Published Versions include all project data, not just the lookahead or Made Ready tasks.
You can publish at any time, even if teams haven’t marked their work as ready or it’s not the Target Date.
Versions are created manually; they won’t be published automatically on the Target Date.
Each version is numbered by default (e.g. Published Version 1), but you can rename them at any time.
Creating a Version adds it as a historical record within the Project.


Select Blockers from the menu
Click
Configure your Blocker by entering a name, selecting a category, choosing a colour & setting an optional Automated Due Date
The Blocker is added to the library of Blockers the team can assign to their Tasks
One or more Blockers can be assigned to a Task at any time.
To assign Blockers:
On the Gantt, use the Column Picker to enable the Blockers column
Click the Blocker cell for your Task and choose a Blocker type from the dropdown
The Blocker will be added to the Task with a status of Open or Overdue depending on its Due Date settings
To override or reset the Due Date:
On the Gantt, use the Column Picker to enable the Blockers column
Click into the Blocker cell
Select the ... next to the relevant Blocker
Select Set Due Date
Pick a new Due Date from the calendar, or select Reset Due Date to re-apply the Blocker Due Date rule to the Task
See also: Bulk Edits
Overdue Blockers are the early warning signs of delay. Whether you're clearing your own list or reviewing risk across the plan, it's easy to surface overdue Blockers and get ahead of what's slipping.
To see Overdue Blockers from the Gantt:
On the Gantt, open the menu in the top right
Toggle Show Overdue Blockers
Task Bars with Overdue Blockers will now be marked with an next to them
Click the icon to open the Blockers Panel
A list of all Overdue Blockers and associated Tasks will appear
Overdue Blockers form part of an owner’s Unresolved Issues - items they need to clear before Making Ready, ahead of the weekly Published Version deadline.
See also: Make Ready
Mark a Blocker as Resolved so your team knows that it has been actioned.
Navigate to the Blocker Task Cell or double click on the Task Gantt bar to open it
Click the next to the Blocker to Resolve it
A date stamp is added to the Task history to indicate when it was marked as Resolved
The Blockers Panel gives you a focused view of everything that’s overdue or upcoming. Filter to see just your own Blockers or the full Project list. You’ll see due dates, task names, and a live view of anything at risk of causing delays - with quick access to resolve things as they’re sorted.
Open the right hand panel
Click the icon to open the Blockers Panel
Blockers will be listed and grouped by Blocker Type
Click the to resolve a Blocker directly from the list
Use the to choose which Blockers to display
Change the Owner dropdown from My Tasks to All Tasks to view Blockers across the entire project
Toggle Overdue Blockers only on or off to switch between seeing just overdue Blockers or all open and overdue Blockers for Tasks in your current view
See also: Export Blockers
Switch to Summary Mode to get a traffic-light view of each Task. Strip all the Blocker information back to just see a quick count of Blockers, colour coded by status.
Turn on Summarise Blockers from Board:
On Board, open the menu
Locate Blockers and select the >
Toggle Summarise Blockers
See the Blockers Summary for each Task
Turn on Summarise Blockers from the Gantt:
On the Gantt, use the Column Picker to enable the Blockers column
Hover over the column name & click the ...
Toggle Summarise Blockers
See the Blockers Summary for each Task
Filter by Blocker type to focus on Tasks needing a specific permit or sign-off, or by Blocker Status to see what’s still Open, Overdue, or Resolved.
Click and
Select Blockers in the first dropdown
Select from Is, Is Not, Is Empty or Is Not Empty
Select your desired Blocker Type in the third dropdown
To Filter by Blocker Status:
Click and
Select Blocker Status in the first dropdown
Select from Is or Is Not
Pick from Open, Overdue or Resolved in the third dropdown
See also: create & share Views
Who can use this feature?
Task Owners, Assignees and Admins can add Blockers to their Tasks, and Resolve Blockers.
All Project members can Create & Manage the Blockers Library by default. This can be changed to Admins only in the Project Settings.

Click your project title in the top left and select Integrations from the menu
Locate the Power BI section and toggle Enable Source
Once you've enabled the Power BI source, you’ll be able to copy your project's unique URL endpoint.
To keep your data secure, the endpoint won’t return any data unless the request includes a valid token. The token is shown once only, so be sure to copy it before closing the window. If it expires or you forget to save it, you can generate a new one at any time.
On the Integrations page, click + Generate New Token
Give your token a name so that people know what it's being used for
Click Generate Token
Select Copy Token
Click Done to close the window
Next up: pick a template. We’ve created a set of ready-to-use Power BI dashboards so you don’t have to build your own from scratch. Choose one that fits your reporting needs, then you’ll be ready to connect your project data.
Visit Aphex's Resource Hub
Pick a Template
Enter in your details & email
Open the email and click the download link
A PBIT file will download to your device
Download a Template or build your own using the API Reference Doc
Next step: open your template Before the template can show anything, it needs to connect to your project. This is where you plug in the values you saved earlier and let Power BI load your project data into the report.
Open the PBIT file in Power BI Desktop
You’ll be prompted to enter three values:
Project API URL
Token
Project Name (this is just for display inside the report)
Click Load
Power BI will securely request your project data and load it into the report
With your data loaded, the dashboard is ready to use. If you’re familiar with Power BI, you can tweak visuals, add filters, or expand the reports to fit your project’s workflow.
Most connection issues come down to one of a few predictable causes. This section walks through the ones we see most often and how to fix them.
When Power BI prompts you with the Access Web Content window, make sure Anonymous is selected.
This is important because the API uses your token for authentication - selecting any other method (like Windows or Organizational Account) will block the connection.
In the Access Web Content window, select Anonymous
Make sure no other method is selected, and that no other information has been entered into the window (like Web API Key, or Organizational Account)
You may also need to ensure the Privacy Level is set to None or Public to avoid errors when refreshing
Open the template
Click Transform Data
Select Data Source Settings
Click Edit Permissions at the bottom of the window
Make sure that Credentials match:
Type: Anonymous
Privacy Level: None
If needed, select Edit to open the Access Web Content window
By default, your request will return data from the 5 most recent Published Versions. If your project’s dataset is too large, the connection may fail to load. Unless you're on an Enterprise plan, the API response must be under 32MB. You can reduce the amount of data being returned by using query parameters to limit the response size.
Read more about query parameters in our API Reference Doc
Bearer tokens used for the Power BI integration are valid for 90 days. After that, the connection will stop working until you generate a new token.
If your token has expired, simply return to the project’s Integrations page, revoke the old token, and generate a new one. You’ll need to re-enter the new token into your report to restore the connection.
Generate a new Token from inside your Aphex Project
Open your template in Power BI
Click Transform Data then Edit Parameters
Select Edit Token
Delete your old token and add your new one, then select Save
You may need to Reload Data
Once your report is connected, you can configure scheduled refresh in Power BI to keep your data up to date automatically.
We suggest setting the refresh to run a few hours (or the day after) your team typically creates the weekly Published Version in Aphex. That way, your dashboard will always reflect the latest plan, without any manual updates.
Publish your report to Power BI Service
In Power BI Desktop, go to File → Publish → My Workspace (or your team’s shared workspace).
Open dataset settings
In Power BI Service, go to your workspace → Datasets tab.
Find the dataset linked to your Aphex report and click the More Options (⋯) → Settings
Set authentication method to Anonymous
Under Data source credentials, confirm that the method is set to Anonymous.
Also check that Privacy Level is set to
Enable “Skip test connection”
To avoid false errors during refresh setup, make sure to enable “Skip test connection”.
This setting tells Power BI not to validate the connection in advance, which is fine, because the bearer token is already embedded in the query.
Set up scheduled refresh
Expand the Scheduled refresh section and turn it on:
Choose daily or weekly refresh
Save your changes
Your dashboard will now stay in sync with the latest Published Plan - no manual exports or updates needed.
Visit the Microsoft Documentation to learn more about
Things to know before you get started:
You will need the Desktop Power BI application downloaded onto your device.
You must be a Project Admin to set up the integration.

Authentication Power BI connects using two parts: a project-specific URL and a bearer token. The token acts like a secure key - it proves that the request is allowed to access the data behind the URL.
Expiry Tokens expire automatically after 90 days, or can be manually revoked at any time from the project’s Integration settings.
Multiple tokens supported You can create as many tokens as you need - useful if you’re connecting different tools or templates.
Naming tokens Each token must be given a name when created. This helps you track where it’s being used (e.g. “PPC Dashboard” or “Client Reporting Suite”).
If you receive a warning about installing the latest version of Power BI Desktop you can most likely continue on without issue (although updating your software is usually a good idea!)
Ensure your token is valid, and that you've copied the Project API URL correctly
Access Web Content Prompt When Power BI prompts you with the Access Web Content window, it’s asking how to authenticate your connection to the API.
Got a great report template? Why not give back to the Aphex Community and share it with us
“The 'Authorization' header is only supported when connecting anonymously.”
These headers can be used with all authentication types: Accept, Accept-Charset, Accept-Encoding, etc.
This means Power BI tried to connect using an authentication method that doesn’t support your bearer token (such as Windows or Organizational Account).
Configure your delay by selecting a Delay Reason, impact type, days of impact, comments, images and record date
Use the Thumbs Up to mark a Task as On Schedule. You can log that work went ahead as planned or even ahead of schedule, and optionally pull the end date in if things are moving faster than expected. Improvements can be added to a Task from anywhere in the project, but let's start by looking at recording one from List View.
Open a List View
Click on the Task card
Configure your On Schedule or Shorten event by selecting an impact type, days of impact, comments, images and record date
Changing the dates of a Promised Task will automatically trigger a Progress Update. Changing the dates of Promised Tasks in a chain will trigger an option to apply Progress Updates to other Tasks that are Promised in the chain.
Update the end of a Promised Task
Configure your Delay by selecting a Delay Reason, impact type, days of impact, comments, images and record date
If you have additional Promised Successors, choose Yes to apply the same delay to the linked Tasks
Select No to only apply the delay to the specific Task you edited
See also: Promised Tasks
When a Progress Update is added, the Task Colour for that day will change to show the Progress Update added for that day. Red represents a Delay and green represents On Track or Shortened.
Open
Make sure that Show Progress Updates is enabled
Days with delays turn red
Days that are On Track or Improved turn green
The Net Delay Number is shown as a on the end of the Task Bar
Each Task keeps a running record of delays, improvements and updates - including who made the change, when it was logged and what the impact was.
Right Click a Task and select View Details
Click the icon to open the Activity Log
See a chronological list of all Delays and Improvements added to the Task over time
See also: Activity Log
If a delay or improvement was logged by mistake, it can be removed from the Task. The original event itself will still be visible in the Task's activity log as a past record, but the delay & impact will not count on the Task any longer.
Open the Task in the right-hand panel and click
Hover over the Progress Update and click the ...
Click Delete
Creating Delay Reasons lets you build a reusable library of Delay Reasons to add when adding a delay to Tasks.
Open the Delay Reasons page, then click
Create your custom Delay Reason by entering a name and selecting a category
Once Delays have been logged, you can filter any View to show Tasks impacted by specific Delay Reasons - or simply highlight all Tasks that have recieved any Delay at all.
Click and
Select Delay Reason in the first dropdown
Select from Is, Is Not, Is Empty and Is Not Empty in the second dropdown
Select your desired Delay Reason in the third dropdown
See also: create & share Views
As the team starts to record delays against Tasks, all updates (including Delays, On Track & Improvement events) can be traced back to the responsible Task Owner or Subcontractor. This makes it easy to understand how all parties are performing across the project.
User Power BI to build custom reporting on delays and performance, based on data in your weekly Published Versions. Aphex provides free templates as a starting point but everything can be customised to suit your project reporting requirements.
Utilise Aphex Insight to track Delay Concentration by Delay Reason. See trends and drill down into specific Tasks to identify which Delay Reason has the highest delay concentration.
See also: Connect to Power BI
Who can use this feature?
Admins, Task Owners and Assignees can add Progress Updates to Tasks.
Cookies set by Aphex on the Websites are called "first party cookies". Cookies on the Websites set by parties other than Aphex are called "third party cookies". Third party cookies enable third party features or functionality to be provided on or through the Websites (e.g. advertising, interactive content and analytics).
We use first party and/or third party cookies on our Websites for various purposes such as:
to facilitate the operation and functionality of our Websites;
to improve your experience of our Websites and make navigating around them quicker and easier;
to allow us to make a bespoke user experience for you and for us to understand what is useful or of interest to you;
to analyze how our Websites are used and how best we can customize them;
to identify future prospects and personalize marketing and sales interactions with them;
We use the following types of cookies in our Websites:
We use essential cookies to make our Websites work. These cookies are strictly necessary to enable core functionality such as security, network management, your cookie preferences and accessibility. Without them you wouldn't be able to use basic services. You may disable these by changing your browser settings, but this may affect how the Websites function.
These cookies are used to enhance the performance and functionality of our Websites but are non-essential to their use. However, without these cookies, certain functionality like videos may become unavailable or you would be required to enter your login details every time you visit the Websites as we would not be able to remember that you had logged in previously.
These account-based marketing cookies enable us to identify future prospects and personalize sales and marketing interactions with them.
These cookies collect information that is used to help us understand how our Websites are being used or how effective our marketing campaigns are, or to help us customize our Websites for you.
We use cookies served by Google Analytics to collect limited data directly from end-user browsers to enable us to better understand your use of our Websites. Further information on how Google collects and uses this data can be found at: https://www.google.com/policies/privacy/partners/. You can opt-out of all Google supported analytics on our Websites by visiting: https://tools.google.com/dlpage/gaoptout.
These cookies collect information over time about your online activity on the Websites and other online services to make online advertisements more relevant to you. This is known as interest-based advertising. They also perform functions like preventing the same ad from continuously reappearing and ensuring that ads are properly displayed for advertisers.
Here is a list of the cookies we use on our Website and why:
Essential and Performance Management
Aphex
In session service delivery critical tracking of events and state.
Wix
Cookies are not the only way to recognize or track visitors. We may use other, similar technologies from time to time, like web beacons (sometimes called "tracking pixels" or "clear gifs"). Their function is to provide us with statistical information about site traffic and how people navigate through our site, as well as to facilitate marketing and interest-based advertising. Web beacons are typically transparent graphic images placed on a site. Web beacons are used in combination with cookies to measure the actions of visitors on websites and so declining cookies will impair their functioning. We and our marketing and advertising partners may use web beacons to obtain information such as the URL of the page on which the beacon appears, the time the page containing the beacon was viewed, and the type of browser used to view the page.
We may also use web beacons in marketing emails sent by our system. If you receive the HTML formatted version of such emails and your email is configured to download images, a record of whether or not you open the email (and, if you open the email, how frequently you open it) will be saved with your subscriber history. Your engagement with the content of the communication (such as which links you click on) will also be recorded.
We also use caching and local storage in your browser to store personalization settings such as your language and which tabs you were last viewing inside our product. This allows us to enhance your experience and resume sessions where you left off.
We may use this information to give us an indication of the popularity of content and to help us make decisions about future content and formatting. We may also use the information to publish more content relevant to users in future issues and to unsubscribe recipients who haven't opened our emails for a period of time.
Some cookies that have been set on our Websites are not set on a first party basis by Aphex. The Websites can be embedded with content from third parties to serve advertising. These third party service providers may set their own cookies on your web browser. Third party service providers control many of the performance and functionality, advertising, marketing and analytics cookies described above. We do not control the use of these third party cookies as cookies can only be accessed by the third party that originally set them.
For a list of third party cookies used refer to the lists above.
You can set and change your preferences, at any time.
Wherever you're located you may also set your browser to block cookies and similar technologies, but this action may block our essential cookies and prevent our website from functioning properly, and you may not be able to fully utilize all of its features and services. You should also be aware that you may also lose some saved information (e.g. saved login details, site preferences) if you block cookies on your browser. Different browsers make different controls available to you. Disabling a cookie or category of cookie does not delete the cookie from your browser, you will need to do this yourself from within your browser, you should visit your browser's help menu for more information.
You can opt-out of interest-based advertising facilitated by the cookies on our Websites by opting out of advertising cookies. In addition, you can opt-out of interest-based advertising from participating members of the following advertising industry associations:
Digital Advertising Alliance (website ads) or youronlinechoices.com (if you are in Europe)
Not all companies that serve targeted ads participate in these opt-out programs, so even after opting-out, you may still receive some cookies and interest-based advertisements from other companies. If you opt-out of targeted ads, you will still see advertisements online but they may be less relevant to you.
You can also use your mobile device settings to limit use of the advertising ID associated with your mobile device for interest-based advertising purposes.
You will need to apply all of the settings described above on each device on which you want the settings to be applied.
We may update this Cookie Policy from time to time in order to reflect, for example, changes to the cookies we use or for other operational, legal or regulatory reasons. Please therefore re-visit this Cookie Policy regularly to stay informed about our use of cookies and related technologies.
The date at the top of this Cookie Policy indicates when it was last updated.
If you have any questions about our use of cookies or other technologies, please email us at [email protected].
Who can use this feature?
Project Users with Full Planner Access can create and open Board Views.
Board View gives you a whiteboard-style layout of your plan, powered by your lookahead. Drag and drop Tasks, record progress, and adjust your plan as work progresses - all changes update instantly across your schedule.
The date picker lets you choose how many weeks to display on the board, from one week up to four.
Click the date range
Select your preferred range at the top of the picker: 1 week, 2 week, 3 week or 4 week
Click any start date in the calendar, the end date calculates automatically
Use the arrow controls, zoom slider and scrubber to move through your timeline and adjust how much of your plan is visible at once
Click to move forward or backward by one week
Click to jump to the current period
Shows one week in detail
Shows two weeks for a broader view
The highlighted shows what’s currently visible
Drag the highlighted section to move through your plan
Board Views can be organised into different swim lanes, depending on what type of set up you need.
Click at the top of the Board View
Select how you want to group tasks
Use ⋮⋮ to drag your Groups in the order in which you want them to be displayed
Click the in the bottom left-hand corner
Complete the Task details
Click to add it to the plan
Tasks created from the Board use your current view to pre-fill details like Group and date.
Click on any visible Task Property
Select a new value
Changes are saved automatically
Change dates: Drag to a different day
Reorder: Drag up or down within a Group
Reassign: Drag between Groups
Tasks on the Board will always be sorted by Start Date - the earlier a Task starts, the higher it will appear within it's grouping.
Aphex will hold the position of your Tasks while you make edits, and then when you're ready to re-apply the Sort Order, click in the bottom right corner.
Refreshing your Aphex window will also trigger the sort order to be re-applied to your Board View.
Use Board to record how each day went and keep your plan up to date. Every update feeds into reporting and the wider schedule, with changes reflected instantly across all other Views.
Open and toggle Progress
Click the progress bar on the day you want to log an update
Choose to mark it on track or improved, or to record a delay
See also:
See at a glance how many of your Tasks have been updated each day, with a live breakdown of what's on schedule, delayed or missing an update.
Click
Toggle Show Task Update Compliance
Click , or to filter to just that day
Filters in Aphex let you show only what matters, whether that’s Tasks with certain properties, or ones that are missing something. Keep it simple or build something more detailed, it's up to you.
Click at the top of the Board
In the dropdown that appears select and choose the property you'd like to filter by
Change the logic from options like or to or to hide or reveal the relevant Tasks
See also: creating & sharing
Tailor your Board View to suit the way you plan & communicate. Adjust the layout, colour coding, visible days of the week and more.
Click at the top left of the Board
Toggle any property you'd like to display on the Task Cards
Use the ⋮⋮ drag handles to reorder the properties on the Task Cards
Click
Select Days
Pick from 5 Day, 6 Day or 7 Day
Click
Select Layout
Pick between Waterfall or Masonry
Click
Select Card Colour
Pick from Owner, Subcontractor or Shift
See also:
Who can use this feature?
All Project Users can create and share Views.
Project Users with Full Planner Access can open Gantt, Map & Board Views. Limited Planner Access Users can open List Views.
Views let you customise how you see the plan, from full project Gantt charts, to Maps, Board Views, or focused daily Task Lists. Every View draws from the same underlying project data but can show different filters, groupings, overlays and layouts.
Views can be saved for quick access - build Personal Views as shortcuts for your own use, or Shared Views to create standardisation for meetings or collaborative sessions.
Click + View at the top of your page
Click Create new View
Choose from Gantt, Map, List and Board
Enter a name for your new View
Click Create View
See also: how to use the , , &
Shared Views are great when a group of people (or the whole project) will need to see the plan data & layout set up in a specific, consistent way.
Open the View you'd like to share
Select View Options on the right-hand side
Click Shared with and toggle on Shared View
Any View you open is fully customisable. You can adjust filters, grouping, layout and view controls at any time to suit what you’re working on. If your changes differ from the Saved View definition, you can either save them (if you have edit access) or reset the view to return to its original definition.
Open a View
Make adjustments to the View Controls
Select Save View or Save View for Everyone in the top right
Open a View
Make adjustments to the View Controls
Select Reset View in the top right to return the View back to the Saved View definition
Every project includes a set of pre-made views. You can adjust them as you work, or duplicate one to create your own saved version.
Full screen mode expands your plan by hiding page headers, giving you more room to focus on the content inside your Gantt, Board, List, and Map views.
Open a new or existing View
Select View Options on the right-hand side
Click Full Screen
Move your cursor to the top of the Page
In the header that is revealed, select the Exit Full Screen Mode button
Or, use the Keyboard Shortcut Esc
As you open Views, they appear as tabs at the top of the page so you can quickly switch between them. You can open as many as you need, reorder them to suit how you work, and hide them when you’re done, without affecting the view itself. Your open View tabs stay just the way you left them, ready for next time.
Who can use this feature?
All project users can add Labour and Plant to their Tasks.
Project Admins can create new Labour and Plant resources.
Labour and Plant can be added to Tasks to track and forecast your daily resource demand.
Creating Labour resource lets you build a reusable library of Labour to assign to Tasks.
Click your Project Title in the top left, then select Project Assets
Select Labour from the menu
Click
Create your custom Labour resource by entering the Name, Labour Type and a Colour
The Labour resource is added to the library of Labour the team can assign to their Tasks
Creating Plant resource lets you build a reusable library of Plant to assign to Tasks.
Click your Project Title in the top left, then select Project Assets
Select Plant from the menu
Click
You can assign as many Labour resources to each Task as you need. Once added to the task, they’re assumed to be needed for the entire working duration - keeping things simple and helping teams plan ahead.
On the Gantt, navigate to the column picker and toggle Labour
Click the Labour cell for your Task & select the relevant Labour option from the dropdown menu
Use the + / - buttons to increase or decrease the Labour quantity needed for the duration of the Task
See also:
You can assign as many Plant resources to each Task as you need. Once added, they’re assumed to be needed for the entire working duration - keeping things simple and helping teams plan ahead.
On the Gantt, navigate to the column picker and toggle Plant
Click the Plant cell for your Task & select the relevant Plant option from the dropdown menu
Use the + / - buttons to increase or decrease the Plant quantity needed for the duration of the Task
See also:
Use the Resource Overlay in the Gantt to forecast Labour & Plant demand day by day. You'll see how much of each Labour or Plant is needed across the project, with a clear breakdown of which Tasks are driving that usage and who's using it.
Click and select Resources
Use the icons on the left to view Labour
Hover over the numbers to view your Total and Project Utilisation
Click and select Resources
Use the icons on the left to view Plant
Hover over the numbers to view your Total and Project Utilisation
See also:
Filter by Labour to quickly review and manage work related to a particular Labour item across your plan.
Click and
Select Labour in the first dropdown
Select from Is, Is Not, Is Empty
Filter by Plant to quickly review and manage work related to a particular Plant item across your plan.
Click and
Select Plant in the first dropdown
Select from Is, Is Not, Is Empty
See also: create & share
Connect your Project as a datasource for Power BI to report on Labour & Plant Demand.
Utilise Aphex Insight to track Labour & Plant Resource Demand. See trends and drill down into specific Tasks to identify where each Labour and Plant Resource is allocated.
See also:
Print the Gantt, Map, Board, and List views to capture exactly what you see on screen. Aphex will print configured overlays, grouping and tasks from your current view.
Print to PDF the live Gantt to share the most up-to-date view of your plan.
Open a Gantt View
Set your Filters, Date Range, Columns, and other View Settings to match how you want your output to look
Relationship Links in Aphex allow you to establish task dependencies, ensuring tasks are completed in the correct order. Whether you need tasks to start together, finish together, or follow one another, Relationship Links help keep your project on track and aligned.
You can draw links directly on the Gantt - just click and drag from one bar to another. The link type is set based on where you start and end. It’s quick, visual, and often the easiest way to build out your logic as you go.
Hover over the Predecessor Task Bar and click the
Bring selected parts of your Master Schedule into Aphex using XER, XML, or MPP files from P6, Asta, or MS Project. Import only the activities your team needs - this helps seed the lookahead plan with the right level of detail or key Milestones - just enough for the team to breakdown, adjust and build from.
The first step is to upload your file.
Click your Project Title in the top left
Select
Required cookies for delivering the website (not active on app.aphex.co)
Segment
App performance tracking.
Marketing cookies
Google Analytics
Tracking of prospects and behaviour for site improvement and retargeting (website only - not active on app.aphex.co).
Segment
Tracking of prospects and behaviour for site improvement and retargeting.
Analytics and customization cookies
Segment
User behaviour and app use tracking for service improvement.
Google Analytics
User behaviour and app use tracking for service improvement.
Logrocket
Session and issue tracking for performance optimisation and user support (active on app.aphex.co only)
Advertising
Retargeting to users after they leave Intercom's websites.
Today
Today’s Date
This Week
Monday to Sunday of the Current Week
Next Week
Next Monday to Sunday (1 week into the Future)
Custom
Custom dates selected by the user
Advance Selected Range
Move the date range forwards and backwards by your selected range
Package
Owner
Folder
Subcontractor
Subcontractor
Shift
Shift
None
Detected clash, not yet resolved
Pending Review
For Review (recipient) / Clashes (requester)
One owner has requested non-conflicting status; the other hasn't responded yet
Non-Conflicting
Non-Conflicting
Both parties have agreed the pair is not a real conflict

Earthworks
Roadworks
Electrical
Drainage
Steel
Other
Metres Squared
Metres Cubic
Kilometers
Kilograms
Tonnes
Tons
Yards
Yards Squared
Yards Cubic
Project Utilisation
The demand for your entire project
Hide Un-utilised resources
Removes resources that aren’t assigned to any Tasks from the resource list
Multi-Select
Publication Frequency
Projects set a recurring target for when users should create a new Published Version.
Time
The time of the next Publication deadline.
Timezone
The timezone for the project
Frequency
A recurring target for when users should create a new Published Version.
Publication Requirements
Set specific fields which are required for publishing. As users update their plans these will flag as missing data if fields are left incomplete.
Set Historic Tasks to Done
All Tasks prior to the Publication Date (Today) will have their Status set to ‘Done’. This will lock Progress Updates and Start & End Dates. Task Status can be changed at any time.
Send Notification
All users added to the Project Users list will receive an email with a link to the most recent Published Version
Documents
Comments
Saved Column Configs
Blocker Summary Panel
Milestone Summary Panel
Board View
List View
Baselines
Allow guests to see all historic baselines from previous versions and imports
Progress Updates
Allow guests to see all Progress Updates (delays & improvements) recorded on tasks
NonePublicSince authentication is handled through the bearer token you already entered, no additional credentials are required here:
Select “Anonymous” as the authentication method, then click Connect.
This tells Power BI not to apply any other login method. Using other options like “Windows” or “Organizational Account” may block the request or cause errors.
“We couldn’t authenticate with the credentials provided.”This suggests Power BI could be using the wrong method (e.g. "Organizational Account") instead of Anonymous.
“The remote server returned an error: (401) Unauthorized.”
This means the API blocked the request - often because Power BI tried to use Windows or Organizational credentials instead of the token.
This usually means the dataset was too large for Power BI to handle in one response.
“Unable to connect to the data source. The connection was closed before the data could be retrieved.”
This can sometimes be triggered when the response is too large and times out during transfer.
Exclude resource data
Append ?resource=false to your API URL
→ Useful if you don’t need labour or plant or material reporting.
Exclude delay status data
Append ?status=false to your API URL
→ Useful if you do not need to report on delay reasons.
Exclude blocker data
Append ?blockers=false to your API URL
→ Useful if you do not need to report on blockers.
You can combine parameters like:
?limit=3&resource=false&status=false


A tasks's start and end date has been moved (pushed later)
Type
Delayed On Schedule
Improved
Reason
Reason for the change. This can be configured by each project individually and typically contains reasons such as "Awaiting Access".
Amount
Impact of the update is recorded in a Value that represents a duration in working days (+ or -)
Amount by
User who recorded the update
Created at
Timestamp of when the update was recorded
A task’s end date has been improved (brought earlier).
Move
A tasks's start and end date has been moved (brought earlier)
Inadequate Planning
Insufficient Resources
Prior Work
Quality
Safety
Scope Change
Submittals and Approvals
Extend
A task’s end date has been delayed from the prior plan or commitment
Date
On Schedule
A task’s end date is confirmed as achievable.
Delay Categories
Environmental
Delay Reason
Is Is Not Is Empty Is Not Empty


Move
Selected working day to record the event against
Shorten
Multi-select
Click to dismiss
Optionally, click the > beside the property to open more options
Use the to hide specific values within that property from view
Toggling on Task Update Compliance is per-user and won't affect anyone else's view
Compliance counts update in real time
Only Tasks visible in your current view and date range are counted
If a Task is assigned to multiple people and appears in multiple Groups, it's only counted once
All Task Properties as well as Unresolved Issues can be applied as a filter
Archived values that are still in use will appear as filter options. Unused archived values will be hidden from the filter options
Tasks that do not match the filter criteria will be hidden from the Board


Choose to share your View with Everyone or specific Users & Teams
Select if users can Edit View or have View Only access
Or, use the Keyboard Shortcut Alt + Enter
Project Users with Full Planner Access can open and create Gantt, Map & Board Views. Limited Planner Access Users can open List Views
Every newly created View begins as a Personal View
Personal views are only visible in the project's Views List to the view's author and Project Admins. Other users won't see someone else's personal view in the Views List, but they can still access it if they have been given the direct URL
The user who creates the View is the View Author
View Authors can toggle between Personal/Shared, set editors, rename, delete, convert, and override the saved definition
Project Admins have the same permissions as View Authors, and can change sharing controls for all views in the project
Adding a user or team to Shared with makes that view available in their Shared with you section. The next time they create or open a view, it’ll appear at the top of their suggested views.
View Authors: The user who initially created the View will become the View Author.
View Authors can:
Open the View from the View List
Toggle their view between Personal & Shared
Specify certain Users & Teams as 'View Editors'
Project Admins have the same permissions as View Authors
Editors: A User or Team who have been named as an Editor on a specific Shared View.
Editors can:
Open the View from the View List
These settings are specific to each page type and contribute to the View Definition. Any changes made here will allow users to override the saved definition
Gantt:
Grouping
Overlays
Filters
Columns
Custom Group Order
Date Range
Map:
Grouping
Filters
Location
Board:
Grouping
Filters
List
Grouping
Filters
These specific settings won't prompt you to save changes, as they don't contribute to the View Definition. They will be remembered between sessions and won't reset when you refresh the page, close the view, or log out
Gantt:
Column Widths
Group Order
Expanded/Collapsed Headers
Zoom
Work Area Panel preferences
Bar Colour
Show Progress / Relationships / Overdue Blockers
Map:
Layer visibility & Basemap
Location / Zoom extents
Work Area Colour
Highlight Issues
Board:
Hidden Groups
Group Order
Layout
Days
List:
Task Properties
All Upcoming Plans
Gantt
When a new user with Full Planner Access enters a project for the first time, the two Aphex Curated Views that will open by default are:
My Upcoming Plan
All Upcoming Plans
When a new user with Limited Planner Access enters a project for the first time, the two Aphex Curated Views that will open by default are:
My Daily Briefing List
Project Daily Briefing List
Full Screen Mode is in Planner only, it is available across all views but cannot be the default for a specific view.
The headers displaying views, view options, Project Settings/Assets, filters etc. will be accessible when moving the mouse over to the top of the screen. Exiting Full Screen
Hit 'ESC' on your keyboard or hover over the top section of your screen and click 'Exit Full Screen' on the revealed headers.
Refreshing your browser window or navigating to Home or Insight will also exit Full Screen.
Visibility
Full Screen Mode applies only to the user who enables it and only on the specific device used.


Create your custom Plant resource by entering the Name, Plant Type and Colour
The Plant resource is added to the library of Plant the team can assign to their Tasks
Click to filter to either Crew or Individual Resource
Click the Resources Configuration icon to switch between Tasks in View and Project Utilisation
Hover over to see the daily breakdown
Click to filter to a specific Plant Type
Click the Resources Configuration icon to switch between Tasks in View and Project Utilisation
Hover over to see the daily breakdown
Is Not EmptySelect your desired Labour item in the third dropdown
Is Not EmptySelect your desired Plant item in the third dropdown
Labour & Plant are multi-select properties
You can assign multiple types of labour or plant to each Task
Each assigned item can have its own quantity
Quantities are applied per day
A quantity of 5 means 5 units are required for each day of the Task's duration
Quantities cannot vary across the days of a Task
Archived Labour & Plant resources will no longer be available to add to Tasks but will still exist on tasks it was assigned to before the resource was archived
On hover, the daily breakdown includes:
Utilisation
Quantity of Material used by Tasks in your current View (respects filters)
# no of Tasks
Number of Tasks in your current View using that Material on the selected day (respects filters)
Project Utilisation
Total quantity used across the entire project (ignores filters)
# no of Project Tasks
Number of Project-wide Tasks using that material on the selected day (ignores filters)
Task Owner Breakdown
Lists each Task Owner contributing to Project usage
Includes Task Count and percentage of total utilisation for that day and Material
Cell shading
Darker = higher quantity
Lighter - lower quantity
Scale is relative to the values shown in the current overlay
Quantity values are only shown in Day View
In Week, Month or Year mode, cell shading remains but numeric values are hidden


Environmental
External Stakeholder
Quality
Resource
Other Permit
N / A
Resetting the Due Date will restore the dynamic behaviour: updating automatically based on the Task’s dates and the original Due Date rule.
Overdue
The Blocker has a Due Date that lies anywhere from Yesterday and into the past
Resolved
The Blocker has manually been marked as completed by a Project User
Blocker Status
Is Is Not
Multi-Select
Design
Safety
Open
The Blocker has a Due Date that lies anywhere from Today and into the future. Blockers without Due Dates also hold the Status of Open
Blockers
Is Is Not Is Empty Is Not Empty


Multi-Select
Click and select Print View to open the Print Menu
From the Print Menu, you can make further adjustments to the Date Range, Page Size, and optionally toggle
Click to view more printing options
Click to download the PDF to your device
Print to PDF your Map View as a staging-diagram flipbook or a single page with all your Tasks and Work Areas mapped out.
Open a Map View
Set your Filters, Date Range, and other View Settings to match how you want your output to look
Click and select Print View to open the Print Menu
Position the map and click
Optionally and select from Day, Week or Month
Click for additional printing options, like adding extra columns to the output
Click to download the PDF to your device
Print to PDF the Board View for a quick, whiteboard-style snapshot of the week ahead.
Open a Board View
Set your Filters, Group By, and other View Settings to match how you want your output to look
Click and select Print View to open the Print Menu
Select your Page Size & Layout
Click to view more printing options
Click to download the PDF to your device
Print to PDF the List View to get a clear, daily to-do list of upcoming work.
Open a List View
Set your Filters, Group By, and other View Settings to match how you want your output to look
Select the Page Size
Click to download the PDF to your device
Need a hard copy of your published plan? You can print to PDF a published version to share a snapshot of the project exactly as it was at the time it was published.
Open the Published Version
Click and select Print Gantt
Select the Date Range you want to print, page size, and optionally toggle
Click to view more printing options
Click to download the PDF to your device
Open the Published Version
Click and select Print Map
Position the map and click
Optionally and select from Day, Week or Month
Click for additional printing options
Click to download the PDF to your device
Notifications appear during loading to keep you informed of progress and potential delays.
Who can use this feature
All Project users are able to print from the Project.
Guests and Non-Aphex Users are able to print Shared Published Versions.

A Print with Loaded Data button will appear and allow you to generate a print with the data that has already loaded. Your printout will show a Data partially loaded label beside the timestamp to show that the loading process was stopped before completion
Release the mouse to automatically create the relationship.
Spotlight Mode helps you quickly see how a task connects to the rest of the plan. Instead of manually tracing arrows or opening extra panels, you can highlight a task and follow its linked pathway directly on the Gantt, with hints showing where the sequence continues off screen.
Select a Task Bar on the Gantt
Click the Spotlight Button that appears next to the Task
The linked pathway will be highlighted immediately
Look for the small Pathway Hint tags at the edges of the screen
These show how many linked Tasks sit just out of view
Click a hint to preview the linked Tasks or jump directly to them
Click the X in the banner
Refreshing the page or logging out will also disable Spotlight Mode
Checkboxes let you select multiple Tasks and build logic between them all at once. Set the sequence, adjust the link type & lag, and apply. It’s the fastest way to build out a full section of your plan.
Hover over tasks and click
Click the Link icon in the multi-select toolbar
Choose the link type (SS, SF, FS, FF), add any lag if needed and confirm
If the Task you want to link to isn’t visible, drop your link on the blue search icon. A menu will open so you can quickly search and select the right Task without changing your filters or losing your place.
Hover over the Predecessor Task and click the
Click and drag to
The Link Search Modal will appear. Use the search bar or filters to find the task you want to link
Select the task, choose the link type, and apply the relationship
When you open a Task, you’ll see a full list of its linked Tasks including Link Type, Lag and Float/Driving. From here, you can make changes or add new relationships; no dragging or switching views required.
Open the Task Panel for the task you want to link.
Scroll to Related Tasks and click
The Link Search Menu will appear. Use the search bar or filters to find the task you want to link.
Select the task, choose the link type, and apply the relationship.
Lag lets you add a space between linked Tasks, helping account for handovers, wait times, or real-world gaps without shifting tasks manually. As you adjust Tasks, Aphex gives you a quick visual cue showing how much lag you’ve just added or removed.
Use the Task Bar, or Start and End properties to edit the dates of the successor Task
The Lag Change Indicator appears, showing the number of lag days added or removed
Open the Task Panel for the Task you want to link.
Scroll to Related Tasks and click into the Lag field and enter a value
On the Gantt, click a Link Line
In the Link Modal, click into the Lag field and enter a value
Select to apply the Lag change to the relationship
Each relationship between Tasks shows whether it’s Driving or how much Float it has. A Driving relationship means the predecessor has zero float - any change to it will move the successor. Links with float display how much flexibility exists before the successor is affected. These values update automatically as Task dates, link type, or lag change, helping you see which parts of the schedule are fixed and which still have room to move.
Click any relationship link on the Gantt - single or multiple
In the Link Menu that opens, Driving Tasks are marked with
Links that aren’t driving display their Float Value
You can edit or break existing relationship links at any time to update or remove connections between Tasks.
On the Gantt, click a Link Line
In the Link Modal that opens, you can either:
edit the Link Type (FS, SF, FF, SS)
edit the Lag
Click to apply edits to the relationship
On the Gantt, click a Link Line
In the Link Modal that opens, click Remove Link
Understanding scheduling behaviour helps you predict how linked tasks behave when dates change based on whether they're Planned, Promised, or Done. It’s the key to controlling movement, Ripple Status, and Progress Updates in your plan.
Successor is Planned:
Both tasks reschedule freely.
Successor follows any changes to the Predecessor.
Successor is Promised or Done:
Successor won’t move.
Only the Predecessor shifts.
Successor is Planned:
Successor moves freely and reschedules based on new Predecessor date.
Successor is Promised:
The task is locked. You can’t move it.
Any changes must start from its Successors.
See also: Task Status
Who can use this feature?
Task Owners, Assignees and Admins can add relationship links between tasks

Master Schedule ImportClick
Upload your File
Choose exactly which Tasks to bring into Aphex. Use a custom field (like a UDF in P6) to flag only the relevant Tasks you want to import; for example, bringing in Construction activities while skipping Design or Procurement.
Click the Column dropdown and select the UDF column you want to filter by
Click the Value dropdown and choose the value you want to import
Click
You can also skip this step by leaving both dropdowns blank and clicking
Importing your schedule in smaller timeframes helps keep things tidy. Most projects avoid bringing in the entire long-range plan at once. By importing just what's needed for the next stage, then running regular imports (e.g. monthly) to add the next few weeks as the project moves forward, you give the team relevant, up to date data they can build from.
Select from Next 4 Weeks, Next 12 Weeks, All Future, All Past and Future
Click
To keep Aphex simple & intuitive, some Master Schedule features aren’t supported. During import, you’ll be prompted to make smart decisions about how to handle things like actual dates, or LoE / WBS Summary Bars that don’t translate 1:1. This helps ensure Tasks still land on the dates they’re supposed to.
If your Import file contains WBS Summaries or Level of Effort (LoE) Tasks, you can choose how to handle these tasks.
For WBS Summaries, you can choose to:
Ignore them from the import so they will be excluded.
Import as Tasks. If imported, WBS summaries will convert to Task Dependant types.
For Level of Effort (LoE) Tasks you can select from:
Ignore all LoE tasks and these will not be imported (this is the recommended option)
Import LoE tasks as task dependant types without links
Import LoE tasks as task dependant types with links - Selecting this option may cause variance in your import
Once you've made your selection, select to move to the next step
There may be some Tasks that are being driven by Tasks outside of your import dates. This can sometimes result in variance. The decisions for this step include:
For Driving Predecessor Tasks, you can choose to:
Add missing Tasks to the import scope (this is the recommended option)
Remove non-driving Links between selected Tasks.
Aphex uses Task Status to define a Task state & scheduling behaviour. Decide how you would like to handle tasks with Actual Dates.
For Actual Starts, you can choose to:
Import without Predecessor Links (this is the recommended option)
Import with Predecessor Links
For Actual Finishes you can select from:
Milestones in your file will always be imported as Milestones in Aphex. You can also choose to set the imported Milestone date as a Target Date - this gives you a stable benchmark to compare against, so you can easily see how the Milestones in the short-term plan are tracking against your baseline or contract dates.
Set Milestone Target Date from the imported Dates
Do nothing
Click
Map the right data across. Task names, logic, and calendars come through automatically, but you can also import WBS structure, assign Owners, Notes, Locations, or Subcontractors based on your UDFs, and bring over key metadata that helps delivery teams plan faster.
To import your current WBS into your Project's Folder tree, select the WBS option from the Folder Code drop-down list.
Additionally, you can also import Subcontractor, Location, Owner and Notes, if you've predefined these in your source tool before exporting.
This is your final review before Tasks are imported into the Project. You'll see a summary of what's about to be created, including Task counts & any new assets. If any changes were made during the process, you can download a CSV to review the modifications. Nothing has been created yet - confirm when you're ready.
Review the data you're importing
Download the skipped tasks, folders or modifications CSV
Select
Before your newly imported work appears on the Gantt, your next step is to distribute tasks to the team. Then, once tasks have been assigned to an owner, the user will be notified that they have newly imported work waiting for them to add to the plan.
If you're a user who has been assigned new tasks from an import, they'll appear in your Backlog. All you need to do is pull them onto the Gantt.
Click your Project Title
Click Master Schedule Imports, then navigate to the Project Data
Project Admins or Members with Additional Permissions can run Master Schedule Imports.

UDFs allow you to filter to the specific data you want to import into Aphex:
In your master schedule, create a User Defined Field (you might want to name this something straightforward: Aphex Filter)
In this UDF assign a consistent value against the activities you would like to import and ones you would not (this could simply be "Yes" and "No")
Please note that you will only see the steps that apply to your Import. If your Import doesn't contain Unsupported Task Types, Driving Predecessors, Actual Dates or Milestones, it will skip these steps.
Only data associated with activities you are importing will be included. i.e Folder codes unrelated to any imported activities will not be brought into Aphex.
If a Folder code already exists in the project, imported activities with that code will be grouped into the existing Folder, even if the Folder names don’t match.
This endpoint provides access to Published Plans for a project which can be a powerful way to establish a "cadence" based reporting routine (.e.g. comparing last week's performance against the prior week's) or the extraction and storage of historical plan data.
By accessing the Published Plans, you can ensure that any measurement of the data is based on reviewed and agreed plans by the project team.
The most common use cases of this endpoint are;
connection to Aphex-provided Power BI templates.
connection to Excel or Power BI to create custom-built reports across a project or series of projects.
consumption and storage via an ETL operation across one or many projects within a portfolio.
The Power BI API has three components.
Query Parameters
Data Model
You can access the API by querying the endpoint URL for your desired project and providing a valid Token.
As a Project Administrator, head to your project in the Aphex Planner app. From the Integrations page the API can be enabled.
This will uncover the API URL specific to that project. The URL structure will be;
From the same location you sourced the API URL, a new Token created. Create a new Token and name it i.e. Project Dashboard Token 1
You cannot retrieve the token later so you should save it in a secret manager. If you lose the token you can generate a new one.
To successfully authenticate your request to the API URL, set the Token in the Authorization header of the request.
This can be done three ways;
If you are using an Aphex Power BI Template, simply paste the URL and Token into the setup modal
If you are generating your own report in Power BI, set up a new "Web" source. From within the Advanced menu enter the URL and header request key of Authorization with Bearer followed by your Token as the value.
If you are consuming the data in any other service construct a valid cURL request (example below).
Query parameters allow you to adjust what the response shall contain. To enable projects of varying size to get the most out of this API within the single response limit of 32Mb the following query parameters are supported;
Valid requests to the API will return a JSON response consistent with the API data model.
The Power BI API Data Model contains the following objects;
The Power BI API has a small number of restrictions and limits to ensure the availability of the system and the security of customer data.
Token Management Restrictions: As covered in section, requests to the API will only succeed if they follow the correct request structure and include both a valid URL and Token. Tokens are generated individually for a Project, by a user with Project Admin rights.
Token Validity Limits: Generated tokens have a maximum lifespan of 3 months to ensure that over time, project data is secure by default. On expiry, or at any time, new tokens can be generated for the project.
Limits: To stay within infrastructure limits and avoid paged responses on this end point, a response limit of 32Mb exists. If you experience a server error, please try reducing you data request by passing in query parameters. There is also a hard data history limit of 6 months.
Generate token
gb | au
OK
Not Found
Unprocessable Entity
Internal Server Error
Revoke token
gb | au
OK
Not Found
Unprocessable Entity
Internal Server Error
Get users
gb | au
projectId
access token
OK
Unauthorized
Unprocessable Entity
Internal Server Error
Get subcontractors
gb | au
projectId
access token
OK
Unauthorized
Unprocessable Entity
Internal Server Error
Get folders
gb | au
projectId
access token
OK
Unauthorized
Unprocessable Entity
Internal Server Error
Get packages
gb | au
projectId
access token
OK
Unauthorized
Unprocessable Entity
Internal Server Error
Get calendars
gb | au
projectId
access token
OK
Unauthorized
Unprocessable Entity
Internal Server Error
Get locations
gb | au
projectId
access token
OK
Unauthorized
Unprocessable Entity
Internal Server Error
Get tasks
gb | au
projectId
YYYY-MM-DD formatted date
YYYY-MM-DD formatted date
day | afternoon | night | 24hr
comma-delimited user IDs
comma-delimited folder IDs
comma-delimited package IDs
comma-delimited location IDs
comma-delimited calendar IDs
comma-delimited subcontractor IDs
comma-delimited user IDs
comma-delimited additional fields (assignees,wbs,package,parent,contractor,labourResources,plantResources,materialResources,location,workArea,progress,predecessors,successors,externalId,notes)
access token
OK
Unauthorized
Unprocessable Entity
Internal Server Error
Each user has an Organisation Role that controls what Organisation information they can access and manage in the Admin Console.
When you add a Task, you can customise its properties to reflect exactly what’s being done, by who, and when, making sure the plan communicates clearly to anyone who needs to see it.
Tasks can store everything from planned resource quantities and work areas to subcontractor assignments and permit requirements. This way, as your plan changes, not only does everything reschedule automatically, but things like resource forecasts, staging diagrams and daily task-lists update on the spot.
You can create Tasks from wherever you’re working - from the Gantt, from the Board, or imported from another source. For an easy start, try adding them directly inside your Folder structure.
On the Gantt, find the Folder where you want the Task to live
This Data Processing Addendum (DPA) supplements and is incorporated into our Aphex Platform Terms of Service (Terms) agreed between Aphex Software Limited, a company registered in England and Wales with company number 09681747 (we, us or our), and the Customer (you or your). This DPA applies to our provision of Services to you under the Terms. This DPA applies from the date you agree to our Terms, and will continue in accordance with the terms of this DPA.
2.1 Capitalised terms in this DPA have the meaning given in the Terms, the Annexures, and as set out below:
Customer means the contracting entity purchasing services from us, as set out in the Terms.
EU GDPR means Regulation 2016/679 of the European Parliament and of the Council on the protection of natural persons with regard to the Processing of Personal Data and on the free movement of such data (General Data Protection Regulation).
Rename the View
Delete the View
Convert the View
Duplicate the View
Save as New View
Override the Saved View Definition
Save as New View
Override the Saved View Definition
Viewers: All Users & Teams who are not the Author or Editor for a specific View.
Viewers can:
If Shared, they can open the View from the View List
If Personal, they can open the View from direct URL
Save as New View
Duplicate the View
Show Relationship Links
Group by Folder, All Future Tasks
My Upcoming Plan
Gantt
Group by Folder, Filter by Owner OR Assignee = Me, Next 6 Months
Board View
Board
Group by Subcontractor & Shift,This Week
Map View
Map
Group by Owner, Today + One Week Forward
Upcoming Milestones
Gantt
Group by Folder, Filter by Milestone = True, All Future Tasks
Clashing Tasks View
Gantt
Group by Owner & Folder, Filter by Issue = Clash, All Future Tasks
Unresolved Issues
Gantt
Group by Owner & Folder, Filter by Issue = Clash
OR Missing Data
OR Overdue Blocker, All Future Tasks
My Daily Briefing List
List
Group by Schedule, Filter by Owner OR Assignee = Me, Today
Project Daily Briefing List
List
Group by Schedule, Filter by Owner OR Assignee = Me, Today
Package
Owner
Folder
Subcontractor
Subcontractor
Shift
Shift
Location
Location
Assignee
Assignee
None
Shift
The colour of the Task Shift
Owner
The user colour of the Task Owner
Concrete Placement
Concrete pumps
Cranes
Dozers
Dumper
Earthmoving Equipment
Excavators
Forklifts
Graders
Lifting Equipment
Marine Equipment
Other
Painting and Coating Equipment
Piling Equipment
Piling Rigs
Rollers
Small or Hand Tools
Tipper Lorrys (20 Tonne)
Trucks and Lorries
Wheeled Loaders
Project Utilisation
The demand for your entire project
Hide Un-utilised resources
Removes resources that aren’t assigned to any Tasks from the resource list
Multi-Select
Plant
Is Is Not Is Empty Is Not Empty
Multi-Select
Pick from either Owner, Subcontractor or Shift for the Bar Colour on the Gantt print. Owner will be selected by default.
Group Dates & Durations
Select whether to print Filtered or Total Start Dates, End Dates, and Durations for Folders, Packages, and Parent Tasks. This lets you control whether your printout shows only visible tasks or the whole group span.
Include footer
To Include/Exclude the Footer at the bottom of the page
Logo
The PDF can be generated with either the Organisation Logo, or the Project's logo.
A0
A1
A2
A3
To Include/Exclude clashes in the print.
Column Data
Up to three additional data points can be shown next to their tasks on the Map Print.
Include footer
To Include/Exclude the Footer at the bottom of the page
Logo
The PDF can be generated with either the Organisation logo, or the Project's logo.
A0
A1
A2
A3
A new page for each week. Only tasks taking place within the specific week will appear on the page.
Month
A new page for each month. Only tasks taking place within the month week will appear on the page.
The PDF can be generated with either the Organisation logo, or the Project's logo.
A0
A1
A2
A3
The PDF can be generated with either the Organisation logo, or the Project's logo.
A3
A4
Select whether to print Filtered or Total Start Dates, End Dates, and Durations for Folders, Packages, and Parent Tasks. This lets you control whether your printout shows only visible tasks or the whole group span.
Include footer
To Include/Exclude the Footer at the bottom of the page
Logo
The PDF can be generated with either the Organisation logo, or the Project's logo.
A0
A1
A2
A3
To Include/Exclude clashes in the print.
Column Data
Up to three additional data points can be shown next to their tasks on the Map Print.
Include footer
To Include/Exclude the Footer at the bottom of the page
Logo
The PDF can be generated with either the Organisation logo, or the Project's logo.
A0
A1
A2
A3
A new page for each week. Only tasks taking place within the specific week will appear on the page.
Month
A new page for each month. Only tasks taking place within the month week will appear on the page.
Delay Data
Delay data includes Progress Update colours, Done & Promised bars and Delay icons.
Work Area Colour
Pick from either Owner, Subcontractor or Shift for the Bar Colour on the Gantt print. Owner will be selected by default.
Day
A new page for each working day. Only tasks taking place on the specific day will appear on the page.
Include footer
To Include/Exclude the Footer at the bottom of the page
Include footer
To Include/Exclude the Footer at the bottom of the page
Bar colour
Pick from either Owner, Subcontractor or Shift for the Bar Colour on the Gantt print. Owner will be selected by default.
Work Area Colour
Pick from either Owner, Subcontractor or Shift for the Bar Colour on the Gantt print. Owner will be selected by default.
Day
A new page for each working day. Only tasks taking place on the specific day will appear on the page.


Bar colour
Show Clashes
Week
Logo
Logo
Group Dates & Durations
Show Clashes
Week
GET /{region}/v1/projects/{projectId}/users HTTP/1.1
Host: app.aphex.co/
Accept: */*
{
"paging": {
"next": {
"after": "text",
"link": "text"
}
},
"results": [
{
"displayName": "text",
"email": "text",
"id": "text"
}
]
}GET /{region}/v1/projects/{projectId}/subcontractors HTTP/1.1
Host: app.aphex.co/
Accept: */*
{
"paging": {
"next": {
"after": "text",
"link": "text"
}
},
"results": [
{
"id": "text",
"name": "text"
}
]
}GET /{region}/v1/projects/{projectId}/folders HTTP/1.1
Host: app.aphex.co/
Accept: */*
{
"paging": {
"next": {
"after": "text",
"link": "text"
}
},
"results": [
{
"code": "text",
"id": "text",
"name": "text",
"parentId": "text",
"path": "text"
}
]
}GET /{region}/v1/projects/{projectId}/packages HTTP/1.1
Host: app.aphex.co/
Accept: */*
{
"paging": {
"next": {
"after": "text",
"link": "text"
}
},
"results": [
{
"code": "text",
"id": "text",
"name": "text"
}
]
}GET /{region}/v1/projects/{projectId}/calendars HTTP/1.1
Host: app.aphex.co/
Accept: */*
{
"paging": {
"next": {
"after": "text",
"link": "text"
}
},
"results": [
{
"id": "text",
"name": "text",
"type": "five-day"
}
]
}GET /{region}/v1/projects/{projectId}/locations HTTP/1.1
Host: app.aphex.co/
Accept: */*
{
"paging": {
"next": {
"after": "text",
"link": "text"
}
},
"results": [
{
"id": "text",
"name": "text",
"type": "map"
}
]
}{
"paging": {
"next": {
"after": "text",
"link": "text"
}
},
"results": [
{
"assignedTo": [
{
"displayName": "text",
"email": "text",
"id": "text"
}
],
"calendar": {
"id": "text",
"name": "text",
"type": "five-day"
},
"duration": 1,
"externalId": "text",
"finish": "text",
"folder": {
"code": "text",
"id": "text",
"name": "text",
"parentId": "text",
"path": "text"
},
"id": "text",
"keyTask": true,
"labour": [
{
"id": "text",
"name": "text",
"quantity": 1
}
],
"location": {
"id": "text",
"name": "text",
"type": "map"
},
"materials": [
{
"dailyActual": [
{
"date": "text",
"quantity": 1
}
],
"dailyPlanned": [
{
"date": "text",
"quantity": 1
}
],
"id": "text",
"name": "text",
"quantity": 1,
"unit": "text"
}
],
"name": "text",
"notes": "text",
"owner": {
"displayName": "text",
"email": "text",
"id": "text"
},
"package": {
"code": "text",
"id": "text",
"name": "text"
},
"parent": {
"id": "text",
"name": "text"
},
"plant": [
{
"category": "text",
"id": "text",
"name": "text",
"quantity": 1
}
],
"progress": [
{
"amount": 1,
"date": "text",
"name": "text",
"type": "delay"
}
],
"relatedTasks": [
{
"id": "text",
"lag": 1,
"name": "text",
"relation": "predecessor",
"type": "start-start"
}
],
"shift": "day",
"start": "text",
"status": "planned",
"subcontractor": {
"id": "text",
"name": "text"
},
"workArea": {
"bbox": [
1
],
"geometry": null,
"id": null,
"properties": {
"ANY_ADDITIONAL_PROPERTY": "anything"
},
"type": "text"
}
}
]
}GET /{region}/v1/projects/{projectId}/tasks HTTP/1.1
Host: app.aphex.co/
Accept: */*
textPOST /{region}/v1/auth/token HTTP/1.1
Host: app.aphex.co/
Content-Type: application/json
Accept: */*
Content-Length: 41
{
"clientId": "text",
"clientSecret": "text"
}POST /{region}/v1/auth/token/revoke HTTP/1.1
Host: app.aphex.co/
Content-Type: application/json
Accept: */*
Content-Length: 56
{
"clientId": "text",
"clientSecret": "text",
"token": "text"
}{
"accessToken": "text",
"expiresIn": "text",
"tokenType": "text"
}You’ll get a Ripple Status prompt.
Optionally apply the delay to the Successor.
Successor is Done:
Successor won’t move. Only the Promised Predecessor shifts.
Start > Finish (SF)
The second task finishes when the first task starts.
Finish > Start (FS)
The second task starts when the first task finishes.
Finish > Finish (FF)
The second task finishes when the first task finishes.
You can pan, scroll, and switch Views without disabling Spotlight
All normal task interactions remain available
Selection behaviour
Spotlight follows the currently selected Task
Clicking into empty space deselects the Task and clears the Pathway Spotlight
Printing
Spotlight is not included in print outputs
Printing does not disable Spotlight
Returning to the Gantt keeps Spotlight active
Shift while drawing the link to keep the existing gap - Aphex will automatically calculate and apply the right lag to preserve the spacing between tasksThe Lag Change Indicator will be visible on the Gantt for a few seconds after the change is applied
When Float = 0, the predecessor is considered Driving - any change to it will immediately shift the successor’s dates
When Float > 0, the predecessor is non-driving and has flexibility before it impacts the successor
Float and Driving values update dynamically whenever task dates, relationship types, or lag are changed
Example
Predecessor task finishes on: 1 September
Successor task starts on: 6 September
Lag: 1 day
Assume all days are working days
Step-by-step:
Days between 1 Sep and 6 Sept (inclusive): 5 days
Float = 5 - 0 - 1 = 4 days
The predecessor has 4 days of float. It can finish as late as 5 September without delaying the successor
Start > Start (SS)


The second task starts when the first task starts.
For Driving Predecessors Level of Effort Tasks you can select from:
Remove non-driving Links between selected Tasks (this is the recommended option)
Add missing Tasks to the import scope
Do nothing
Once you've made your selection, select to move to the next step
Set Task Status to Done (this is the recommended option)
Do nothing
Once you've made your selection, select to move to the next step
Click
Save time during your import by including Owners and Project Assets in your import file.
You can add the email address of the user’s you’d like to assign imported work to automatically, and the subcontractor and location of each task.
Create a UDF for each attribute (i.e. Subcontractor, Location and Owner) you wish to pre-populate.
Name each UDF something memorable, like “Aphex Subcontractor”.
In each UDF (eg. Subcontractor or Location), insert the field (Subcontractor, location etc.) for each activity. This should be consistent with the name in your Aphex project (if not, Aphex will create a new one)
In the Owner UDF, insert the email address of the activity’s owner. Check that this matches the email address the team member uses for Aphex. If not, the address entered will receive an invite to join the project.
If a Task has already been imported before (based on its Activity ID), it will be skipped - even if it’s since been updated in the source tool.
Imported Tasks are treated as the source of truth from the time they’re brought into Aphex - they won’t be overridden or replaced by future imports.
If a one-day duration is applied, Aphex will automatically add a -1 day lag to any successor links to prevent introducing variance.
If an Asset (like a Subcontractor or Owner) already exists with an exact name match, the imported tasks will be assigned to it. Otherwise, a new Asset will be created.
The Owner field must contain email addresses. If the email matches an existing user in the project, the task will be assigned to them. If not, they’ll be invited as a new user.
If a calendar with the same name already exists in the Aphex project, imported Tasks will be assigned to the existing calendar instead.
Relationship links between Tasks in your import scope are created automatically.
If both linked Tasks are imported at the same time, the relationship is created during import.
If the successor is imported later, Aphex will automatically stitch the existing predecessor and the newly imported successor back together once both Tasks exist.
Shifts are assigned to every Tasks.
Day Shift is assigned by default.
Depending on task timing, Aphex may assign All Shift or Night Shift automatically.
External IDs are generated automatically:
If Primavera P6 is the source, the Activity ID becomes the External ID.
If Microsoft Project is the source, the External ID is built from the Project Name + ID.
Task Type
Modification Reason (for Modified):
Why the task was changed (e.g., "Task type changed", "Links removed", "Status changed to Done", "Target Date set")
Skipped Reason (for Skipped):
Why the task was skipped (e.g., "LoE Tasks Skipped", "WBS Summary Skipped")
Folders Skipped CSV:
There is also a report for skipped folders, with folder-level details, e.g., folder code, name, and reason for skipping


Blockers
blockers=boolean
This parameter will determine whether blockers are included in the response. If not provided, the response will default to true
Fair Use Policy: The API endpoint is designed to support periodic (usually weekly) requests from projects. Use of the service outside that threatens the availability of the service for other projects could result in a suspension of the service for the offending project.
https://app.aphex.co/power-bi/v1/<your_api_account_id>curl \
-X GET \
-H "Authorization: Bearer $<your_token>" \
https://app.aphex.co/power-bi/v1/<your_API_account_id_here>Limit
limit=number
This parameter will determine how many of the historical published versions are returned. If not provided, the response will default to 5
Status
status=boolean
This parameter will determine whether status events are included in the response. If not provided, the response will default to true
Resource
resource=boolean
If you are looking for the quick guide to setting up Power BI for your project, check out this guide here
Note to enable responses greater than 32Mb please ask about an Enterprise plan.
The Versions of the Tasks included in each of the Publications along with all Task properties.
Response
Task ID
Publication ID
Task Name
Start
End
Duration
Calendar
Shift
Owner Name
Owner Email
Subcontractor
Work Area ID
Location Name
Location Type
Folder Path
Folder Name
External ID
Package ID
Package Name
Parent ID
Milestone *
Status
Notes
Blockers
AssigneeEmails
AssigneeNames
Tags
TargetDate
*Milestones will appear as Key Task [true / false] in the response
Note to enable responses greater than 32Mb please ask about an Enterprise plan.
This parameter will determine whether labour, plant and material assignments are included in the response. If not provided, the response will default to true
Billing Admin
Access to billing and subscription management only.
Member
Access assigned at the project level only - no admin or billing permissions.
Alongside their Organisation Role, Users can also be granted a Planner Seat. Seats are paid and will determine if the user has the possibility of accessing Planner in each Project they are invited to:
Planner
Can be given Full Planner Access in any Project they are a User on
Is able to open Aphex Insight
Full Planner access is determined at the Project level, but Users must first be assigned the correct seat to be eligible.
You can assign or revoke Planner Seats individually, in bulk, or during the user invite flow.
Open the Admin App and select Organisation Users
Indiviual Assignment:
Click on a specific User to open their slide-in panel
Toggle on their Planner Seat
Bulk Assignment:
Select multiple Users using the checkboxes
Use the multi-select toolbar to provision Planner Seats for all selected Users
Adding New Users:
When using the <+ add user> flow, you can assign Planner Seats during the invitation process by toggling their Planner Seat on
Open the Admin App and select Organisation Users
Click "Add User" to trigger the Organisation Add User window
Enter email addresses separated by commas
The system will validate email formats and check for existing users
Toggle the Planner Seat option as needed
Click
Adding a User at the Organisation level gives them access to the Organisation, but they won’t see any plans until they’ve been added to a Project
Suspending a User blocks their access to the Organisation and all associated Projects without deleting their data. Suspended Users no longer count toward your billed seat total.
Open the Admin App and select Organisation Users
Indiviual Suspension:
Click on a specific User to open their slide-in panel
Click ... then Suspend User
Confirm
Bulk Suspension:
Select multiple Users using checkboxes
Use the multi-select toolbar to choose ... then Suspend
Deleting an Organisation User removes all record of that User from your Organisation. Users must be suspended before they can be deleted.
Open the Admin App and select Organisation Users
Indiviual Delete:
Click on an already suspended User to open their slide-in panel
Click ... then Delete User
Confirm
Bulk Delete:
Select multiple suspended Users using checkboxes
Use the multi-select toolbar to choose ... then Delete User
Exporting Organisation Users allows you to download a CSV file containing user data from the Organisation Users table.
Open the Admin App and select Organisation Users
Select at the top right of the table
Super Admin
Everything. Full control over the Organisation, Project management, Users, Settings, Billing - even deletion.
System Admin
Same as Super Admin, except they can’t delete the Organisation or manage billing.
Select at the bottom of the group
Your new Task will appear as a line item within that Folder, ready to edit
See also: Task Properties
Tasks can be edited at any time; whether you're refining the plan, making updates as work progresses, or finalising details for the as-built record. You can update Tasks one by one or in bulk. Let's look at making edits across a selection of Tasks.
Use the to select all Tasks you want to update
Hold Shift on your keyboard to quickly select everything in between
Once selected, the multi-select toolbar will appear at the bottom of the Gantt
Click the to open the list of properties to edit - pick the one you want to change
Select the new value from the list
Click the to confirm. Your update will be applied to all selected Tasks
See also: editing via Gantt Columns
Drag-and-drop Tasks on the Gantt to easily adjust the start and end dates.
Hover over the Task Bar on the Gantt
Drag either end of the Task Bar to extend or shorten its Duration
Drag the middle to shift the entire Task forward or backward in time
Subtasks work just like regular Tasks, with all the same properties, but are nested inside a Parent Task. They’re ideal for breaking down higher-level activities, especially when importing from a Master Schedule, while keeping a clear link back to the source activity.
Hover over the Task you want to break down
Click
Hover over Add Subtasks
Enter the number of Subtasks you want to create
Click the to confirm
Your Task is now a Parent Task with embedded Subtasks
To add more Subtasks later, click directly under the Parent Task
Subtasks can only go one level deep (Parent → Subtask). If you need more structure, it's best to use Subfolders to build out your plan.
See also: Subfolders
Subtasks can be moved from one Parent Task to another, as long as a few conditions are met.
Click the column picker towards the top left of the Gantt
Toggle on the Parent column
Click into the cell for the Subtask you want to move
Select the new Parent Task from the list
The Subtask will move under the selected Parent
Use the to select all Tasks you want to duplicate
Hold Shift on your keyboard to quickly select everything in between
Once selected, the multi-select toolbar will appear at the bottom of the Gantt
Click to duplicate all selected Tasks
Hover over the Task Name
Select
Select Duplicate
Use the to select all Tasks you want to delete
Hold Shift on your keyboard to quickly select everything in between
Once selected, the multi-select toolbar will appear at the bottom of the Gantt
Select
Click Delete Tasks to delete all selected Tasks
Hover over the Task Name
Select
Select Delete Task
If you have multiple Aphex Projects, you may want to move Tasks & assets from one to another. We'll show you how.
Use the to select all Tasks you want to copy
Hold Shift on your keyboard to quickly select everything in between
Once selected, the multi-select toolbar will appear at the bottom of the Gantt
Click the and select Copy to an Aphex Project
Pick an existing Project or create a new one
Select whether to copy all Task Properties or pick from a custom list
Review the 'Copy Task Summary' and Click
Open the destination project: your tasks will be waiting on the Gantt
You can open a Task from anywhere; Gantt, Map, Board, or List View. Just click the task to open the full Task Panel, right on top of your current view so you won’t lose your place. Reorder the panel sections to keep the most relevant info where you need it.
Right-click any Task and select View Details
The Task Panel will open
Click any Task Card from the section on the left hand-side
Or, click the Work Area on the Map and then the icon
The Task Panel will open
Click any Task Card on Board
The Task Panel will open
Click the name of any Task in your List
The Task Panel will open
The Task Activity Log shows a full history of every change, from edits and delays to comments & documents, with who made the change and when.
Right-click any Task and select View Details
The Task Panel will open
Click to toggle the Activity Log on or off
Right-click any Task and select View Details
The Task Panel will open
Start typing into the Add Comment box at the bottom of the panel
Right-click any Task and select View Details
The Task Panel will open
Click the at the bottom of the panel
Select or to upload an image or document
Uploaded files will appear in the Task Activity Log
Use filters to show only
Who can use this feature?
Any Project User with full Planner Access can create Tasks. Task Owners, Assignees and Admins can edit Tasks.
Task Owners and Admins can delete Tasks.

Transferred Data means any Personal Data Processed by us or our Personnel on behalf of you in connection with the Terms.
Restricted Transfer means a transfer of personal data from the United Kingdom to any other country which is not subject to adequacy regulations pursuant to Section 17A of the United Kingdom Data Protection Act 2018.
Services means the services we agree to provide to you pursuant to the Terms.
UK GDPR means the EU GDPR as incorporated into United Kingdom law by virtue of Section 3 of the United Kingdom’s European Union (Withdrawal) Act 2018.
UK Addendum means the international data transfer addendum to the European Commission’s standard contractual clauses for international data transfers approved by the Information Commissioner’s Office under section 119A of the Data Protection Act 2018 on 21 March 2022 (version B.1.0), and as updated from time to time.
2.2 The terms, “Commission”, “Controller”, “Data Subject”, “Member State”, “Personal Data”, “Personal Data Breach”, “Processor”, “Processing” and “Sub-Processor” shall have the same meaning as in the UK GDPR.
The Parties acknowledge and agree that in connection with the Terms, where you provide us with Transferred Data, you will be the Controller, and we will process the Transferred Data on your instructions as a Processor.
4.1 Each Party agrees to comply with Applicable Data Protection Law in the Processing of Transferred Data.
4.2 You instruct us to process Transferred Data in accordance with this DPA (including in accordance with Annex 1).
4.3 We agree to not process Transferred Data other than on your documented instructions.
We agree to take reasonable steps to ensure the reliability of any of our Personnel who may have access to the Transferred Data, ensuring in each case that:
(a) access is strictly limited to those individuals who need to know / access the relevant Transferred Data, as strictly necessary for the purposes of the Terms; and
(b) the relevant Personnel are subject to confidentiality undertakings or professional or statutory obligations of confidentiality.
6.1 Taking into account the state of the art, the costs of implementation and the nature, scope, context and purposes of Processing as well as the risk of varying likelihood and severity for the rights and freedoms of natural persons, we agree to implement appropriate technical and organisational measures in relation to the Transferred Data to ensure a level of security appropriate to that risk in accordance with Applicable Data Protection Law, and as further particularised in Annex 2.
6.2 In assessing the appropriate level of security, we agree to take into account the risks that are presented by Processing, in particular from a Personal Data Breach.
7.1 Where we wish to engage a new Sub-Processor, we agree to provide written notice to you of the details of the engagement of the Sub-Processor at least 14 days’ prior to engaging the new Sub-Processor (including details of the processing it will perform). You may object in writing to our appointment of a new Sub-Processor within 7 days of such notice, provided that such objection is based on reasonable grounds relating to data protection. In such event, the Parties will discuss such concerns in good faith with a view to achieving resolution. If the Parties are not able to achieve resolution, we may, at our election:
(a) not appoint the proposed Sub-Processor;
(b) not disclose any Transferred Data we process on your behalf to the proposed Sub-Processor; or
(c) inform you that we may terminate the Terms (including this DPA) for convenience, in which case, clause 14.2 will apply.
7.2 You agree that the remedies described above in clauses 7.2(a)-(c) are the only remedies available to you if you object to our engagement of any proposed Sub-Processor by us.
7.3 Where we engage a Sub-Processor to process Transferred Data, we agree to enter into a written agreement with the Sub-Processor containing data protection obligations no less protective that those in this DPA with respect to the Transferred Data, and to remain responsible to you for the performance of such Sub-Processor’s data protection obligations under such terms.
7.4 Where the the transfer of Transferred Data from us to a Sub-Processor is a Restricted Transfer, it will be subject to the UK Addendum (and documents or legislation referred to within it), which shall be deemed to be incorporated into this DPA, and the UK Addendum is considered an appropriate safeguard.
8.1 Taking into account the nature of the Processing, we agree to assist you by implementing appropriate technical and organisational measures, insofar as this is possible, for the fulfilment of your obligations, as reasonably understood by you, to respond to requests to exercise Data Subject rights under the Applicable Data Protection Law.
8.2 We agree to:
(a) promptly notify you if we receive a request from a Data Subject under any Applicable Data Protection Law in respect of Transferred Data; and
(b) ensure that we do not respond to that request except on your documented instructions or as required by Applicable Data Protection Law to which we are subject, in which case we shall, to the extent permitted by Applicable Data Protection Law, inform you of that legal requirement before we (or our Sub-Processor) respond to the request.
9.1 We agree to notify you without undue delay upon becoming aware of a Personal Data Breach affecting Transferred Data, and to provide you with sufficient information to allow you to meet any obligations to report or inform Data Subjects of the Personal Data Breach under the Data Protection Laws.
9.2 We agree to co-operate with you and take reasonable commercial steps as directed by you to assist in the investigation, mitigation and remediation of each such Personal Data Breach.
9.3 If you decide to notify a Supervisory Authority, Data Subjects or the public of a Personal Data Breach, you agree to provide us with advance copies of the proposed notices and, subject to Applicable Data Protection Law (including any mandated deadlines under the UK GDPR), allow us an opportunity to provide any clarifications or corrections to those notices.
We agree to provide reasonable assistance to you, at your cost (to be charged on a reasonable time and materials basis), with any data protection impact assessments, and prior consultations with Supervisory Authorities or other competent data privacy authorities, which you reasonably consider to be required by article 35 or 36 of the UK GDPR or equivalent provisions of any other Data Protection Law (to the extent you do not otherwise have access to the relevant information and such information is in our control).
Subject to this clause 11, and subject to any document retention requirements at law, we agree to promptly and in any event within 30 business days of any valid requests involving the Processing of Transferred Data (Cessation Date), delete and procure the deletion of all copies of those Transferred Data.
12.1 Subject to this clause 12, where required by law, we shall make available to you on request all information reasonably necessary to demonstrate compliance with this DPA, and shall allow for and contribute to audits, including inspections, by you or an auditor mandated by you in relation to the Processing of Transferred Personal Data by us.
12.2 Where clause 12.1 applies, any audit (or inspection):
(a) must be conducted during our regular business hours, with reasonable advance notice (which shall not be less than 30 business days);
(b) will be subject to our reasonable confidentiality procedures;
(c) must be limited in scope to matters specific to you and agreed in advance with us;
(d) must not require us to disclose to you any information that could cause us to breach any of our obligations under Applicable Data Protection Law;
(e) to the extent we need to expend time to assist you with the audit (or inspection), this will be funded by you, in accordance with pre-agreed rates; and
(f) may only be requested by you a maximum of one time per year, except where required by a competent Supervisory Authority or where there has been a Personal Data Breach in relation to Transferred Personal Data, caused by us.
12.3 Your information and audit rights only arise under clause 12.1 to the extent that the Terms does not otherwise give you information and audit rights that meet the relevant requirements of Applicable Data Protection Law.
Despite anything to the contrary in the Terms or this DPA, to the maximum extent permitted by law, the Liability of each Party and its affiliates under this DPA is subject to the exclusions and limitations of Liability set out in the Terms.
14.1 Each Party agrees that a failure or inability to comply with the terms of this DPA and/or the Applicable Data Protection Law constitutes a material breach of the Terms. In such event, you may, without penalty:
(a) require us to suspend the processing of Transferred Data until such compliance is restored; or
(b) terminate the Terms effective immediately on written notice to us.
14.2 In the case of such suspension or termination by you, we shall provide a prompt pro-rata refund of all sums paid in advance under the Terms which relate to the period of suspension or the period after the date of termination (as applicable).
14.3 Notwithstanding the expiry or termination of this DPA, this DPA will remain in effect until, and will terminate automatically upon, deletion by us of all Transferred Data covered by this DPA, in accordance with this DPA.
14.4 You authorise our engagement of the Sub-Processors already engaged by us at the date of this DPA, which are set out at trust.aphex.co. .
Personal Data Transferred
Personal data of users you invite to the Platform, including:
first and last name
email address
phone number
Special Categories of Personal Data and criminal convictions and offences
Special Categories of Data will not be processed.
Relevant Data Subjects
Your staff members
Your customers
Anyone about whom personal data is input into the Services
Frequency of the transfer
Continuous
In assessing the appropriate level of security, we agree to take into account the risks that are presented by Processing, in particular from a Personal Data Breach. We have implemented and will maintain the following technical and organisational measures to protect Transferred Data:
Technical Security Measures
6.2.1 Encryption and Data Protection
Data at Rest: All Transferred Data is encrypted at rest using industry-standard AES-256 encryption
Data in Transit: All data transmissions are protected using TLS 1.2 or higher encryption protocols
Key Management: Cryptographic keys are managed through secure key management systems with automated rotation, role-based access controls, and comprehensive audit logging
Database Security: Production databases are encrypted and access is restricted to authorised personnel only through secure authentication mechanisms
6.2.2 Access Controls and Authentication
Multi-Factor Authentication (MFA): Required for all employee access to systems containing or processing Transferred Data
Role-Based Access Control (RBAC): Access to Transferred Data is granted based on the principle of least privilege and business need-to-know basis
Regular Access Reviews: Systematic review and audit of user access rights conducted quarterly to ensure continued appropriateness
Single Sign-On (SSO): Centralised authentication system with secure identity management
Session Management: Automatic session timeouts and secure session handling protocols
6.2.3 Network Security
Web Application Firewall (WAF): All public-facing endpoints are protected by managed WAF solutions to prevent common web application attacks
Network Segmentation: Production environments are logically separated from development and testing environments
Intrusion Detection and Prevention Systems (IDS/IPS): Network-based and host-based monitoring systems for detecting and preventing unauthorised access attempts
DDoS Protection: Distributed denial-of-service protection mechanisms implemented at network level
Virtual Private Networks (VPN): Secure remote access channels for authorised personnel
6.2.4 System Security and Monitoring
Security Information and Event Management (SIEM): Comprehensive logging and real-time monitoring of security events across all systems processing Transferred Data
Vulnerability Management: Regular vulnerability scanning and penetration testing, with documented remediation processes
Endpoint Protection: Advanced threat detection and response solutions deployed on all endpoints
Backup and Recovery: Automated daily backups of all Transferred Data with encryption matching production data standards
System Hardening: Operating systems and applications configured according to industry security benchmarks
6.2.5 Application Security
Secure Development Lifecycle (SDLC): Security considerations integrated throughout the software development process
Code Analysis: Static and dynamic code analysis tools used to identify security vulnerabilities
Threat Modelling: Security threat assessments conducted for new features and system changes
Third-Party Security Assessment: Regular penetration testing and security assessments by qualified external security firms
Organisational Security Measures
6.2.6 Information Security Management
ISO 27001 Certification: Our information security management system is certified to ISO 27001:2022 standards
Security Governance: Dedicated information security team with defined roles, responsibilities, and escalation procedures
Risk Management: Regular security risk assessments and documented risk treatment plans
Incident Response Plan: Comprehensive incident response procedures with defined roles, communication protocols, and recovery processes
Business Continuity: Documented business continuity and disaster recovery plans tested at least annually
6.2.7 Personnel Security
Background Checks: Security screening of personnel with access to Transferred Data in accordance with applicable laws
Confidentiality Agreements: All personnel with potential access to Transferred Data are bound by confidentiality obligations
Security Training: Mandatory security awareness training for all employees, conducted annually with additional role-specific training for technical staff
Access Provisioning and De-provisioning: Formal processes for granting and revoking system access, including immediate access revocation upon employment termination
6.2.8 Vendor and Sub-processor Management
Due Diligence: Security assessments of all sub-processors and vendors with access to Transferred Data
Contractual Requirements: All sub-processors subject to data protection obligations equivalent to those in this DPA
Regular Audits: Periodic assessment of sub-processor security controls and compliance
Supply Chain Security: Monitoring and assessment of third-party security practices and incident notifications
6.2.9 Physical and Environmental Security
Data Centre Security: Physical security controls managed by certified cloud infrastructure providers (with SOC 2 Type II and ISO 27001 certifications)
Office Security: Access controls, visitor management, and clean desk policies at corporate facilities
Equipment Security: Secure disposal and sanitisation of hardware containing Transferred Data
Environmental Controls: Appropriate environmental monitoring and controls for systems processing Transferred Data
6.2.10 Compliance and Audit
Regular Audits: Internal security audits conducted at least annually, with external compliance audits for relevant certifications
Documentation: Comprehensive documentation of all security controls and procedures
Policy Management: Regular review and update of security policies and procedures to reflect current threats and best practices
Compliance Monitoring: Ongoing monitoring and assessment of compliance with applicable data protection regulations and industry standards
Review and Improvement
We commit to:
Regularly reviewing and updating these measures to address evolving security threats and technological developments
Conducting annual assessments of the effectiveness of implemented security controls
Implementing improvements based on audit findings, security assessments, and industry best practices
Notifying you of any material changes to our security measures that may affect the protection of Transferred Data
These measures are designed to ensure an appropriate level of security taking into account the state of the art, implementation costs, and the nature, scope, context, and purposes of processing, as well as the risks of varying likelihood and severity for the rights and freedoms of natural persons.
Available at https://trust.aphex.co/
In Aphex, the project’s WBS is built using Folders. Folders and Subfolders are how teams organise and group Tasks across the plan - whether you're pulling in a detailed structure from P6 or Asta, or building a more streamlined setup to suit daily and weekly site planning.
Root Folders sit at the top of your Folder hierarchy - everything else rolls up into them. You can create one directly from the Gantt while planning, or use the Folders Management page to build out your structure more intentionally.
Make sure that your set to Folders
job title.
Nature of the transfer
As specified in the Terms and this DPA, including without limitation:
collection, organisation, storage (hosting), retrieval and other processing of Transferred Personal Data necessary for us to provide, maintain and improve the Platform]; and
transmission, disclosure and dissemination of Transferred Personal Data to provide the Services in accordance with the Terms or as compelled by law.
Purpose of processing
The purpose of the transfer and processing are as specified in the Terms and this DPA.
Duration of the Processing
The term of the Terms, and for a period of 30 days after termination or expiry of the Terms, unless otherwise required by law.


Confirm
Confirm
Full access and management of the Projects page
Full access and management of the Security controls
Ability to permanently delete the Organisation (Obliterate)
Management of Advanced Permissions
Full access and management of Billing & Subscription
Full access and management of the Projects page
Full access and management of the Security controls
Management of Advanced Permissions
Be added to Projects
Access Aphex Insight
Open the Admin App
Manage Org Settings
Delete the Org
Manage Org Users
Provision Paid Seats
Members & Billing Admin:
Only possible via Invite User flow
Downgrade Paid Seats
Manage Existing Projects
Manage Billing
Invite New Members to Org
Permissions can be customised
Create New Projects
Permissions can be customised
Transfer Projects Between Orgs
Manage Authentication
Users with Planner Seats count toward your billed seat total - this directly affects your Organisation’s subscription cost.
Only Super Admins and System Admins can manage Planner Seat assignments at the organisation level.
The invite link is optional - invited Users can also sign up directly using their invited email address at app.aphex.co/sign-up
Authentication: Matches organisation setup
Last Login: Shows as "never" until first login
Status Indication
Suspended users show as Suspended throughout the system
Billing Impact
Suspended users are no longer billed
Records Preserved
User data and activity history remain intact
User's activity history and records are permanently deleted
User's email address
Role
User's Organisation Role
LastLogin
The date of the last time the user logged in to the Organisation
Planner Seat
Yes/No
Auth
How users sign in to the system
Suspension Status: Shows "Suspended" for suspended users
Full access and management of Organisation Settings
Management of Organisation Settings
Full access and management of Billing & Subscription
Name
User's chosen display name

Full access and management of Organisation Users
Full access and management of Organisation Users
Access the Org
Each task starts with a 1-day duration
Each new task will be placed on the nearest Monday within your current View
(You can adjust these at any time)
Subtask
Milestone
Tasks you don’t have permission to edit will be skipped, and you’ll be notified
After each action, you’ll get a summary of how many tasks were updated or skipped with the option to undo
Package
Folder
If one of these Properties are edited, this update will automatically apply to the Parent and all its Subtasks.
All other Task Properties can be individually allocated to Subtasks.
Progress Updates
Comments
Documents
Milestone History
Material Actuals
All Relationship Links between the duplicated Tasks will be duplicated
Copied Assets will match to existing Assets (if the Name or Code matches), otherwise new Assets will be created in the destination Project
Tasks can only be moved into Projects within the same Organisation
The layout will apply every time you open a task, until you change it again
There are different task panel layouts for Tasks, Parent Tasks, and Packages


Add Root Folder will appear on the GanttClick your Project Title in the top left, then select Project Assets
Select Folders from the menu
Click
Add a Folder Name and update the code if needed
Click Save
The Folder is added to the project structure, ready for the team to add Tasks into
Subfolders help you build out your Folder Structure with as much detail as your plan needs. You can nest Subfolders as deep as required - there's no limit!
From the Folders Management Page:
Click your Project Title in the top left, then select Project Assets
Select Folders from the menu
Hover over the Folder you would like to add a Subfolder to
Click on the + symbol
Select Add Sub-Folder
Add a Folder Name and update the code if needed
Click Save Changes
The Subfolder is added to the project structure, ready for the team to add Tasks into
Hover over the Folder you are adding to
Click on the + symbol
Select Add Subfolder
Type in the Subfolder Name & select the Create [Folder Name] button
If parts of your Folder Structure need to stay exactly as they are, you can apply Folder Protection. You can lock down changes to names, codes, position, or structure - including the ability to add Subfolders.
Click your Project Title in the top left, then select Project Assets
Select Folders from the menu
Locate the Folder you'd like to Protect
Click the in the State column to cycle through the various Protected States:
Default
Semi-Protected
Click Save Changes
Reordering Folders is quick and flexible. Move a single Folder or an entire branch - just remember that the Folder Structure is shared with everyone on the project, so your updates will apply project-wide.
Click your Project Title in the top left, then select Project Assets
Select Folders from the menu
Hover over the Folder name & click and hold to the left of the checkbox
Drag the Folder to move it
Click Save Changes
To move a Folder using the Overflow Menu
Hover over the Folder & click the ...
Select Move to bring up the menu
Click on the Folder you want to move to & confirm using the button
Click Save Changes
You can duplicate Folders to help build out your Folder Structure faster – avoiding the need to recreate similar setups manually.
From the Folders Management Page:
Click your Project Title in the top left, then select Project Assets
Select Folders from the menu
Hover over the Folder & click the ...
Choose one of the two duplication options:
Duplicate – duplicates only the selected Folder.
Duplicate Branch – duplicates the Folder and all its Sub-Folders.
Click Save Changes
From the Gantt:
Locate the Folder(s) you want to duplicate.
Hover over the Folder & click the ...
Choose one of the two duplication options:
Duplicate – duplicates only the selected Folder and the tasks visible within it.
Duplicate Branch – duplicates the Folder, all its Sub-Folders, and the tasks visible within them.
Choose one of the two options in the Task Ownership Modal
Keep original Owners
Assign Ownership to me
Click Confirm Duplicate
To use the Folder Importer, upload a spreadsheet with both a Code and Name for each Folder.
The importer works with CSVs exported from other planning tools. If your system doesn’t support folder exports, you can copy folder codes and names manually into our template.
Click your Project Title in the top left, then select Project Assets
Select Folders from the menu
Click
Choose either Upload a File or Copy and Paste
Add your data (upload CSV or copy and paste)
Map both the Folder Code and Name fields
Review your data
Complete the Import
See also: import Folders from your Master Schedule
Folders can be deleted one by one or in bulk - whatever works best for your clean-up.
Click your Project Title in the top left, then select Project Assets
Select Folders from the menu
Hover over the Folder you wish to delete
Select ... and then Delete Folder
This organises your Tasks by the Folders they belong to. It's a simple way to view your plan in the same structure used across the Project.
Click the menu in the top left of the Gantt
Pick Folder as a Primary Grouping
Click the menu in the top left of the Gantt
Select the button next to Folder to switch to Flattened Folders
Flattened Folders shows only the lowest level Folder for each Task in a single row
The full Folder path appears above the Folder Name, saving vertical space
Click the same icon again to return to Folder Tree mode
Folder Tree shows your full Folder hierarchy, one row per level, so you can see exactly where each Tasks sits in the structure.
Apply a Folders Filter to see only the Tasks sitting in certain parts of your Project structure.
Click and
Select Folder in the first dropdown
Select the Operator in the second dropdown
Is Within to reveal Tasks that sit inside the selected branch
Is to reveal Tasks that belong to the specific Folder
Pick your Folders in the third dropdown
Click Apply Selected
See also: create & share Views
Who can access this feature?
Project Admins can run Master Schedule Imports.
Folder codes update to match their new Parent. If you move a Folder, its code prefix will adjust to reflect its new location.
Move the entire Folder Branch:
All your selected Folders (& contained Subfolders) will keep their original nested positions after being moved under the destination Folder.
The importer automatically warns and excludes any duplicate Folder codes
The importer will autocomplete branches where they are missing in the source file.
For example, a Folder Code imported as East.123.A.1 will automatically create the parent nodes of East, East.123, and East.123.A if they are not included in either the source file or the existing Aphex project
This guide outlines how to prepare your Asta Powerproject file before importing into Aphex. We've included known quirks, export tips, supported file types and small adjustments that can make a big difference once the file is uploaded into your Aphex Project.
Once you've exported your file, see how to run the import into Aphex:
XER
XML (Primavera P6 Schema)
XML ( Microsoft Project Schema)
At Aphex, we respect your privacy and data protection rights and recognize the importance of protecting the personal data we collect and process. This Privacy Policy is designed to help you to understand what personal data we collect about you and how we use and share it.
When we refer to Aphex in this Privacy Policy, we mean Aphex Software Limited, a company registered in England and Wales, company registration number 09681747 and register address of 82 Wandsworth Bridge Road, London, United Kingdom, SW6 2TF, and all group companies of Aphex Software Limited, including:
Aphex Australia Pty Ltd (ABN: 13 628 119 648)
("Aphex", "we", "us", "our").
Each user has an Project Role that controls what Tasks they can edit, and what data they can manage inside the Project.
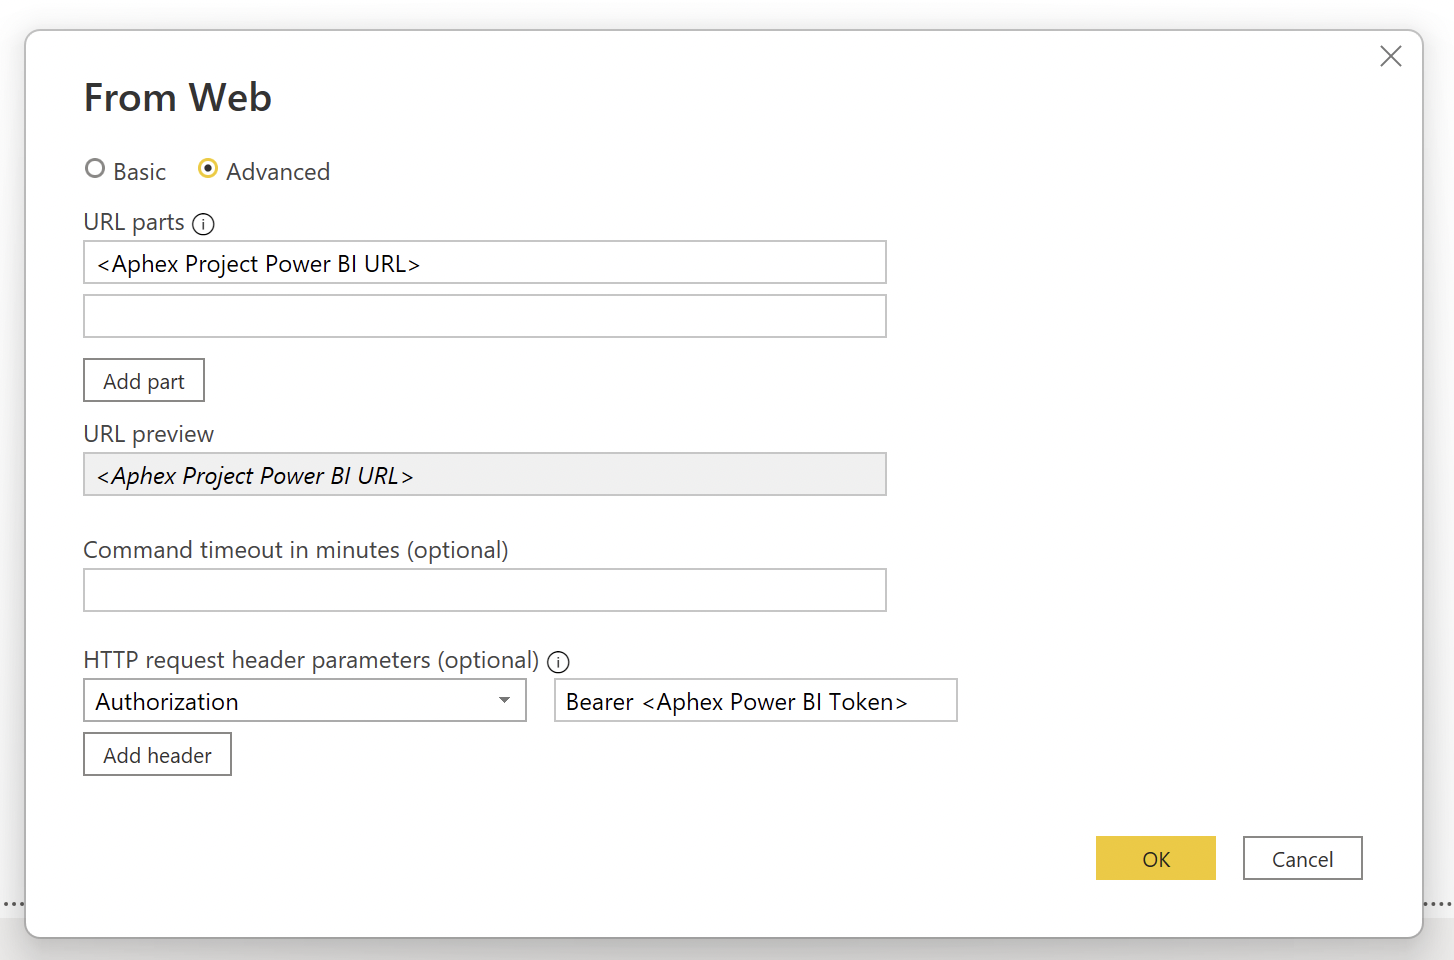
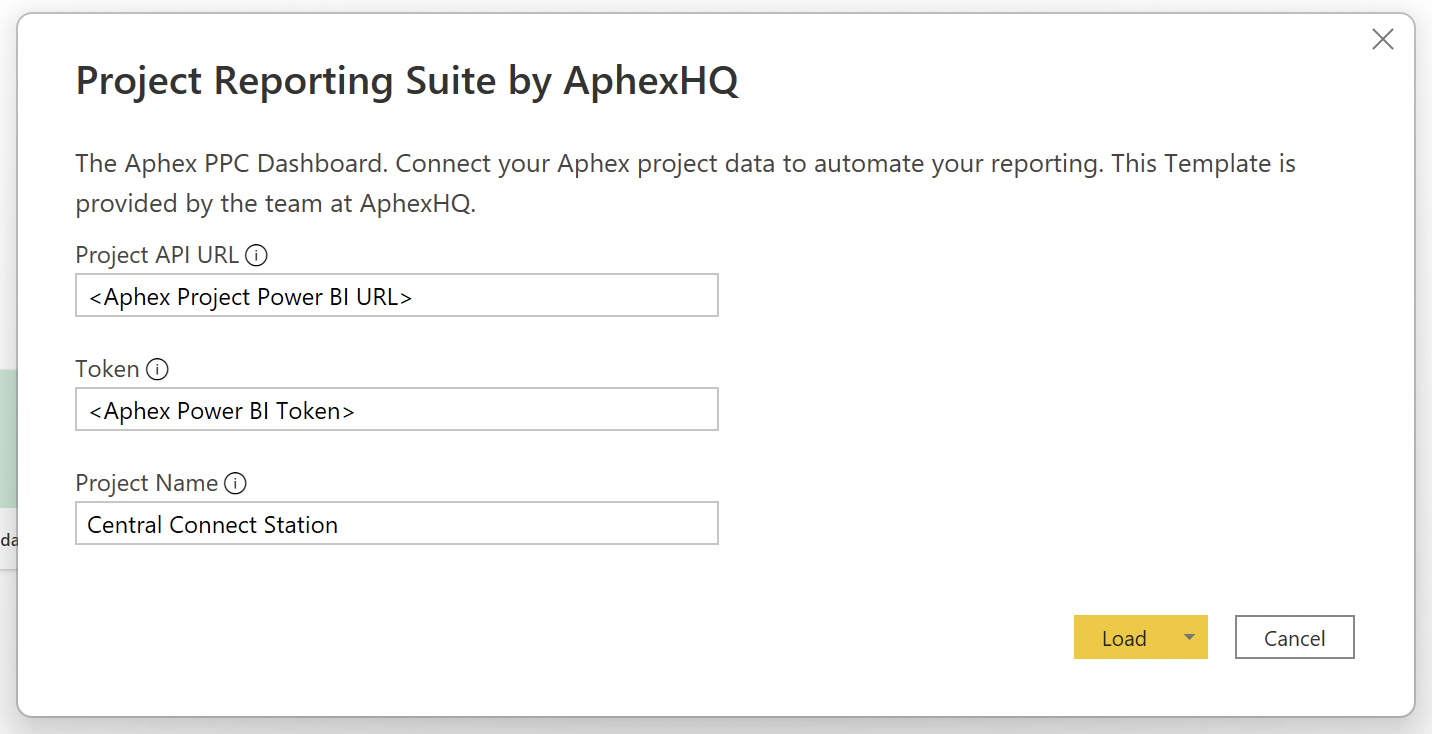
Protected
Folders use a tree-style structure - each level down the tree adds another decimal place to the code, showing its position in the hierarchy
Default
✓
✓
✓
✓
Semi-Protected
-
-
-
✓
Move the selected Folders only:
All your selected Folders (& contained Subfolders) will be flattened to the same level under the destination Folder.
[duplicate] suffix.Can duplicate any folder or branch.
All duplication options are disabled.
Admins & Members (Allow Root Folders: On)
Can duplicate any folder or branch.
Can duplicate any folder or branch.
Admins & Members (Allow Root Folders: Off)
Can duplicate any folder or branch.
Cannot duplicate root-level folders, but can duplicate any nested folders.
When duplicating tasks, ownership is handled differently depending on your role and selected option:
Admin
All duplicated tasks will keep their original owners.
All duplicated tasks will be assigned to you.
Member (No Delegate Permissions)
Tasks owned by other users will be skipped and not duplicated.
Any String
Opting to delete the entire Folder branch will delete the selected row, and all Folders nested underneath
Folder Code
A period-separated code (sometimes called WBS path)
Example; East.123.A.1
This would be imported as
East
123
A
1
Folder
Is Is Not Is Within Is Not Within Is Empty Is Not Empty
Sample Folder Import


Admins Only
Admins Only
Folder Name
Multi-select
MPP
Visit the Asta Documentation for guidance on how to export to XML (P6) and XER & MPP and XML (MP)
Often, your delivery team won't need to see every single task in the Master Schedule in Aphex - they just need the right slice of it. Filtering before you export from Asta means the plan you import into Aphex includes only relevant tasks, not cluttered with everything else, like Procurement or Design. There are three main ways to filter, let's take a look at each below.
Best For: Quick exports of exactly what’s on screen
Supported Export Formats: MS Project XML or MPP
For full details, visit the Asta Documentation to see how to Apply Filters and learn more about the Export Wizard
Best For: Selecting a complete phase/area/discipline directly from the WBS (one or several branches) and bringing it across intact.
Supported Exported Formats: MS Project XML or MPP
For full details, visit the Asta Documentation for exporting to Microsoft Project
Best For: Granular control over exactly which tasks you want to import, regardless of where they sit in the overall structure.
Supported Exported Formats: MS Project XML, MPP, P6 XML, XER
For full details, visit the Asta Documentation to see how to work with User Fields
See also: apply your Custom Filter during the Import Process
Aphex can build your folder structure from your Asta hierarchy. It only creates Folders for WBS levels that have Tasks included in your import (empty branches aren’t created).
Your mapping options depend on the export schema you’re using:.
What it is: The formal WBS code in the exported file
Why pick this: You want folders to follow the project’s formal WBS exactly. Only select this option if you’ve built/assigned WBS codes to activities
Supports: Primavera P6 XML and XER
What it is: A hierarchy built from the chart/summary grouping at export time (the “natural” on-screen order)
Why pick this: You want Folders to mirror the practical on-screen grouping you used when exporting. Select this option when you’re organising by visible grouping and don’t have WBS codes in place.
Supports: Primavera P6 XML and XER
What it is: An automatic path like 1.2.3 that shows a task’s exact position in the outline
Why pick this: You want Folders to mirror the on-screen outline from an MS Project-schema export
Supports: MS Project XML and MPP
What is it: Asta’s Work Breakdown Number assigned to each task. It’s a hierarchical, generated identifier (often looks like 1.2.3). It isn’t the formal WBS code; it’s Asta’s task ID scheme
Why pick this: If your team already references WBNs and wants that familiar structure reflected in Aphex
Supports: MS Project XML
By default, Aphex imports all core task & relationship data from your export.
If you've already captured extra information in Asta, like Owner, Location, Subcontractor or Notes, you can pull these into Aphex too, using Asta's Task-level User Fields.
If you don't - that's no problem! It's easy and quick to apply the same edits in the Aphex plan.
Create a User Field in Asta:
Select Task in the Object type dropdown
Choose String as the Field type
We've suggest naming it something descriptive, like Aphex_Subcontractor
Add this new User Field as a column in your Asta view
For each Task you're importing, add in the value (the Subcontractor name, in this example) in the relevant cell
Repeat for any other optional property you want to import.
Also: How to map User Fields during the Import Process
Asta’s Summary Bars are used to group and structure Tasks in a hierarchical plan. In Asta, they’re a distinct Object Type.
However, when imported into Aphex, Summary Bars are treated as regular Tasks, which can result in duplication if the Tasks they summarise are also imported.
Mid‑Links are a type of logic link in Asta where the dependency connects to or from the middle of an activity, rather than the start or finish.
To keep things as simple as possible for end users, Aphex doesn’t handle mid‑link logic - all links must connect to either the start or end of a task.
Additionally, as mid-links aren’t supported in P6 or MS Project, Asta converts them during export to XML or XER to the closest matching link type.
In Aphex, the smallest possible task duration is one day.
This works well once tasks are in Aphex, but it can cause changes if you’re importing from a Master Schedule where some tasks are shorter than a full day.
Aphex automatically handles these adjustments during the import process, which should result in sequenced tasks remaining aligned on the correct dates, without you needing to do anything.
To keep Aphex as simple as possible, constraints are not supported (e.g., “Must Start On”, “Start No Earlier Than”). When you import from Asta, Aphex will schedule from links, durations, start date and calendars. As a result, tasks that were being “held” by constraints in the source file can move once imported and be a source of variance.
Aphex assumes the lookahead inside Aphex is most up-to-date version of the plan, once tasks are imported. On later imports, existing Aphex tasks are not overwritten. Imports only ever create new tasks (i.e., tasks that don’t already exist in Aphex).
Often, your Master Schedule is contractual, so nothing should change by accident. Aphex shows what’s moved and why; updates back to Asta stay manual, deliberate, and on your terms.
Weekly Published Versions & Import Baselines - snapshots you can compare against.
Variance Reports & Exports - quickly see what changed since the last baseline (date moves, duration changes, new/removed tasks, completion).
External ID awareness - imported tasks carry the Asta identity, even when imported Tasks have been broken down into subtasks, so you can still line them up 1:1 when editing in Asta.
In Asta, Tasks and Milestones are treated as separate object types. If you create a User Field for the Task object, it won’t be applied to Milestones - even if they appear in the same activity list.
This means that if you're filtering for Milestones alongside Tasks, as the User Field you’ve created is Type = Task and Data type = String, it won’t apply to Milestones - so they won’t pass the "Aphex_Import = Yes" filter during import.
For full details on creating and managing User Fields, visit the .
In Asta, Tasks and Milestones are treated as separate object types. If you create a User Field (UF) for the Task object, it won’t be applied to Milestones - even if they appear in the same activity list.
This means that if you're importing Milestones alongside Tasks, any values for optional fields like Subcontractor, Owner, Location, or Notes won’t carry over for Milestones. You can still add them manually in Aphex after the import.
If Summary Bars are used purely for grouping, consider filtering them out before export to avoid duplicating detail tasks.
Alternatively, if you’re looking to bring in a high-level version of the programme, you can choose to import just the Summary Bars for a top-line plan.
interact with any of Aphex’s websites (including aphex.co, app.aphex.co, help.aphex.co) or our social media pages (collectively, the "Sites") ("website users");
visit any of Aphex’s premises ("office visitors");
attend an Aphex event or an event which Aphex sponsors ("event attendees");
use Aphex's applications and services, to the extent that we are acting as a controller of your personal data (collectively, the "Aphex Services") ("customers");
interact with any shared data from Aphex's Apps (including shared reports and plans ("guests");
are a marketing prospect, who is anyone whose data Aphex processes for the purposes of assessing customer eligibility ("marketing prospect"); or
receive marketing communications from Aphex.
This Privacy Policy takes into account the General Data Protection Regulation 2016/679 (EU GDPR) for individuals located in the European Union or European Economic Area, and General Data Protection Regulation (EU) 2016/679) (UK GDPR) and the Data Protection Act 2018 (DPA 2018). In this Privacy Policy, the EU GDPR and UK GDPR are together referred to as the GDPR. This Privacy Policy also takes into account the requirements of the Australian Privacy Act 1988 (Cth) and the Australian Privacy Principles, as well as the New Zealand Privacy Act 2020 and the Information Privacy Principles.
For the purposes of the GDPR, this Privacy Policy covers personal data that we collect and process in our capacity as a controller of personal data. Where you are invited to access the Aphex Services by a business, that business is the ‘controller’ of any personal data that you input into the Services (“End User Data”), and we act as a data processor to process your End User Data on behalf of the controller organisation. The controller is responsible for complying with any regulations or laws that require providing notice, disclosure, and/or obtaining your consent prior to transferring the End User Data to us to process on their behalf, therefore End User Data is not covered by this Privacy Policy. You should view the controller’s privacy policy and/or contact the controller to understand their privacy practices in relation to your End User Data.
Our Data Protection Officer can be contacted in writing at [email protected].
The personal data that we collect about you broadly falls into the categories set out in the following table. Some of this information you provide voluntarily when you interact with the Aphex Services and Sites, or when you attend an event or visit our premises. Other types of information may be collected indirectly from your device, such as device data and service data (and in cases where cookies are used to collect this data, subject to your consent). From time to time, we may also receive personal data about you from third party sources (as further described in the table).
We may collect the following personal data about:
our website users;
recipients of marketing communications; and
marketing prospects.
1. Registration, contact, and company information:
first and last names;
email addresses;
phone numbers;
avatars;
company name;
your role in your company.
2. Payment information:
credit card information;
billing and mailing addresses;
other payment-related information.
3. Device data:
operating system type and version number, manufacturer and model;
browser type;
screen resolution;
IP address;
unique device identifiers.
4. Service data:
the website you visited before browsing to the Aphex Services;
how long you spent on a page or screen;
how you interact with our emails;
navigation paths between pages or screens;
date and time;
pages viewed;
links clicked.
5. Third party source data:
profile information gathered from social networking sites;
information that you have viewed or interacted with our content;
company information;
job titles;
avatars;
email addresses;
phone numbers;
addresses;
6. Geolocation data
The sources of this third party personal data may include:
Contact enrichment and lead generation providers; and
Targeted online advertising providers
We may collect the following personal data about our office visitors:
1. Registration, contact and company information:
first and last names;
email addresses;
phone numbers;
company name;
2. Visitation Data
time and date of arrival;
photograph ID;
signature;
CCTV footage.
We may collect the following personal data about event attendees:
1. Registration, contact and personal information:
first and last names;
email addresses;
phone numbers;
mailing addresses;
company name;
your role in your company.
2. Visitation Data
time and date of arrival;
photograph ID;
signature;
CCTV footage.
3. Third party source data:
first and last names;
email addresses;
phone numbers;
mailing addresses;
company name;
your role in your company.
4. The sources of this third party personal data may include:
The event organizer
We may collect the following personal data about our customers and guests (to the extent applicable):
1. Registration and contact information:
first and last names;
email addresses;
phone numbers;
mailing addresses;
company name;
your role in your company.
2. Payment information:
credit card information;
billing and mailing addresses;
other payment-related information.
3. Device data:
operating system type and version number, manufacturer and model;
browser type and language;
screen resolution;
IP address;
unique device identifiers.
4. Service data:
the website you visited before browsing to the services;
how long you spent on a page or screen;
navigation paths between pages or screens;
session date and time; activity status (including first seen, last seen, last heard from - and last contacted);
pages viewed;
links clicked;
language preferences
tags applied within customer accounts
Aphex assigned user identifier.
5. Third party source data
profile information gathered from social networking sites;
information that you have viewed or interacted with our content;
company information;
job titles;
avatars;
email addresses;
phone number;
approximate geolocation data.
Where cookie consent (under applicable laws) is required to collect any of the above personal data, the collection will be subject to your consent.
Some device data, service data and third party source data is collected through the use of first or third party cookies and similar technologies. Aphex Apps do not collect, retain, or share data regarding a particular user's activity across multiple websites or applications that are not owned by Aphex. Aphex does assign each user a unique user ID within the scope of an individual website, but does not collect or retain IP or any information that would allow Aphex to identify the same particular user on more than one website. For more information, please see Aphex's Cookie Policy.
Do Not Track. Some Internet browsers may be configured to send "Do Not Track" signals to the online services that you visit. We currently do not respond to "Do Not Track" or similar signals. To find out more about "Do Not Track," please visit http://www.allaboutdnt.com.
We collect and process personal data about you only where we have legal bases for doing so under applicable laws. We have set out below, in a table format, a description of all the ways we plan to use your personal data, and which of the legal bases we rely on to do so. We have also identified what our legitimate interests are where appropriate. Note that we may process your personal data for more than one lawful ground depending on the specific purpose for which we are using your data. Please reach out to us if you need further details about the specific legal ground we are relying on to process your personal data where more than one ground has been set out in the table below.
Purpose of use / disclosure
Legal Basis for processing
Providing and facilitating delivery of the Aphex Services, including to provide you with a login.
Performance of a contract with you
Providing and facilitating delivery of the Aphex Site
Legitimate interests: to facilitate the function of our Aphex Site.
To contact and communicate with you about the Aphex Services, including in response to any support requests you lodge with us or other enquiries you make with us.
Performance of a contract with you
Legitimate interests: to administer the Aphex Services, including to inform you of the availability or security of the Aphex Services.
In certain circumstances, we may collect your personal data on a different legal basis. If we do, or if we use your personal data for purposes that are not compatible with, or are materially different than, the purposes described in this notice or the point of collection, we will explain how and why we use your personal data in a supplementary notice at or before the point of collection. Where we refer to legal bases in this section we mean the legal grounds on which we can rely when processing personal data.
We may disclose some or all of the personal data we collect to the following third parties:
To Aphex Group Companies:
Aphex Software Limited;
Aphex Australia Pty Ltd;
Any such other group companies as may be added to this list from time to time.
Our employees and contractors
Service Providers:
Consultants and vendors engaged by us to support our provision of the Aphex Services and Sites and the operation of our business, including IT service providers, data storage, web-hosting and server providers, marketing or advertising providers, payment systems operators, and including those service providers set out on our , from time to time; and
third-party AI providers such as Open AI and Anthropic.
Professional Advisors:
Professional advisors, such as lawyers, auditors and insurers, in the course of the professional services that they render to us.
Compliance with Law Enforcement:
Comply with applicable laws, lawful requests, and legal process, such as to respond to subpoenas or requests from government authorities;
Protect our, your or others’ rights, privacy, safety or property (including by making and defending actual or prospective legal claims);
Business Transfers:
Parties to transactions or potential transactions (and their professional advisors) involving a corporate divestiture, merger, consolidation, acquisition, reorganization, sale or other disposition of all or any portion of the business, assets, or equity interests of Aphex Group Companies (including, as part of a bankruptcy or similar proceeding).
Analytics businesses:
Third parties to collect and process data, such as Google Analytics (To find out how Google uses data when you use third party websites or applications, please see www.google.com/policies/privacy/partners/ or any other URL Google may use from time to time), Meta Pixel or other relevant analytics businesses.
Aggregated or anonymised information. We may also share aggregated or anonymised information with third parties for other purposes. Such information does not identify you individually, but may include usage, viewing and technical information such as the websites you generally use, the configuration of your computer, and performance metrics related to the use of websites which we collect through our technology, products and services. If we are required under applicable law to treat such information as personal data, then we will only disclose it as described above. Otherwise, we may disclose such anonymised information for any reason.
We retain your personal data only for as long as necessary to fulfill the purposes set out in this Privacy Policy, or as otherwise required under law. If you would like more information about specific retention periods please contact [email protected]
Note that content you create may remain on the Sites even if you cease using the Sites or we terminate access to the Sites.
We will process End User Data for as long as is required and/or permitted under the relevant data processing agreement between us and the controller entity, unless required to be retained by law.
The Aphex Services and Sites, are provided and hosted globally by Google Cloud. Unless otherwise specified, we may transfer, and process, your personal data outside of the country in which you are resident to other Aphex Group Companies and our service providers including to the UK, Australia and other such countries as we deem appropriate from time to time. These countries may not have equivalent privacy and data protection laws (and, in some cases, may not be as protective). We will protect your personal data in accordance with this Privacy Policy wherever it is processed.
Certain recipients (our service providers and other companies) who process your personal data on our behalf may also transfer personal data outside the country in which you are resident. Where such transfers occur, we will make sure that an appropriate transfer mechanism is put in place to protect your personal data.
If you are a resident of the EEA or the UK you have the following data protection rights:
Access: You may request details of the personal data that we hold about you and how we process it (commonly known as a “data subject request”). If you wish to access, correct, update or request deletion of your personal data, you can do so at any time by using the contact details below.
Processing and portability: You can object to processing of your personal data, ask us to restrict processing of your personal data or request portability of your personal data.
Unsubscribe: You have the right to opt-out of marketing communications we send you at any time. If you no longer wish to receive our newsletter and promotional communications, you may opt-out of receiving them by clicking on the "unsubscribe" or "opt-out" link in the communications we send you. Please note, however, that it may not be possible to opt-out of certain service-related communications. You can let us know at any time if you do not wish to receive marketing messages by contacting us on the Aphex Messenger or by contacting us using the contact details below.
Withdraw consent: If we have collected and process your personal data with your consent, then you can withdraw your consent at any time. Withdrawing your consent will not affect the lawfulness of any processing we conducted prior to your withdrawal, nor will it affect processing of your personal information conducted in reliance on lawful processing grounds other than consent.
Information from third parties: If we receive personal data about you from a third party, we will protect it as set out in this Privacy Policy. If you are a third party providing personal data about somebody else, you represent and warrant that you have such person’s consent to provide the personal data to us.
Complaints: If you wish to make a complaint, please contact us using the details below and provide us with full details of the complaint. We will promptly investigate your complaint and respond to you, in writing, setting out the outcome of our investigation and the steps we will take to deal with your complaint. You have the right to complain to a data protection authority about our collection and use of your personal information. For more information, please contact your local data protection authority. Contact details for data protection authorities in the EEA and the UK are available . We would, however, appreciate the chance to deal with your concerns before you approach the relevant data protection authority, so please contact us in the first instance.
You can exercise any of these rights by submitting a request to our Data Protection Officer at [email protected].
If you are a resident of Australia or New Zealand, you have the following data protection rights:
Your choice: Please read this Privacy Policy carefully. If you provide personal information to us, you understand we will collect, hold, use and disclose your personal information in accordance with this Privacy Policy. You do not have to provide personal information to us, however, if you do not, it may affect our ability to do business with you.
Information from third parties: If we receive personal information about you from a third party, we will protect it as set out in this Privacy Policy. If you are a third party providing personal information about somebody else, you represent and warrant that you have such person’s consent to provide the personal information to us.
Restrict and unsubscribe: To object to processing for direct marketing/ unsubscribe from our email database or opt-out of communications (including marketing communications), please contact us using the details below or opt-out using the opt-out facilities provided in the communication.
Access: You may request access to the personal information that we hold about you. An administrative fee may be payable for the provision of such information. Please note, in some situations, we may be legally permitted to withhold access to your personal information. If we cannot provide access to your information, we will advise you as soon as reasonably possible and provide you with the reasons for our refusal and any mechanism available to complain about the refusal. If we can provide access to your information in another form that still meets your needs, then we will take reasonable steps to give you such access.
Correction: If you believe that any information we hold about you is inaccurate, out of date, incomplete, irrelevant or misleading, please contact us using the details below. We will take reasonable steps to promptly correct any information found to be inaccurate, out of date, incomplete, irrelevant or misleading. Please note, in some situations, we may be legally permitted to not correct your personal information. If we cannot correct your information, we will advise you as soon as reasonably possible and provide you with the reasons for our refusal and any mechanism available to complain about the refusal.
Complaints: If you wish to make a complaint, please contact us using the details below and provide us with full details of the complaint. We will promptly investigate your complaint and respond to you, in writing, setting out the outcome of our investigation and the steps we will take in response to your complaint. If you are not satisfied with our response, you may contact the Office of the Australian Information Commissioner (if you are an Australian resident), or the Office of the New Zealand Privacy Commissioner (if you are a New Zealand resident).
Our website may contain links to other party's websites. We do not have any control over those websites and we are not responsible for the protection and privacy of any personal data which you provide whilst visiting those websites. Those websites are not governed by this Privacy Policy.
We may change this Privacy Policy from time to time. We will notify you if we make a significant change to this Privacy Policy, by contacting you through the contact details you have provided to us and by publishing an updated version on our website.
For any questions or notices in relation to this Privacy Policy regarding Aphex Software Limited, please contact us at:
Aphex Software Limited, a company registered in England and Wales, with company number 09681747
C/O: Data Protection Officer
Email: [email protected]
For any questions or notices in relation to this Privacy Policy regarding Aphex Australia Pty Ltd, please contact us at:
Aphex Australia Pty Ltd, a company registered in Australia, with company number 13 628 119 648.
Email: [email protected]
Additional Permissions allow Project Admins to grant specific capabilities to Project Members without changing their Project Role.
Currently the available additional permissions include:
Import Master Schedule
Allows a Member to import a Master Schedule and manage imported tasks
Seperate from their Project Role, Users either have Full or Limited Planner Access - this defines product functionality access.
Full
Complete access to all Planner features and View types
Limited
Restricted to List View only and mobile app access
Planner access is set per Project, but requires a paid Planner Seat for Full access.
Planner Access can be set to Full or Limited for users whether you’re updating one person, multiple users at once, or inviting someone new.
Open the Project and click your Project Title in the top left, then Users
Individual Assignment:
Locate a specific User in the table
Toggle their Planner Access to Full
Bulk Assignment:
Select multiple Users using the checkboxes
Use the multi-select toolbar to turn on Full Planner Access for all selected Users
Adding New Users:
When using the Add User flow, you can allocate Full Planner Access during the invitation process by toggling their Planner Access to Full
These same steps can be taken to set Planner Access to Limited
Project Admins can grant the Import Master Schedule permission to Members either individually or in bulk.
Individual Assignment (User Panel)
Locate a specific User in the table
Click on the User's name
In the Extra Permissions section, toggle on Import Master Schedule
Bulk Assignment (User Table)
Select multiple Users using the checkboxes
Click the Additional Permissions icon in the multi-select toolbar.
Open the Project and click your Project Title in the top left, then Users
Click "Add User" to trigger the Project Add User window
Enter email addresses separated by commas
The system will validate email formats and check for existing users
Choose between Admin or Member for their Project Role
Toggle the Full or Limited Planner Access options as needed
Click
Archiving a User blocks their access to the Project without deleting their data or records in the Project.
Open the Project and click your Project Title in the top left, then Users
Indiviual Archive:
Locate a specific User in the table
Hover over their row and click ... then Archive User
Confirm
Bulk Archive:
Select multiple Users using the checkboxes
Use the multi-select toolbar to choose ... then Archive Users
Deleting a Project User removes all record of that User from your Project. Users must already by archived, and not own any Tasks or Packages before they can be deleted.
Open the Project and click your Project Title in the top left, then Users
Individual Delete:
Locate a specific User in the table
Hover over their row and click ... then Delete User
Confirm
Bulk Delete:
Select multiple Users using the checkboxes
Use the multi-select toolbar to choose ... then Delete Users
Task Delegates allow one user to edit all tasks owned by another. For example, if User A is set as a Task Delegate for User B, they can edit any task assigned to User B.
A user can have multiple Task Delegates, and there’s no limit to how many can be assigned.
Open the Project
Click your Project Title in the top left, then Users
Locate the User you want to set a Delegate for
Click on the User's name to open the User Panel
Click in the Task Delegate section
Select one or more Users who should be able to edit all Tasks owned by this User
See also: Task Ownership
Plan Reviewers create a two-step approval process for weekly plan updates. When a Task Owner marks their work as Ready, their assigned Reviewer gets notified and should review it before the final version is published.
Open the Project
Click your Project Title in the top left, then Users
Locate the User you want to set a Reviewer for
Click on the User's name to open the User Panel
In the Plan Reviewer section, open the dropdown menu
Choose one User to act as the Reviewer for that person’s plan
See also: Reviewing Plans
Exporting Project Users allows you to download a CSV file containing user data from the Project Users table.
Open the Project and click your Project Title in the top left, then Users
Select at the top right of the table
Project Admin
Everything. Full control over the Project Users, Settings, Assets, Imports, Publishing & Permissions. Can edit all Tasks in the Project.
Project Member
Can make edits to their own Tasks and add new Users to the project.
Prevent, identify, investigate and deter fraudulent, harmful, unauthorized, unethical or illegal activity, including cyberattacks and identity theft.
To contact and communicate with you about any enquiries you make with us via our website.
Legitimate interests: to ensure we provide the best client experience we can offer by answering all of your questions.
For internal record keeping, audit, anti-fraud, administrative, invoicing and billing purposes.
Performance of a contract with you
To comply with a legal obligation
Legitimate interests: to recover debts due to us and ensure we can notify you about changes to our terms of business and any other administrative points.
For analytics, market research and business development, including to operate and improve the Aphex Services and Sites.
Legitimate interests: to keep our website updated and relevant, to develop our business, improve our Services and to inform our marketing strategy.
For advertising and marketing, including to send you promotional information about our events and experiences and information that we consider may be of interest to you.
Legitimate interests: to develop our Services and grow our business.
For health and safety purposes, where you visit our offices.
Performance of a contract with you.
Legitimate interests: to protect our premises and confidential information against unauthorised access and the safety of our staff and office visitors.
To manage event registrations and attendance
Performance of a contract with you.
To maintain the security of the Aphex Services and Sites.
Legitimate interests: to control unauthorised use or abuse of the Aphex Services and Sites, or otherwise detect, investigate or prevent activities that may violate Aphex policies or applicable laws.
To comply with our legal obligations or if otherwise required or authorised by law.
To comply with a legal obligation.
MPP and XML (MS Project Schema)
Exporting specific branches
Exporting filtered views
Using WBN or OutlineNumber
Repeating imports over time is harder if the Asta project name changes, as it affects task identifiers and can cause duplicates
In Asta: View → Filters → New Filter
Apply the filter so your view shows only those tasks
Right-click anywhere in the project view (or on a summary group) and select:
Export branch or view to Microsoft Project
Choose MS Project XML as the export format.
In the export wizard, look for the option:
Export only visible tasks or “Export current view” (wording can vary by Asta version).
Make sure this is selected - otherwise, Asta will export the entire schedule.
Confirm the export - only the tasks visible in the filtered view will be included in the file.
Right-click the branch and choose:
Export branch or view to Microsoft Project.
In the Export dialog, select Branch
This ensures only the chosen WBS branch (or branches) will be included
Confirm Microsoft Project XML as the export format
PropertiesUser-Defined FieldsType: Task
Data type: String
Suggested name: Aphex_Import
Tag tasks to import
Set Aphex_Import = Yes on every task you want to bring into Aphex.
Export the project
Use your required schema: MS Project XML, MPP, Primavera P6 XML, or XER
If the export wizard offers field options, ensure User‑Defined Fields are included
WBSWBS optionsImport to Aphex → during the Map Fields step:
Map Folders = WBS Code
Visit the Asta Documentation for more detail
WBS, tick Natural order to create the exported WBS from your chart/summary hierarchyImport to Aphex → during the Map Fields step:
Map Folders = Natural Order
Visit the Asta Documentation for more detail
Import to Aphex → during the Map Fields step:
Map Folders = OutlineNumber
Visit the Asta Documentation for more detail
Export to Microsoft ProjectImport to Aphex → during the Map Fields step:
Map Folders = Task ID (WBN)
There’s no additional checkbox to 'include WBN' - if WBN codes exist in your project, Asta writes them into the MS Project XML and Aphex will expose them as Task ID (WBN) during mapping.
Visit the Asta Documentation for more detail
Owner
Owner's Aphex Email Address
Aphex_Owner
Location
Location Name
Aphex_Location
Notes
Free Text
Aphex_Notes
For Subcontractor and Location, insert the value for each relevant activity.
If the value already exists in your Aphex Project, the imported Tasks will automatically be assigned to the relevant Subcontractor or Location
If the value is unique, Aphex will create a new Subcontractor or Location and assign the imported tasks to the newly created asset
For Owner, insert the email address of the activity’s owner.
Check that this matches the email address the team member uses for Aphex. This will ensure the Tasks are automatically assigned to the correct user.
If not, the address entered will receive an invite to join the Aphex project.
For Notes, they will automatically be added as a text note to the specific imported activity
Start DateEnd Date
Duration
Calendar
Relationship Links
Export a logic free version
If you have prolific use of mid-links, you might explore exporting a copy of the file with no dependencies at all. This avoids misinterpreted links entirely, and will ensure that all imported activities land on their correct dates. This could be a good option to consider if you're only bringing in high-level activities that the team will be breaking down and detailing anyway, or just the key milestones that they can build towards
Be ready for some variance
If mid-links stay in, expect some differences in how tasks relate to each other in Aphex
A Task that started at 9pm and finished at 9am becomes two full days
We add -1 day lag to successor logic links to offset the extra time
E.g if you had three 1 hour tasks linked in a F>S chain all happening on the same day, we automatically convert them each to 1 day tasks, and subtract one day of lag from each relationship.
This keeps all tasks starting on the same day, matching your Master Schedule, while still meeting our minimum duration requirement
Activity IDMS Project XML / MPP: maps External ID = <projectname>_<taskUniqueId>
<projectname> is the name of the MS Project file
<taskUniqueId> is the unique task ID from the file
E.g. if you have a task with ID 123 in a file called "aphex-program-2.0", the External ID would be aphex-program-2.0_123.
(WBN / OutlineNumber / WBS Code / Natural Order control folder structure, not Task identity.)
Rule: if the External ID in the incoming file matches an Aphex task’s External ID, Aphex treats it as “already imported” and does not update it.
XER & XML (Primavera P6 Schema)
Selecting from WBS Code or Natural Order
Exporting specific branches
Repeating imports over time
Subcontractor
Subcontractor Name
Cannot export filtered view
Aphex_Subcontractor
Import Master Schedule for the selected users. Confirm
Confirm
Edit Tasks
Manage Project Settings
Manage Project Permissions
Add Project Users
Organisation -controlled
Manage Project Users
Create Teams
Manage Integrations
Import Tasks via CSV
Import Master Schedule
Members require the Import Master Schedule additional permission to access this feature
Publish the Plan
Make Ready
Manage Publicly Shared Data
Create and Share Views
Manage All Views
Create & Manage Folders
Project-controlled
Create & Manage Packages
Create & Manage Labour
Create & Manage Plant
Create & Manage Materials
Create & Manage Subcontractors
Create & Manage Locations
Create & Manage Calendars
Create & Manage Delay Reasons
Create & Manage Blockers
Project-controlled
Create & Manage Tags
Project-controlled
Gantt Views
Board Views
Map Views
List Views
Aphex Mobile (List & Map)
Published Versions
This ensures project access never exceeds what's permitted by organisation-level entitlements
The invite link is optional - invited Users can also sign up directly using their invited email address at app.aphex.co/sign-up
Status Indication
Archived users show as Archived throughout the project
Billing Impact
Archiving a Project User has no impact on their Paid Seat or billing status
Records Preserved
User data and activity history remain intact on the Project
Super Admin Protection
If archiving a Project Admin, there must be at least one other active Project Admin
Any changes the user made to a task remain in-tact and recorded as a historic event on the Task
User's email address
Role
User's Project Role
LastLogin
The date of the last time the user logged in to the Organisation
Planner Access
Full/Limited
Status
Archived/Active
Task Delegate
Email addresses of the User's Task Delegates
Plan Reviewer
Email address of the User's Plan Reviewer
Create Tasks
Aphex Planner
Name
User's chosen display name
Protected
-
-
-
-
All duplicated tasks will be assigned to you.
Member (With Delegate Permissions)
Tasks owned by other users will be skipped unless you have delegate permissions.
All duplicated tasks will be assigned to you.

Who can use this feature?
Project Users with Full Planner Access can create and open Gantt Views.
Gantt Views can be grouped by different properties within your plan to organise your Tasks in different ways.
To change how the Gantt is Grouped:
Click the menu in the top left of the Gantt
Select a Primary Grouping. Pick from Folder, Owner, Package, Shift or Location
Optionally, select a Sub-Grouping to apply another level of structure beneath the Primary Group
When Hide Empty Primary Groups is , only Groups that contain visible Tasks will show on the Gantt. Any Groups without Tasks in your current View will be hidden.
Click the menu in the top left of the Gantt
Select either Collapse All or Expand All
Gantt Views are very flexible and allow you to visualise any set of Tasks over time.
To change the visible Date Range on the Gantt:
Click at the top of the Gantt
Yours might also look similar to or
Choose your preferred mode from the selector:
Filters in Aphex let you show only what matters, whether that’s Tasks with certain properties, or ones that are missing something. Keep it simple or build something more detailed, it's up to you.
To filter the Tasks you see in a Gantt View:
Click at the top of the Gantt
In the dropdown that appears select and choose the property you'd like to filter by
Change the logic from options like or to or to hide or reveal the relevant Tasks
Using Filter Groups:
Groups are helpful when combining logic and logic in your filter
Click to create an additional filter group
See also: creating & sharing
If your Gantt looks empty, it's usually because settings like Filters, your Date Range, or the Hide Empty Groups toggle are hiding your tasks or groups. Aphex provides clear messages and icons to help you adjust your view.
Empty Gantt Message:
When no tasks or groups are visible, a message will appear in the Gantt:
Looks like your Gantt is empty Try adjusting or to reveal activities and groups
To reveal your tasks, simply click the highlighted or in the message to open the relevant panel and adjust your view settings.
Hidden Groups Notification:
When the Hide Empty Groups toggle is active, a notification appears at the top of the Gantt if any groups (Folder, Location, Owner, Package, Shift or Subcontractor) are hidden as a result:
[X] Hidden [Group Type] Adjust your and configuration to reveal hidden groups
To reveal hidden groups:
Click the highlighted or in the message to open the relevant panel and adjust your view settings.
Open [View Settings Icon] and set the Hide Empty Groups toggle to [Toggle Off Icon].
Hidden Items in Folders:
Look for the next to a Folder Row. This icon indicates the folder contains subfolders, but they are hidden by your current Filters, Date Range, or Hide Empty Toggle.
To temporarily reveal the hidden folers:
Click the next to the folder name. This displays the contents without changing your overall Gantt view.
Tasks on the Gantt will always be sorted by Start Date - the earlier a Task starts, the higher it will appear within it's grouping.
Aphex will hold the position of your Tasks while you make edits, and then when you're ready to re-apply the Sort Order, click in the bottom left corner.
Refreshing your Aphex window will also trigger the sort order to be re-applied to your Gantt View.
You can view your projects on a range of time scales, from a single day to a full year:
Head to the bottom-right corner of your Gantt
Use the menu to switch between Day, Week, Month, or Year
Overlays let you layer in things like baselines, critical path visibility, or daily resource demand. This means you can add extra context to your Gantt without changing up or leaving your View.
Click at the top of the Gantt
Select from Resource, Baseline, Critical Path
To compare the Live Plan to a previous week, select Baseline
See also: and
When viewing your Gantt, Aphex automatically calculates a Start Date, End Date, and Duration for Folders, Packages, and Parent Tasks. These adjust based on what’s visible in your View and which working calendar you chose to apply.
Click
Select Group Duration Calendar
Choose one out of: Project Default, 5 Day Week, 7 Day Week
Open the Column Picker and toggle Duration or Start / End
These values change dynamically with Filters or Date Range updates
Filtered values are marked with a
See also:
Turn on any Task Property as a spreadsheet-style column, then click into cells to edit, bulk-fill, or paste across Tasks.
To hide and show Gantt Columns:
Click the button at the top of the Gantt
Set the toggles to or to hide or reveal any combination of columns
Once a column is enabled, select any cell to change the value
Every colour and icon on the Gantt tells you something. Whether it’s a Milestone, a delay, or who is responsible for the work - you can choose what shows and how it looks.
Click in the top right of the Gantt
Select Bar Colour
Choose how you’d like to colour the Gantt; by Subcontractor, Shift, or Owner
Milestones will appear as and any associated Target Dates will be if slipped and if on track
Overdue Blockers will be represented with next to the end of the Task
Delays are shown as a on the Task Bar, displaying the total amount of days the Task has been delayed by
See also:
Use the Gantt search to quickly find Tasks. As you type, matching Tasks are highlighted and jumped into view automatically.
To Search for Tasks:
Click into the Search Bar in the top left of the Gantt
Type in your search term
Press Enter on your keyboard or click the < and > icons to cycle through all matching Tasks
- Enter the number of days before and/or after today to create a moving window.
- Pick specific start and end dates using the date pickers.
Optional: Toggle "Show Surrounding Weeks" to add an extra week of visibility on either side of your selection
This will show a list of all Published Versions, and all Master Schedule Imports
Select any option to see how how your current plan compares to your baseline
Hover over the icon to see:
The Filtered value
The Total value
Your Gantt will update instantly to reflect the new colour scheme
Show Progress and Show Overdue Blockers to hide these Icons from the GanttChoose a Primary and Sub Grouping to shape how your Gantt is displayed e.g. Group by Subcontractor, then by Shift, to see separate swimlanes for each combo
The layout updates instantly as you change grouping options
All Primary groupings, except Folders, can be rearranged into a custom order, per user
Sub Groupings only show groups that contain tasks - empty groups won’t appear
Folder Grouping can be switched between a nested Tree Mode and a Flattened Mode, which condenses the Folder path into a single row to save vertical space on the Gantt
Preset
Preset mode offers quick-select options for the most common project viewing timeframes. Simply click on any option to instantly apply that date range to your timeline. These ranges automatically recalculate based on today's date.
Rolling
Rolling mode creates a dynamic window of time that stays centered around today and automatically shifts forward as time passes. Enter the number of days you want to see before and/or after the current date.
Fixed
Fixed mode gives you complete control to select any specific start and end date. Use the date pickers to choose exactly which timeframe you want to view. Unlike other modes, this range stays fixed and doesn't change as days pass.
Show Surrounding Weeks
This toggle is available in all three modes and provides quick additional context around your selected range. When enabled, it adds one week of visibility before your start date and one week after your end date, making it easier to see what's coming up next or what just happened without changing your core date selection.
Project Default
Respects the non-working days of your Project's Default Calendar
This setting only affects how Durations are displayed for Folders, Packages, and Parent Tasks. It doesn’t change individual Task calendars or impact other users.
When a plan is published, Group Durations are always calculated using a 5 day workweek (Monday–Friday).


Welcome to Aphex! We provide a cloud-based platform (Platform) for construction project coordination and delivery.
In these terms and conditions (Terms), when we say you or your, we mean, you, the entity entering into these Terms. If you are an individual, we mean the entity you are authorised to represent and for which you act (such as your employer). If you are using the Platform on behalf of your employer or a business entity, you, in your individual capacity, represent and warrant that you are authorised to act on behalf of your employer or the business entity and to bind the entity and the entity’s personnel to these Terms.
Our entity which you will enter into this contract with will depend on where you are incorporated or domiciled or your specific agreement with us. In the event of no explicit superseding agreement the default terms are:
where you are incorporated or domiciled in Australia, these Terms will be entered into between you and Aphex Australia Pty Ltd (ABN 13 628 119 648) (we, us or our); or
where you are incorporated or domiciled in any other region other than Australia, these Terms will be entered into between you and Aphex Software Limited, a company registered in England and Wales with company number 09681747 (we, us, or our).
Where you are entering into these Terms with Aphex Australia Pty Ltd, the Australian Addendum at Attachment 1 (Australian Addendum) will apply. In the event of any conflict between these Terms and the Australian Addendum (when you are contracting with Aphex Australia Pty Ltd), the Australian Addendum will take precedence.
These Terms form our contract with you, and set out our obligations as a service provider and your obligations as a customer. You cannot use our Services unless you agree to these Terms.
Some capitalised words in these Terms have defined meanings, and each time that word is used in these Terms it has the same meaning. You can find a list of the defined words and their meaning at the end of these Terms or throughout these Terms.
For questions about these Terms, or to get in touch with us, contact us using the details below:
Disclaimer regarding the use of AI: The Services may involve the use of Artificial Intelligence (AI) (through OpenAI, Anthropic, and any other AI provider introduced by us from time to time). See clause 4 for further information on our use of AI.
These Terms contain the terms and conditions on which we supply the Platform to you, whether the Platform comprises of services and/or digital content. Please read these Terms carefully before you accept these Terms by accessing the Platform.
2.1 These Terms apply from when you accept these Terms, until the date on which all of your Authorised User’s Accounts are terminated in accordance with these Terms. We grant you and each Authorised User a right to use our Services for this period of time only (which may be suspended or revoked in accordance with these Terms).
2.2 You and each Authorised User must be at least 18 years old to use the Platform.
2.3 Variations to these Terms: We may amend these Terms at any time, by providing written notice to you. By continuing to use our Platform after the notice or 30 days after notification (whichever date is earlier), you agree to the amended Terms. If you do not agree to the amendment, you may cancel your subscription with effect from the date of the change in these Terms by providing written notice to us. If you cancel your subscription, you and your Authorised Users will no longer be able to access our Services (including our Platform) on and from the date of cancellation, and we will close your Authorised Users’ Accounts.
2.4 If you access or download our mobile application from (1) the Apple App Store, you agree to any Usage Rules set forth in the App Store Terms of Service or (2) the Google Play Store, you agree to the Android, Google Inc. Terms and Conditions including the Google Apps Terms of Service.
2.5 We may use integrated APIs in our Services including ESRI and Mapbox. You may also integrate further APIs into the Platform. Your use of ESRI, Mapbox or any additional API may be subject to the terms of service of the relevant API provider. You acknowledge and agree that we have no control over and are not liable for the proper function of any third-party API integrated into the Platform.
3.1 We provide the following services to you:
(a) access to our Platform; and
(b) access to our support services, as further particularised in our Support Policy (Support Services), (collectively, our Services).
3.2 If you require Support Services, your Authorised Users may request these by getting in touch with us through our Platform.
3.3 Unless we agree otherwise, Support Services cannot be used to support any other products or services, and does not include training, installation of software or hardware, software development or the modification, deletion or recovery of data or any on-site services.
3.4 In consideration of your payment of the Fees, we will provide the Platform in accordance with these Terms and all applicable laws, whether ourselves or through our personnel. We warrant to you that the Platform will be provided using reasonable care and skill.
3.5 We will not be responsible for any other services unless expressly set out in these Terms or on our Platform.
3.6 Additional Services: If you require additional services, we may, in our sole discretion, provide such additional services (to be scoped and priced in a separate contract provided by us).
3.7 Alpha, Preview, Beta or Experimental Services: If we provide you with access to any new, alpha, preview, beta or experimental services (Experimental Services), you acknowledge that because of the developmental nature of such services, you use them at your own risk and we have no obligation to maintain or provide error corrections. Any Experimental Services we provide you with access to are for evaluation purposes only and not for production use, and we may discontinue those services at any time at our sole discretion. We may, in our sole discretion, launch any Experimental Services as full features of our Platform, and may introduce fees in respect of such services. We agree to notify you of any such change by giving you 30 days’ notice in writing via the Platform (Notification). You may choose not to utilise the relevant functionality, in which event you will not be charged. Where you wish to continue using the Experimental Services after our Notification, the relevant fees will form part of the Fees and you must pay these to us in accordance with clause 9.
3.8 Third Party Products or Services: Where you engage third parties to operate alongside our Services (for example, any third-party software systems you wish to integrate with our Platform), those third parties are independent of us and you are responsible for (meaning we will not be liable for) the goods or services they provide, unless we expressly agree otherwise.
4.1 Certain features of the Platform use artificial intelligence (AI) provided by third parties (including OpenAi, Anthropic, and others we may add from time to time). You can enable or disable AI features by opting into or out of specific features, and this can be managed at any time by your Admin Users.
4.2 You acknowledge and agree that:
(a) AI-generated content or outputs may not always be accurate or complete;
(b) we do not guarantee the accuracy, reliability, suitability or completeness of any content or output generated by AI. We recommend that you thoroughly review any summaries or other output generated by AI before publishing such output; and
(c) you are solely responsible for verifying the accuracy, reliability, suitability or completeness of any content or output generated by AI.
4.3 Whilst we use our best commercial endeavours to limit any personal data sharing with our AI providers, we do not guarantee that any personal data input into the Platform will not be shared with our AI providers.
4.4 You are solely responsible for any data you input into the Platform, including any personal data you input into the AI features of the Platform. If you do not want any of your information or personal data to be shared with our AI providers, you should not use the relevant AI features, or you should redact or not submit the relevant information or personal data.
4.5 You agree not to submit any sensitive data via the Platform.
4.6 Despite anything to the contrary, to the maximum extent permitted by law, we will not be liable for, and you waive and release us from and against, any Liability arising from or in connection with, any content or output generated by AI via the Platform.
5.1 You may invite a number of users to the Platform, up to any limits specified in your chosen subscription, who will be permitted to access and use the Platform and join your Organisation (Authorised Users).
5.2 You must ensure that each Authorised User complies with these Terms and our Acceptable Use Policy. You are responsible and liable for the acts or omissions of your Authorised Users, including where your Authorised User breaches these Terms and/or the Acceptable Use Policy.
5.3 Your Authorised Users may register on the Platform and create an account using their email address and password (Account). Your Authorised Users may register for an Account using their Apple, Google or Microsoft account (Single Sign-On Account). If your Authorised Users sign in to their Account using a Single Sign-On Account, they authorise us to access information from their Single Sign-On Account including your name and contact information.
5.4 Your Authorised Users are responsible for keeping their Account details confidential, and you will be liable for all activity on your Authorised Users’ Accounts, including any purchases made using their Account details. You agree to immediately notify us of any unauthorised use of an Account linked to your Organisation.
5.5 We may suspend your or an Authorised User’s access to our Services where we reasonably believe there has been any unauthorised access or use of the Services (such as unauthorised sharing of login details for our Platform). If we suspend your access to the Services, we will let you know within a reasonable time of doing so, and we will work with you to resolve the matter, or if it cannot be resolved, then we may terminate your Account and your access to our Services will end.
5.6 Your Authorised Users may delete their Account at any time via the Platform without affecting your Organisation or any other Authorised User. An Admin User may also request the deletion of any Authorised Users via the Platform.
5.7 You may decide which of the features of the Platform each Authorised User will have access to via your Account. Each Authorised User which is given access to a particular feature will be considered to have a User Seat within the Platform.
5.8 You may designate certain Authorised Users as Admin Users within the Platform. These Admin Users will have the ability to add or remove Authorised Users, change Authorised User permissions, and otherwise manage Accounts within your Organisation.
6.1 Admin Users may create one or more Organisations within the Platform which your Authorised Users may join.
6.2 Each Organisation will require a separate subscription, and may have separate Fees payable.
6.3 You are responsible for all activity occurring within your Organisation, and for payment of any Fees associated with any Organisations established by your Authorised Users.
6.4 You and your Admin Users are solely responsible for inviting or removing your Authorised Users from any Organisations which you control.
6.5 You represent and warrant that your Admin Users are authorised to act on your behalf and create Organisations, and to bind you to any Fees that may be payable for additional Organisations.
7.1 If you wish to change the Services (for example, by upgrading to a different tier of the Services), you must provide notice to us through your Account that you wish to vary the Services at least 5 Business Days before the next Payment Date. If you vary the Services and the Fees increase, we agree to provide you with access to the additional Services features immediately, and the increased Fees will apply on the next Payment Date.
7.2 Where you downgrade your tier of Services (for example from Pro+ to Pro), all of Your Data and Output Data and any profile settings attached to your Account will save in your Account, however will only be accessible where your tier of the Services grant you access to the relevant feature.
8.1 The Services may begin with a free version that has access to some Platform features. You acknowledge and agree that the free version of the Platform may not grant you access to all functionality within the Platform, and certain features may only be activated once you have any applicable Fees.
8.2 The paid Services may begin with a free trial (Free Trial). The Free Trial will last for the period specified on the Platform (if applicable). We determine Free Trial eligibility in our sole discretion and we may limit eligibility to prevent Free Trial abuse. We reserve the right to revoke the Free Trial and suspend your Account at any time.
8.3 If you do not pay the fees for the Services you have chosen (Fees) at the end of the Free Trial, you and your Authorised Users’ access to the Platform will finish at the end of the Free Trial. The date you make payment (Payment Date), the Services will start and the Free Trial will end.
8.4 Unless the Services are suspended or terminated in accordance with these Terms, your access to the Services will roll over on an ongoing monthly or annual basis, and you will be charged the Fees on an ongoing monthly or annual basis from the Payment Date (as set out on the Platform). Without limiting your rights at law you can cancel the Services at any time in accordance with the “Cancellation” clause of these Terms (clause 16.1) and the cancellation will take effect from the next Payment Date falling after the 14 day notice period has ended.
8.5 You will be billed based on the number of active User Seats within your Organisation at any time, as set out on the Platform. Where you choose a monthly subscription, the Fees for the upcoming month will be updated to reflect the highest number of active User Seats during the previous month. Where you choose an annual subscription, you prepay for a set number of active User Seats (Purchased Seats). If your actual number of active User Seats exceeds the Purchased Seats, we will invoice you an overage charge for any difference between the active User Seats and the Purchased Seats. You must pay the amount set out in our invoice in advance for the upcoming month.
8.6 The payment methods we offer for the Fees are set out on the Platform. We may invoice you manually, or we may require you to provide us (or our payments processor) with your debit or credit card information, so that we may process your payment through our payment processor.
8.7 You must not pay, or attempt to pay, the Fees by fraudulent or unlawful means. If you make a payment by debit card or credit card, you warrant that you are authorised to use the debit card or credit card to make the payment.
8.8 You agree that we may set-off or deduct from any monies payable to you under these Terms, any amounts which are payable by you to us (whether under these Terms or otherwise). We do not store any credit card details, and all payment information is collected and stored through our third-party payment processor.
8.9 To the extent permitted by law, the Fees are non-refundable and non-cancellable once paid. For the abundance of clarity, you will not be entitled to a refund of any portion of the Fees where you do not use all of your Purchased Seats during your annual subscription.
8.10 We may need to change the Fees from time to time. If we change the Fees, we will provide you with 30 days’ notice of the change. After 30 days, we will apply the updated Fee to the Services. If the updated Fee is not acceptable to you, you may cancel the Services in accordance with the ‘Cancellation’ clause.
8.11 If any payment has not been made in accordance with this clause 8, we may (at our absolute discretion):
(a) after a period of 5 Business Days, cease providing the Services, remove your access to your Account, and recover, as a debt due and immediately payable from you, our additional costs of doing so (including reasonable legal fees, debt collector fees and mercantile agent fees); and/or
(b) charge interest at a rate equal to 4% above the Bank of England’s base rate, from time to time, but at 4% a year for any period when that base rate is below 0%, per annum, calculated daily and compounding monthly, on any such amounts unpaid after the due date for payment in accordance with this clause 8.
8.12 Taxes: You are responsible for paying any levies or taxes associated with your use of our Services, for example sales taxes, value-added taxes or withholding taxes (unless we are required by law to collect these on your behalf).
9.1 While you have an active Organisation on the Platform, we grant you (and each Authorised User) a right to use our Platform (which may be suspended or revoked in accordance with these Terms). This right cannot be passed on or transferred to any other person, except as otherwise set out in these Terms.
9.2 You agree to use the Platform in accordance with our Acceptable Use Policy, and you acknowledge and agree that the Acceptable Use Policy forms a part of this Agreement.
9.3 You (and your Authorised Users) must not:
(a) access or use our Platform in any way that is improper or breaches any laws, infringes any person's rights (for example, intellectual property rights and privacy rights), or gives rise to any civil or criminal liability;
(b) interfere with or interrupt the supply of our Platform, or any other person’s access to or use of our Platform;
(c) introduce any viruses or other malicious software code into our Platform;
(d) use any unauthorised or modified version of our Platform, including but not limited to for the purpose of building similar or competitive software or for the purpose of obtaining unauthorised access to our Platform;
(e) attempt to access any data or log into any server or account that you are not expressly authorised to access;
(f) use our Platform in any way that involves service bureau use, outsourcing, renting, reselling, sublicensing, concurrent use of a single user login, or time-sharing;
(g) circumvent user authentication or security of any of our networks, accounts or hosts or those of any third party; or
(h) access or use our Platform to transmit, publish or communicate material that is, defamatory, offensive, abusive, indecent, menacing, harassing or unwanted.
10.1 We will use our best commercial endeavours to make the Platform available in accordance with our Service Level Agreement . The remedy set out in the Service Level Agreement will be your sole and exclusive remedy arising from our failure to meet any targets set out in the Service Level Agreement.
10.2 From time to time, we may perform such reasonable scheduled and emergency maintenance and updates in relation to the Platform in order to continue to supply the Platform to you and our other customers (Scheduled or Emergency Maintenance). You agree that access to, or the functionality of all or part of the Platform, may need to be suspended for a period of time in order for us to perform the Scheduled or Emergency Maintenance, and to the maximum extent permitted by law, we will not be liable to you for any interruptions or downtime to the Platform as a result of any Scheduled or Emergency Maintenance.
10.3 Our Services (including our Platform) may interact with, or be reliant on, products or services provided by third parties, such as cloud hosting service providers. To the maximum extent permitted by law, we are not liable for disruptions or downtime caused or contributed to by these third parties.
10.4 We will try to provide you with reasonable notice, where possible, of any disruptions to your access to our Services. Where the Scheduled or Emergency Maintenance relates to scheduled downtime, we agree to provide you with at least 24 hours’ notice where possible. We agree to limit any scheduled maintenance to a maximum of 8 hours per calendar month.
11.1 You acknowledge and agree that any Intellectual Property or content (including copyright, patents and trademarks) available on the Platform, the Platform itself (including how it looks and functions), any algorithms or machine learning models used on the Platform, as well as our copyrighted works, trademarks, inventions, designs and other intellectual property (Our Intellectual Property) will at all times vest, or remain vested, in us.
11.2 We authorise you to use Our Intellectual Property solely for your limited commercial use. You must not exploit Our Intellectual Property for any other purpose, nor allow, aid or facilitate such use by any third party. Use must be limited to Authorised Users on devices that are controlled or approved by you.
11.3 You must not, without our prior written consent:
(a) copy, in whole or in part, any of Our Intellectual Property;
(b) reproduce, retransmit, distribute, disseminate, sell, publish, broadcast or circulate any of Our Intellectual Property to any third party; or
(c) breach any intellectual property rights connected with the Platform, including (without limitation) altering or modifying any of Our Intellectual Property, causing any of Our Intellectual Property to be framed or embedded in another website, or creating derivative works from any of Our Intellectual Property.
11.4 Subject to the conditions below, you and your Authorised Users may share any reports generated via the Platform, including by exporting Your Data or the Output Data (as those terms are defined below), generating shareable links via the Platform, creating publishable versions of Your Data or the Output Data, or by using any of the other features we may make available on the Platform from time to time (Published Reports). When sharing any Published Reports, you (and your Authorised Users):
(a) must not remove any identifying marks, including any of our trademarks or Our Intellectual Property contained within the Published Reports;
(b) acknowledge and agree that where the Published Reports are generated via shareable links generated via the Platform, the information within these Published Reports can be accessed by anyone with the shareable link; and
(c) acknowledge and agree that you are solely responsible for your use of the Published Reports, including for ensuring that the confidentiality of any Published Reports is maintained and that the Published Reports (including any shareable links generated via the Platform) are only shared with their intended audiences.
Your Data
11.5 You own all data, information, personal data, or content you and your Authorised Users upload into the Platform (Your Data), as well as any data or information output from the Platform using Your Data as input (Output Data). Note that Output Data does not include the Analytics (as described below).
11.6 You grant us a limited licence to copy, transmit, store, backup and/or otherwise access or use Your Data and the Output Data to:
(a) communicate with you;
(b) supply the Platform to you and otherwise perform our obligations under these Terms;
(c) diagnose problems with the Platform;
(d) enhance and otherwise modify the Platform;
(e) perform Analytics;
(f) develop other services, provided we de-identify Your Data; and
(g) as reasonably required to perform our obligations under these Terms.
11.7 You agree that you are solely responsible for all of Your Data that you and your Authorised Users make available on or through the Platform. You represent and warrant that:
(a) you are either the sole and exclusive owner of Your Data or you have all rights, licences, consents and releases that are necessary to grant to us the rights in Your Data (as contemplated by these Terms); and
(b) neither Your Data nor the posting, uploading, publication, submission or transmission of Your Data or our use of Your Data on, through or by means of our Platform will infringe, misappropriate or violate a third party’s intellectual property rights, or rights of publicity or privacy, or result in the violation of any applicable law or regulation.
11.8 You acknowledge and agree that we may monitor, analyse and compile statistical and performance information based on and/or related to your use of the Platform, in an aggregated and anonymised format (Analytics). You acknowledge and agree that we own all rights in the Analytics, and that we may use the Analytics for our own business purposes, provided that the Analytics do not contain any identifying information.
11.9 We do not endorse or approve, and are not responsible for, any of Your Data.
11.10 You are responsible for (meaning we are not liable for) the integrity of Your Data on your systems, networks or any device controlled by you.
11.11 You acknowledge and agree that the Platform and the integrity and accuracy of the Output Data is reliant on the accuracy and completeness of Your Data, and the provision by you of Your Data that is inaccurate or incomplete may affect the use, output and operation of the Platform.
11.12 This clause will survive the termination or expiry of these Terms.
12.1 You represent, warrant and agree that:
(a) you and your Authorised Users will not use our Platform, including Our Intellectual Property, in any way that competes with our business;
(b) there are no legal restrictions preventing you from entering into these Terms;
(c) all information and documentation that you provide to us in connection with these Terms is true, correct and complete;
(d) you are responsible for ensuring your Systems and data are appropriately backed up and up to date before we perform any Services that may affect them;
(e) you are solely responsible for notifying the relevant parties (including your Authorised Users) of any planned outages or downtime necessary for the performance of the Services; and
(f) you have not relied on any representations or warranties made by us in relation to the Platform (including as to whether the Platform is or will be fit or suitable for your particular purposes), unless expressly stipulated in these Terms;
(g) any of your Admin Users have authority to bind you to any terms or Fees; and
(h) you must immediately notify us if any of your Admin Users no longer have authority to bind you.
13.1 Nothing in these Terms limits any Liability which cannot legally be limited, including Liability for:
(a) death or personal injury caused by negligence; and
(b) fraud or fraudulent misrepresentation.
13.2 To the maximum extent permitted by law, we will not be liable for, and you waive and release us from and against any Liability arising from or in connection with:
(a) any Third Party Products or Services, or any unavailability of the Platform due to a failure of the Third Party Products or Services;
(b) any unauthorised access to or use of your Published Reports or any data contained within them;
(c) any instructions or requests provided by you or your Personnel to us;
(d) Your Data;
(e) Any content generated by AI via the Platform; and
(f) any results obtained from, or recommendations made by, the Services.
13.3 Subject to clause 13.1 (liability which cannot legally be limited), but despite anything to the contrary, to the maximum extent permitted by law:
(a) you agree to indemnify us for any Liability we incur due to your breach of the Platform Licence clause (clause 9) and the Intellectual Property clause (clause 13) of these Terms;
(b) neither Party will be liable for any Consequential Loss;
(c) a party’s liability for any liability under these Terms will be reduced proportionately to the extent the relevant liability was caused or contributed to by the acts or omissions of the other party, including any failure by that other party to mitigate its loss; and
(d) our aggregate liability for any liability arising from or in connection with these Terms will be limited to (i) the total subscription Fees paid or payable for the Services during the 12 months immediately preceding the date on which the claim arose or (ii) in the event that no subscription Fees are paid or payable in respect of such period, our total aggregate liability will be limited to £100.
13.4 We have given commitments as to the compliance of the Platform with these Terms and applicable Laws in clause 3.5. In view of these commitments, the terms implied by sections 3, 4 and 5 of the Supply of Goods and Services Act 1982 are, to the maximum extent permitted by law, excluded from these Terms.
13.5 This clause will survive the termination or expiry of these Terms.
14.1 Cancellation: You or your Admin Users may request to cancel the Services at any time by providing us a minimum of 14 days written notice via the Platform. Your cancellation will take effect from the next Payment Date falling after the 14 day notice period has ended.
14.2 We may terminate these Terms (meaning you will lose access to our Services, including access to your Account) if:
(a) you do not pay the Fees as they fall due;
(b) you or your Authorised Users breach these Terms and do not remedy that breach within 14 days of us notifying you of that breach;
(c) you or your Authorised Users breach these Terms and that breach cannot be remedied; or
(d) you experience an insolvency event (including but not limited to bankruptcy, receivership, voluntary administration, liquidation, or entering into creditors’ schemes of arrangement).
14.3 Should we suspect that you are in breach of these Terms, we may suspend your access to the Platform while we investigate the suspected breach.
14.4 Upon expiry or termination of the Services, we will retain Your Data (including copies) as required by law or regulatory requirements (and where we have entered into a data processing agreement with you, in accordance with the data processing agreement).
14.5 Where termination is due to our breach of these Terms, we agree to refund you for any prepaid unused Fees on a pro-rata basis.
14.6 Termination of the Services will not affect any rights or liabilities that a Party has accrued under these Terms.
14.7 This clause will survive the termination or expiry of these Terms.
15.1 To the extent that you or your Authorised Users are using or accessing our Platform on an iOS device, you further acknowledge and agree to the terms of this clause. You acknowledge that these Terms are between you and us only, not with Apple Inc. (Apple), and Apple is not responsible for the Platform and any content available on the Platform.
15.2 Apple has no obligation to furnish you or your Authorised Users with any maintenance and support services with respect to our Platform.
15.3 If our mobile application fails to conform to any applicable warranty, you may notify Apple and Apple will refund the purchase price of the mobile application to you (where applicable). To the maximum extent permitted by applicable law, Apple will have no other warranty obligation whatsoever with respect to the mobile application and any other claims, losses, liabilities, damages, costs or expenses attributable to any failure to conform to any warranty will be our responsibility.
15.4 Apple is not responsible for addressing any claims by you or any third party (including your Authorised Users) relating to our mobile application or your use of our mobile application, including but not limited to: (1) product liability claims; (2) any claim that our mobile application fails to conform to any applicable legal or regulatory requirement; and (3) claims arising under consumer protection or similar legislation.
15.5 Apple is not responsible for the investigation, defence, settlement and discharge of any third-party claim that our mobile application infringes that third party’s intellectual property rights.
15.6 You agree to comply with any applicable third-party terms when using our mobile application.
15.7 Apple and Apple subsidiaries are third-party beneficiaries of these Terms, and upon your acceptance of these Terms, Apple will have the right (and will be deemed to have accepted the right) to enforce these Terms against you as a third-party beneficiary of these Terms.
15.8 You hereby represent and warrant that: (1) you are not located in a country that is subject to a U.S. Government embargo, or that has been designated by the U.S. Government as a "terrorist supporting" country; and (2) you are not listed on any U.S. Government list of prohibited or restricted parties.
16.1 Assignment: Subject to the below clause, a Party must not assign or deal with the whole or any part of its rights or obligations under these Terms without the prior written consent of the other Party (such consent is not to be unreasonably withheld).
16.2 Assignment of Debt: You agree that we may assign or transfer any debt owed by you to us, arising under or in connection with these Terms, to a debt collector, debt collection agency, or other third party.
16.3 Contracts (Rights of Third Parties) Act 1999: Notwithstanding any other provision of these Terms, nothing in these Terms confers or is intended to confer any right to enforce any of its terms on any person who is not a party to it.
16.4 Disputes: Neither we or you may commence court proceedings relating to any dispute, controversy or claim arising from, or in connection with, these Terms (including any question regarding its existence, validity or termination) (Dispute) unless we and you first meet (in good faith) to resolve the Dispute. Nothing in this clause will operate to prevent us or you from seeking urgent injunctive or equitable relief from a court of appropriate jurisdiction.
If the Dispute is not resolved at that initial meeting:
(a) where you are resident or incorporated in England and Wales, refer the matter to mediation, administered by The Centre for Effective Dispute Resolution; or
(b) where you are not resident or incorporated in England and Wales, refer the matter to arbitration administered by the London Court of International Arbitration (LCIA), with such arbitration to be conducted in London, before one arbitrator, in English and in accordance with the LCIA Arbitration Rules.
16.5 Force Majeure: To the maximum extent permitted by law, we shall have no Liability for any event or circumstance outside of our reasonable control.
16.6 Marketing: You agree that we may send you electronic communications about our products and services. You may opt-out at any time by using the unsubscribe function in our electronic communications
16.7 Governing law: These Terms are governed by the laws of England and Wales. Each Party irrevocably and unconditionally submits to the exclusive jurisdiction of the courts operating in England and Wales and any courts entitled to hear appeals from those courts and waives any right to object to proceedings being brought in those courts. The Platform may be accessed in the UK and overseas. We make no representation that the Platform complies with the laws (including intellectual property laws) of any country outside of the UK. If you access the Platform from outside the UK, you do so at your own risk and are responsible for complying with the laws in the place you access the Platform. The United Nations Convention of Contracts for the International Sale of Goods is expressly excluded from these Terms.
16.8 Notices: Any notice given under these Terms must be in writing addressed to us at the details set out below or to you at the details provided in your Account. Any notice may be sent by standard post or email, and will be deemed to have been served on the expiry of 48 hours in the case of post, or at the time of transmission in the case of transmission by email.
16.9 Publicity: You agree that we may advertise or publicise the fact you are a customer of ours, for example on our website or in our promotional material, and you grant us a right to display and use your logo and branding solely for that purpose. We agree to seek your prior written consent before publishing any specific project details.
16.10 Privacy: All personal data you and your Authorised Users provide to us will be treated in accordance with Applicable Data Protection Law and in accordance with our Privacy Policy, . You agree to comply with all Applicable Data Protection Laws. To the extent that we act as the Processor of any Personal Data of which you are the Controller (as these terms are defined in the Data Protection Act 2018), the Parties each agree to comply with the terms of our Data Processing Agreement, which is available on our and forms part of these Terms.
16.11 Severance: If a provision of these Terms is held to be void, invalid, illegal or unenforceable, that provision is to be read down as narrowly as necessary to allow it to be valid or enforceable, failing which, that provision (or that part of that provision) will be severed from these Terms without affecting the validity or enforceability of the remainder of that provision or the other provisions in these Terms.
16.12 Third party sites: The Platform may contain links to websites operated by third parties. Unless we tell you otherwise, we do not control, endorse or approve, and are not responsible for, the content on those websites. We recommend that you make your own investigations with respect to the suitability of those websites. If you purchase goods or services from a third party website linked from the Platform, such third party provides the goods and services to you, not us. We may receive a benefit (which may include a referral fee or a commission) should you visit certain third-party websites via a link on the Platform (Affiliate Link) or for featuring certain products or services on the Platform. We will make it clear by notice to you which (if any) products or services we receive a benefit to feature on the Platform, or which (if any) third party links are Affiliate Links.
16.13 Entire agreement: These Terms contain the entire understanding between the Parties and the Parties agree that no representation or statement has been made to, or relied upon by, either of the Parties, except as expressly stipulated in these Terms, and these Terms supersede all previous discussions, communications, negotiations, understandings, representations, warranties, commitments and agreements, in respect of its subject matter. You acknowledge and agree that these Terms will take precedence over any terms and conditions you subsequently provide to us in respect of the Platform, including any terms and conditions contained within a purchase order provided by you to us.
Acceptable Use Policy means our acceptable use policy,
Account has the meaning given in clause 5.3.
Admin Users means your Authorised Users who are granted administrative rights, as set out in the Platform.
AI has the meaning given in clause 4.1.
Applicable Data Protection Law means the laws and regulations applicable to the processing of Personal Data by the Parties in connection with the Terms, including the Data Protection Act 2018 and Privacy Act 1988 (Cth).
Authorised Users has the meaning given in clause 5.1.
Consequential Loss includes any consequential loss, indirect loss, real or anticipated loss of profit, loss of benefit, loss of revenue, loss of business, loss of goodwill, loss of opportunity, loss of savings, loss of reputation, loss of use and/or loss or corruption of data, whether under statute, contract, equity, tort (including negligence), indemnity or otherwise.
Experimental Services has the meaning given in clause 3.7.
Fees has the meaning given in clause 8.3.
Intellectual Property means any copyright, registered or unregistered designs, patents or trade marks, business names, get-up, goodwill, domain names, know-how, inventions, processes, trade secrets or confidential information, circuit layouts, software, computer programs, databases or source codes, including any application for registration of, and any improvements, enhancements or modifications of, the foregoing, and any right to apply for and be granted, renewals or extensions of, and rights to claim priority from, such rights and all similar or equivalent rights or forms of protection which subsist or will subsist now or in the future, including in respect of the foregoing.
Liability means any expense, cost, liability, loss, damage, claim, notice, entitlement, investigation, demand, proceeding or judgment (whether under statute, contract, equity, tort (including negligence), misrepresentation, restitution, indemnity or otherwise), howsoever arising, whether direct or indirect and/or whether present, unascertained, future or contingent and whether involving a third party or a party to these Terms or otherwise.
Organisation means an environment within the Platform where Authorised Users may manage construction projects, including to submit, post or modify Your Data.
Our Intellectual Property has the meaning given in clause 11.1.
Output Data has the meaning given in clause 11.5.
Payment Date has the meaning given in clause 8.3.
Platform has the meaning given at the beginning of these Terms.
Published Reports has the meaning given in clause 11.4.
Purchased Seats has the meaning given in clause 8.5.
Scheduled or Emergency Maintenance has the meaning given in clause 10.2.
Services has the meaning given in clause 3.1.
System means all hardware, software, networks, telecommunications and other IT systems used by a Party from time to time, including a network.
Your Data has the meaning given in clause 11.5.
Where you are contracting with Aphex Australia Pty Ltd (ABN 13 628 119 648), the following provisions will apply in addition to the above Terms:
1. Interest on late payments: Clause 8.11(b) is omitted and replaced with: “charge interest on any overdue payments at a rate equal to the Reserve Bank of Australia’s cash rate, from time-to-time, plus 2% per annum, calculated daily and compounding monthly”.
2. Consumer Law Rights:
2.1 In some jurisdictions, you may have guarantees, rights or other remedies provided by law (Consumer Law Rights), and these Terms do not restrict your Consumer Law Rights. We will only be bound by your Consumer Law Rights and the express wording of these Terms.
2.2 Subject to your Consumer Law Rights, we do not provide a refund for a change of mind or change in circumstance.
2.3 If you accept these Terms in Australia, nothing in these Terms should be interpreted to exclude, restrict or modify the application of, or any rights or remedies you may have under, any part of the Australian Consumer Law (as set out in Schedule 2 of the Competition and Consumer Act 2010 (Cth)). If our Platform is not ordinarily used for personal, household or domestic use, our liability for a breach of your Consumer Law Rights is limited to either resupplying our Services, or paying the cost of having our Services resupplied.
3. Liability:
3.1 Clause 13 is omitted and replaced with the following:
“To the maximum extent permitted by law, we will not be liable for, and you release us from liability for, any Liability caused or contributed to by, arising from or in connection with:
(a) your computing environment (for example, your hardware, software, information technology and telecommunications services and systems); or
(b) any use of our Services by a person or entity other than you or your Authorised Users.
Regardless of whatever else is stated in these Terms, to the maximum extent permitted by law:
(a) neither we or you are liable for any Consequential Loss;
(b) a party’s liability for any Liability under these Terms will be reduced proportionately to the extent the relevant Liability was caused or contributed to by the actions (or inactions) of the other party, including any failure by the other party to mitigate its loss;
(c) (where our Services are not ordinarily acquired for personal, domestic or household use or consumption) in respect of any failure by us to comply with relevant Consumer Law Rights, our Liability is limited (at our discretion) to supplying the Services again or paying the cost of having the Services supplied again; and
(d) our aggregate liability to you for any Liability arising from or in connection with these Terms will be limited to the amount of any Fees paid by you to us in respect of the supply of the relevant Services to which the Liability relates, or if you do not have a subscription, to AU$100.“
4. Disputes:
4.1 Clause 16.4 is omitted and replaced with the following:
17.1 “Neither we or you may commence court proceedings relating to any dispute, controversy or claim arising from, or in connection with, these Terms (including any question regarding its existence, validity or termination) (Dispute) unless we and you first meet (in good faith) to resolve the Dispute. Nothing in this clause will operate to prevent us or you from seeking urgent injunctive or equitable relief from a court of appropriate jurisdiction.
17.2 If the Dispute is not resolved at that initial meeting:
(a) where you are resident or incorporated in Australia, refer the matter to mediation, administered by the Australian Disputes Centre in accordance with Australian Disputes Centre Guidelines for Commercial Mediation; or
(b) where you are not resident or incorporated in Australia, refer the matter to arbitration administered by the Australian Centre for International Commercial Arbitration, with such arbitration to be conducted in Brisbane, Queensland, Queensland, before one arbitrator, in English and in accordance with the ACICA Arbitration Rules.”
5. Governing law:
Clause 16.7 is omitted and replaced with the following:
“These Terms are governed by the laws of Queensland, and any matter relating to these Terms is to be determined exclusively by the courts in Queensland and any courts entitled to hear appeals from those courts.”
Definitions
Consequential Loss includes any consequential loss, special or indirect loss, real or anticipated loss of profit, loss of benefit, loss of revenue, loss of business, loss of goodwill, loss of opportunity, loss of savings, loss of reputation, loss of use and/or loss or corruption of data, whether under statute, contract, equity, tort (including negligence), indemnity or otherwise. However, your obligation to pay us any amounts for access to or use of our Services (including our Platform) will not constitute “Consequential Loss”.
Our contact details:
UK entity
Aphex Software Limited, a company established in England and Wales. Our company registration number is 09681747.
Geographical address: 82 Wandsworth Bridge Road, London, SW6 2TF
Email address: [email protected]
Australian entity
Aphex Australia Pty Ltd (ABN 13 628 119 648).
Geographical address: 2/28 Metroplex Avenue, Murrarrie, 4172
Email address: [email protected]
X Week Lookahead
Today + (Project Lookahead Period)
Next 30 Days
Today + Next 30 Days
Next 3 Months
Today + Next 12 Weeks
Next 6 Months
Today + Next 25 Weeks
Next 12 Months
Today + Next 52 Weeks
All Future Tasks
From Today to Last Task
Project to Date
From First Task to Today
All Tasks
From First Task to Last Task
Forwards
Today + specified days into future
Backwards
Today - specified days into past
Combined
Full rolling window centred on today
Start Date
Selected start date
End Date
Selected end date
Combined
Fixed range from start to end date
Off (default)
Displays exactly the calculated range, no additions
On
Adds 1 week before start date + 1 week after end date to visible area
5 Day Week
(Mon–Fri) Static calendar
7 Day Week
(Mon–Sun) Static calendar
All required columns
Ctrl + 2
Time columns
Ctrl + 3
User columns
Ctrl + 4
Resource columns
Ctrl + 5
Map columns
Ctrl + 6
Structure columns
Ctrl + 7
Other columns
Ctrl + 8
Copy
Ctrl + C
Paste
Ctrl + V
Select multiple cells
Shift + Click (cell)
Select multiple tasks
Shift + Click (checkbox)
Undo
Ctrl + Z
New line
Shift + Enter
Move task and break links
Shift + Click + Drag (task)
Duplicate Task
Ctrl + D
Here at Aphex, we aim to keep things simple! That’s why we’ve created a set of pre-designed Power BI reports that allow you to pull data and insights directly from your project.
A key advantage of these templates is that they exclusively pull from your published versions, ensuring you always have the most accurate and up-to-date information at your fingertips.
This feature enables confident, data-driven decision-making. Each template is fully customisable to suit your unique project needs, but you can also use them as-is for immediate reporting.
This report provides a snapshot of your project's progress against its plan, tracking key metrics such as PPC (Percent Plan Complete) and identifying recorded delays within your publications.
Key Measures:
Leading Measure: You can choose your preferred method for measuring PPC (Percent Plan Complete) which helps in understanding how well your project is performing against the plan:
PPC (Task Day): Calculates the overall average percentage of task completion by evaluating the PPC of each task. The PPC of a task represents the percentage of planned workdays that were completed between two publication dates (such as from last week to now).
Latest Publication: Shows the date of the most recent publication in your dataset.
Current PPC: Displays the current PPC based on tasks completed between the two most recent publications selected.
Tasks Progressed: Calculates the number of unique tasks that have made progress (i.e., have recorded workdays) during the specified reference window, which is the period between two publication dates (e.g., from last week to now). It only considers the most recent version of each task. If no progress is recorded, it returns 0.
Unplanned Tasks: Calculates the number of unique tasks that have made progress (i.e., recorded workdays) but were not included in the planned work during the specified reference window (the period between two publication dates, such as from last week to now). It only considers the most recent version of each task. If no unplanned progress is recorded, it returns
Primary Source of Delay: Identifies the main reason for delays based on the amount of status logged for different reasons. It filters data by positive statuses, narrows it down to relevant owners, and returns the most significant delay reason within the reference window.
A number of filters can be applied to the report. By default, all filters are set to show all data:
Publications Included: Displays all publications in your dataset (up to five) by default, with options to select specific ones for analysis.
Task Owners: Displays all Task Owners with tasks in the selected publications
Overall PPC Trend: Breaks down the PPC on specific publication dates within the dataset and provides a rolling average (over four weeks). Hovering over the values reveals information about the included published versions (PPC, Tasks Progressed, and Unplanned Tasks).
Performance Breakdown - Users/Subcontractors/Packages: Compares the PPC of Owners, Subcontractors and Packages within the specified timeframe and over the past four weeks (rolling average). Owners are users assigned as task owners during the specified timeframe, while Subcontractors and Packages are assigned to tasks within the same timeframe.
Delay Breakdown: Details the reasons for delays associated with tasks in the specific time window and shows the individual reasons for delays along with their total impact (in days) for each reason.
Available In:
See Also:
This report provides a comprehensive overview of your project's performance, including weekly and cumulative Percent Plan Complete (PPC) scores, reasons for non-completion (RNC), and detailed task status breakdowns.
Key Measures:
Available In:
See Also:
This report offers an in-depth analysis of your project's weekly progress, highlighting task statuses and providing insights into reasons for non-completion. With detailed visualisations, you can effectively track performance and identify areas for improvement.
Available In:
This report monitors the completion and quality of your weekly publications, tracking user involvement and identifying potential issues such as clashes or missing information. With clear visualisations, you can easily assess the status of each publication and address any concerns that may arise.
Key Measures:
Available In:
See Also:
The Plan Comparison report provides a comprehensive analysis of plan and milestone variances, enabling you to compare the overall plan or specific milestones effectively. By highlighting changes between any two points in time, this report helps you to make informed decisions based on real-time data insights.
Key Measures:
Available In:
The Milestone Comparison report provides a focused analysis of milestone date changes across your publication history, enabling you to track schedule progression and identify trends in milestone movement over time. By comparing milestone end dates between publications and visualising variance trends, this report helps you understand schedule stability, anticipate potential delays, and communicate milestone changes effectively.
Key Measures:
Available In:
The Daily Task Allocation report provides a detailed view of task distribution across your team, enabling you to compare planned versus actual work execution on a daily basis. By analysing task allocation between any two publications, this report helps you identify workload patterns, capacity constraints, and deviations from your original plan, supporting more accurate resource planning and scheduling decisions.
Key Measures:
Available In:
The Blockers Dashboard provides a comprehensive overview of key details regarding blockers (issues or obstacles) that may impact your project. By tracking and analysing these blockers, you can identify potential risks and implement strategies to mitigate them effectively.
Key Measures:
Available In:
The Material Resource offers valuable insights into how effectively material resources are planned and utilised across your project. By comparing planned quantities against actual usage, this report helps you identify trends and discrepancies, ensuring you have a comprehensive understanding of your material distribution.
Key Measures:
Available In:
The Labour and Plant Resource delivers clear visualisations and precise forecast allocations, enabling you to effectively analyse how Labour and Plant resources are planned across your projects. With this dashboard, you can easily identify trends and make informed decisions regarding resource allocation.
Key Measures:
Available In:
Packages: Displays all Package Names with tasks in the selected publications
Subcontractors: Displays all Subcontractors with tasks in the selected publications
Folder Code: Displays nested folder codes for the purpose of filtering to a specific branch of the folder tree.
Leading Measure: You can choose your preferred method for measuring PPC (Percent Plan Complete) which helps in understanding how well your project is performing against the plan:
PPC (Task Day): Calculates the overall average percentage of task completion by evaluating the PPC of each task. The PPC of a task represents the percentage of planned workdays that were completed between two publication dates (such as from last week to now).
PPC (Task): Calculates the efficiency of task completion in a project by comparing the number of tasks completed to the number of tasks planned between two publication dates (such as from last week to now).
Latest Publication: Shows the date of the most recent publication in your dataset.
Planned: Counts the number of individual tasks scheduled to occur within the specified time window.
On Track: Counts the number of tasks that are currently ongoing or have been completed within the specified time window.
Delayed: Counts the number of tasks that have been delayed (pushed out) within the specified time window.
Unplanned: Counts tasks that were not scheduled to start within the earlier selected publication but are now included in the most recent selected publication.
Brought Forward: Counts tasks that have been advanced beyond the latest publication selected.
Deleted: Counts tasks that existed in previous publications but have been removed from the most recent selected publication.
A number of filters can be applied to the report. By default, all filters are set to show all data:
Publications Included: Displays all publications in your dataset (up to five) by default, with options to select specific ones for analysis.
Task Owners: Displays all Task Owners with tasks in the selected publications
Packages: Displays all Package Names with tasks in the selected publications
Subcontractors: Displays all Subcontractors with tasks in the selected publications
Folder Code: Displays nested folder codes for the purpose of filtering to a specific branch of the folder tree.
Planned Percentage Complete by Week: Breaks down the PPC on specific publication dates within the dataset and provides a rolling average (over four weeks). Hovering over the values reveals information about the included published versions (PPC, Tasks Progressed, and Unplanned Tasks).
Leading Measure: You can choose your preferred method for measuring PPC (Percent Plan Complete) which helps in understanding how well your project is performing against the plan:
PPC (Task Day): Calculates the overall average percentage of task completion by evaluating the PPC of each task. The PPC of a task represents the percentage of planned workdays that were completed between two publication dates (such as from last week to now).
PPC (Task): Calculates the efficiency of task completion in a project by comparing the number of tasks completed to the number of tasks planned between two publication dates (such as from last week to now).
A number of filters can be applied to the report. By default, all filters are set to show all data:
Publications Included: Displays all publications in your dataset (up to five) by default, with options to select specific ones for analysis.
Task Owners: Displays all Task Owners with tasks in the selected publications
Packages: Displays all Package Names with tasks in the selected publications
Subcontractors: Displays all Subcontractors with tasks in the selected publications
Folder Code: Displays nested folder codes for the purpose of filtering to a specific branch of the folder tree.
Latest Publication: Shows the date of the most recent publication in your dataset.
Planned: Counts the number of individual tasks scheduled to occur within the specified time window.
On Track: Counts the number of tasks that are currently ongoing or have been completed within the specified time window.
Delayed: Counts the number of tasks that have been delayed (pushed out) within the specified time window.
Unplanned: Counts tasks that were not scheduled to start within the earlier selected publication but are now included in the most recent selected publication.
Brought Forward: Counts tasks that have been advanced beyond the latest publication selected.
Deleted: Counts tasks that existed in previous publications but have been removed from the most recent selected publication.
Publications Included: By default, this report includes all publications within your dataset (up to a maximum of five). You have the option to select specific publications for your analysis.
Task Owners: By default, this report includes all task owners within your dataset. You have the option to select specific Task Owners for your analysis.
Publication Breakdown: Provides a comprehensive overview of each publication, detailing the status, clashes, missing fields, and blockers associated with each user and publication date. By clicking on an individual publication, you can focus on the corresponding data within the Publication Summary.
Primary Publication Selector: This allows you to choose the publication for analysis, with the default set to the latest publication. You can also select from Latest, Prior, or Rest options to customise your comparison.
Comparison Publication Selector: The default for this selector is set to Rest, but you can adjust it to Latest, Prior, or Rest, enabling a tailored view of your comparison data.
Subcontractors: By default, this report includes all subcontractors within your dataset. You have the option to select specific Task Owners for your analysis.
Task Owners: By default, this report includes all task owners within your dataset. You have the option to select specific Task Owners for your analysis.
Packages: By default, this report includes all Packages within your dataset. You have the option to select specific Packages for your analysis.
Folder Code (tree): By default, this report includes all Folder Codes within your dataset. You have the option to select specific Folder Codes for your analysis.
Selected publication: You can select only one Published Version at a time, with the default setting being the latest Publication Version, referred to as the Selected Publication. Options include Latest, Prior, or Rest for customised analysis.
Milestones Ending In: By default, the dashboard focuses on the next month, but you can adjust the timeframe to include options like Last, Next, This, Days, Weeks, Months, and Years for a more specific analysis.
Publications Included: By default, this includes all publications within your dataset (up to a maximum of five). You have the flexibility to select specific publications to include in your analysis. The latest two selected publications are used for comparison.
Date Range Included: By default, the dashboard focuses on the next month, but you can adjust the timeframe to include options like Last, Next, This, Days, Weeks, Months, and Years for a more specific analysis.
Date: Shows dates in the selected range
Owner: The owner of the task. Alternatively, this can be set to Subcontractor or Package
Planned Tasks: The number of tasks planned to be worked on per day from the prior selected publication
Actual Tasks: The number of tasks that happened per day in the latest selected publication
Over-time bar chart showing:
Count of Tasks Planned on Given Date: The number of tasks planned to be worked on per day from the prior selected publication
Count of Tasks on Given Date: The number of tasks that happened per day in the latest selected publication
The X-Axis displays dates in the selected range, as well as the Task Owners/Subcontractors/Packages working on each day
Open Blockers (4 Weeks): This metric counts the number of open blockers that are due within the next four weeks, providing insight into immediate concerns.
Overdue Blockers: This measure calculates the total number of overdue blockers in the selected publication, helping you identify tasks that need urgent attention.
Top Overdue Category: This identifies the blocker category with the highest number of overdue blockers for the selected publication. The data is filtered to show overdue blockers, grouped by category.
Average Days Overdue: This metric calculates the average number of days that overdue blockers have been outstanding within the selected publication, allowing for assessment of the severity of delays.
Top Overdue Blocker: This identifies the specific blocker that has the highest average number of overdue days for the selected publication, highlighting the most pressing issues.
Selected Publication: You can select only one Published Version at a time, with the default setting being the latest Publication Version, referred to as the Selected Publication. Options include Latest, Prior, or Rest for customised analysis.
Open Blockers Date Range: Adjusting the date range in this section influences the graph when the status is set to Open. It affects the task results in the Open tab of the table on the right, focusing on open blockers with due dates within the specified timeframe. Note that open blockers without due dates will not be included in the graph.
Group Blockers By: Select how to group the information displayed in the graph - by Category, Owner, or Subcontractor. The Y-axis reflects the count of distinct blocker names based on the selected status and date range, while the X-axis displays your chosen grouping option.
Blocker Category: This selector allows you to focus on one category at a time. The default setting is "All Categories." When a specific category is selected, the report filters to display data exclusively related to blockers within that category.
Blocker Status: Use this feature to select between Open, Overdue, Resolved, or All Blockers to dynamically update the information displayed in the accompanying graph. The default setting is Overdue.
Folder Code: Filter to view blockers on tasks within a specific WBS (Folder) in the included publications. By default, all blockers will be displayed.
Task Owner: Filter to view blockers on tasks owned by a specific user. By default, all blockers will be displayed.
Packages: Filter to view blockers on tasks within a specific package. By default, all blockers will be displayed.
Subcontractors: Filter to view blockers on tasks assigned to a specific Subcontractor. By default, all blockers will be displayed
Category: The graph displays how many blockers there are in each category within the selected Publications Included, with their names listed above the bars for easy identification. Hovering over each category bar will show the category name, the individual blockers assigned to that category, and the total number of blockers in that category.
All Overdue: The All Overdue tab lists all tasks associated with overdue blockers within the selected published version, providing a comprehensive view of outstanding issues.
Open: The Open tab displays all tasks linked to open blockers, filtered by those whose due dates fall within the specified date range set in the Open Blockers Date Range control.
Selected Publication: You can select only one Published Version at a time, with the default setting being the latest Publication Version, referred to as the Selected Publication. Options include Latest, Prior, or Rest for customised analysis.
Date Range Included: By default, the dashboard focuses on the next month, but you can adjust the timeframe to include options like Last, Next, This, Days, Weeks, Months, and Years for a more specific analysis.
Resource Types: This displays the titles of materials within your Aphex project, helping you easily identify the resources in use.
Subcontractors: Filter to view materials on tasks assigned to a specific subcontractor. By default, all materials are displayed
Folder Code (tree): Filter to view materials on tasks within a specific folder. By default, all materials are displayed
Packages: Filter to view materials on tasks assigned to a specific package. By default, all materials are displayed
Task Owners: Filter to view materials on tasks owned by a specific user. By default, all materials are displayed
Progress Percentage: This calculates the percentage of actual materials used compared to the planned materials in the selected primary publication. It offers a straightforward percentage score to assess how closely actual usage aligns with your plans, enabling informed decision-making for future resource allocation.
Selected Publication: You can select only one Published Version at a time, with the default setting being the latest Publication Version, referred to as the Selected Publication. Options include Latest, Prior, or Rest for customised analysis
Resource Types: The Resource Types selector allows you to choose which Labour and Plant resources to display. By default, all resources are included, giving you a comprehensive overview
Subcontractors: Filter to view labour & plant on tasks assigned to a specific subcontractor. By default, all resources are displayed
Packages: Filter to view labour & plant on tasks assigned to a specific package. By default, all resources are displayed
Task Owners: Filter to view labour & plant on tasks owned by a specific user. By default, all resources are displayed
Folder Code (tree): Filter to view labour & plant on tasks assigned to a specific folder. By default, all resources are displayed


